Epilog Knowledge Base - Support Center

Imagine. Design. Create.

basic search

advanced search

Exact phrase:

  • Home
  • Knowledge Base Categories
  • Home
  • Knowledge Base Categories
  • |
  1. Home
  2. Creating a Skateboard Jig in CorelDRAW X5
  • Drivers and Firmware 20 Articles

    • Printing from CorelDRAW - Dashboard Not Recognizing Hairlines or Outlines
    • How to install the Epilog Control Center & Dashboard Print Driver
    • Laser Engrave or Cut a City Map (CorelDRAW)
    • Blurry Driver Screen
    • Driver and Firmware Downloads
    • Symantec / Windows SmartScreen Warnings after Driver Downloads
    • Warning from AVAST Antivirus Software
    • How do I use the Job Manager?
    • Upgrading Firmware in Your Laser
    • Installing Firmware Updates with FlashMaster
    • Using the Dithering Option in the Epilog Laser Dashboard
    • Using an Apple Computer with Laser
    • Windows 8 Driver Install Using a Crossover Ethernet Cable
    • Using the Bottom-Up Engraving Option in the Laser Dashboard
    • Using the Center-Center Option in the Epilog Laser Dashboard
    • Saving Configuration Settings in the Epilog Laser Dashboard
    • Uninstalling a Windows Print Driver
    • 64 Bit Drivers for older Epilog Laser Systems
    • How to Set the Default Settings in the Print Driver
    • How to Install / Troubleshoot a USB Connection over Windows 7
  • System Maintenance 96 Articles

    • Leveling the Table in the Fusion Pro 48
    • X-Axis Belt Replacement for Fusion Pro 32 and Fusion Pro 48
    • Aligning the CO2 Laser in the Zing 24
    • Aligning the CO2 Laser in the Zing 16
    • Aligning the CO2 Laser in the Fusion Edge
    • Cleaning the Laser's Vector Cutting Grid
    • How to replace the Zing lens carriage roller
    • How to replace the Zing Y-motor
    • How to replace the Zing X-motor
    • How to remove and install the Zing X-axis assembly
    • How to tension the Zing X-axis belt
    • How to replace the Zing table motor
    • How to replace the Zing power supply
    • How to remove and install the Zing lens carriage
    • How to replace the Zing laser assembly
    • How to replace the Zing control and display unit
    • How to check and adjust the Helix table level
    • How to check and adjust the Zing table level
    • How to replace the Zing mirrors
    • How to replace the Zing backplane board
    • How to replace the Zing X-axis belt
    • How to replace the Mini X-axis encoder strip
    • How to set the Mini X-Y home
    • How to replace the Mini/Helix Z-motor
    • How to replace the Mini Z-belt
    • How to replace the Mini power supply
    • How to replace the Mini Y-axis belt
    • How to replace the Mini X-axis motor
    • How to replace the Mini X-axis belt
    • How to install the Mini keyboard
    • How to replace the Mini X-axis encoder reader
    • How to replace the Mini controller board
    • How to align the Mini/Helix MT laser
    • How to align the Mini/Helix MX laser
    • How to replace the Mini & Helix X/Y Combo PCB
    • How to install the Mini/Helix super silent fans
    • How to square the Mini/Helix ruler guides
    • How to replace the Mini/Helix slider blocks
    • How to replace the FiberMark slider blocks
    • How to set the Mini/Helix manual & auto focus
    • How to replace the Helix Z-belt
    • How to replace the Helix/Mini Y-motor assembly
    • How to replace the Helix X-beam belt
    • How to replace the Helix X-axis assembly
    • How to replace the Mini linear rail assembly
    • How to replace the Helix double power supply
    • How to replace the Helix power supply
    • How to replace the Helix/Mini interlocks
    • How to upgrade the Helix double power supply
    • How to replace the Mini/Helix auto focus plunger
    • How to replace the Helix controller board
    • How to replace the Mini/Helix X-axis motor
    • How to upgrade the Mini/Helix fan assembly
    • How to upgrade the Mini/Helix laser tube
    • How to replace the Mini laser tube
    • How to replace the Helix/Mini fans
    • Cleaning and Maintenance for the Helix & Mini
    • How to clean the Helix encoder strip
    • How to replace the Fusion Y-axis drive
    • How to tension the Fusion X-axis belt
    • How to replace the Fusion X-axis idler
    • How to replace the Fusion X-axis sensor
    • How to replace the Fusion X-axis motor
    • How to adjust the Fusion table level
    • How to replace the Fusion rotary motor
    • How to replace the Fusion Z-motor
    • How to replace the Door Assembly on all Fusion Models
    • How to replace the Fusion keyboard assembly
    • How to install the Fusion X-motor
    • How to replace the Fusion Power Supply
    • How to replace the Fusion Laser Safety Module
    • How to install the Fusion Keypad Assembly
    • How to replace the Fusion Y-motor
    • How to calibrate the Fusion M2/32/40 focus
    • How to replace the Fusion X-Axis Belt
    • How to replace the lens on the Fusion
    • How to align the laser for the Fusion CO2
    • How to install the Fusion 3-Jaw Chuck Rotary Attachment
    • How to set the X-Y home position on the FiberMark
    • How to set the FiberMark manual focus gauge
    • How to replace the FiberMark X-motor
    • How to replace the FiberMark Z-motor
    • How to replace the FiberMark Y-motor
    • How to replace the FiberMark Laser
    • How to replace the Interlocks on the FiberMark
    • How to Remove the FiberMark X-axis Assembly
    • How to replace the Optics in the FiberMark
    • How to Optically Align the FiberMark
    • How to replace the FiberMark Encoder Strip
    • How to replace x-axis belt on the FiberMark
    • How to replace the FiberMark Controller Board
    • How to align the FiberMark Laser
    • How to Clean the X-axis Encoder Strip
    • Cleaning the X-Axis Linear Encoder
    • Cleaning Your Optics
    • Reducing Fire Hazards with your Laser
  • Troubleshooting 30 Articles

    • Networking 3 Articles
      • Troubleshooting a Crossover Cable Connection
      • Wireless Printing to an Epilog Laser
      • How to Install / Troubleshoot a USB Connection over Windows 7
    • Air Assist 1 Articles
      • Troubleshooting the Air Assist Feature
    • Epilog Zing 26 Articles
      • Aligning the Laser Beam on the Epilog Zing
      • Aligning the CO2 Laser in the Zing 24
      • Aligning the CO2 Laser in the Zing 16
      • How to replace the Zing lens carriage roller
      • How to replace the Zing Y-motor
      • How to replace the Zing X-motor
      • How to remove and install the Zing X-axis assembly
      • How to tension the Zing X-axis belt
      • Troubleshooting the Zing Engraver
      • How to replace the Zing table motor
      • How to replace the Zing power supply
      • How to remove and install the Zing lens carriage
      • How to replace the Zing laser assembly
      • How to replace the Zing control and display unit
      • How to check and adjust the Zing table level
      • How to replace the Zing mirrors
      • How to replace the Zing backplane board
      • How to replace the Zing X-axis belt
      • Y-Axis Motor Replacement on the Epilog Zing
      • X-Axis Assembly Removal and Installation for the Epilog Zing
      • Power Supply Replacement for the Epilog Zing
      • Lens Carriage Removal and Installation on the Epilog Zing
      • Laser Tube Assembly Replacement for the Zing Laser
      • Incorrect Carriage Roller Size
      • Control/Display Unit Replacement on the Epilog Zing
      • Lens Carriage Roller Replacement on the Zing Laser
    • Epilog Mini 56 Articles
      • How to replace the Mini X-axis encoder strip
      • How to set the Mini X-Y home
      • How to replace the Mini/Helix Z-motor
      • How to replace the Mini Z-belt
      • How to replace the Mini power supply
      • How to replace the Mini Y-axis belt
      • How to replace the Mini X-axis motor
      • How to replace the Mini X-axis belt
      • How to install the Mini keyboard
      • How to replace the Mini X-axis encoder reader
      • How to replace the Mini controller board
      • How to align the Mini/Helix MT laser
      • How to align the Mini/Helix MX laser
      • How to replace the Mini & Helix X/Y Combo PCB
      • How to install the Mini/Helix super silent fans
      • How to square the Mini/Helix ruler guides
      • How to replace the Mini/Helix slider blocks
      • How to set the Mini/Helix manual & auto focus
      • How to replace the Helix/Mini Y-motor assembly
      • How to replace the Mini linear rail assembly
      • How to replace the Helix/Mini interlocks
      • How to replace the Mini/Helix auto focus plunger
      • How to replace the Mini/Helix X-axis motor
      • How to upgrade the Mini/Helix fan assembly
      • How to upgrade the Mini/Helix laser tube
      • How to replace the Mini laser tube
      • How to replace the Helix/Mini fans
      • Cleaning and Maintenance for the Helix & Mini
      • How to Clean the X-axis Encoder Strip
      • Linear Encoder Cleaning on the Epilog Mini/Helix
      • Fan Replacement on the Epilog Mini and Helix Systems
      • Control Board Replacement on the Mini and Helix Systems
      • Checking Table Level on the Mini and Helix Lasers
      • Aligning the Laser Beam of the Mini and Helix
      • Adjusting Table Level for the Mini and Helix
      • Loss of Power in a Epilog Mini/Helix
      • X-Axis Rail Assembly Replacement on the Epilog Mini
      • Z-Axis Belt Replacement in the Epilog Mini
      • Y-Axis Belt Replacement on the Epilog Mini/Helix/FiberMark
      • Setting Manual Focus and Auto Focus on the Mini/Helix
      • Z-Motor Replacement in the Mini/Helix
      • Squaring the Ruler Guides on the Mini/Helix
      • X-Axis Encoder Strip Replacement for the Mini/Helix
      • Setting the X-Y Home Position on the Mini/Helix
      • X-Axis IKO Bearing Set Replacement in the Mini
      • Power Supply Replacement (IPXQ) on the Epilog Mini
      • Auto Focus Plunger Replacement on the Mini/Helix
      • Display Installation on the Mini/Helix
      • I-Beam Replacement on the Epilog Mini
      • X-Axis Motor Replacement on the Epilog Mini
      • Laser Tube Replacement in the Epilog Mini and Helix
      • Super-Silent Fans Installation Instructions for the Epilog Mini and Helix
      • Keyboard Installation on the Mini
      • X-Axis Flex Cable Replacement on the Epilog Mini
      • X-Axis Belt Replacement on the Mini
      • X-Axis Encoder Read Head Replacement on the Mini
    • Epilog Helix 44 Articles
      • How to check and adjust the Helix table level
      • How to align the Mini/Helix MT laser
      • How to align the Mini/Helix MX laser
      • How to replace the Mini & Helix X/Y Combo PCB
      • How to install the Mini/Helix super silent fans
      • How to square the Mini/Helix ruler guides
      • How to replace the Mini/Helix slider blocks
      • How to set the Mini/Helix manual & auto focus
      • How to replace the Helix Z-belt
      • How to replace the Helix/Mini Y-motor assembly
      • How to replace the Helix X-beam belt
      • How to replace the Helix X-axis assembly
      • How to replace the Helix double power supply
      • How to replace the Helix power supply
      • How to replace the Helix/Mini interlocks
      • How to upgrade the Helix double power supply
      • How to replace the Mini/Helix auto focus plunger
      • How to replace the Helix controller board
      • How to replace the Mini/Helix X-axis motor
      • How to upgrade the Mini/Helix fan assembly
      • How to upgrade the Mini/Helix laser tube
      • How to replace the Helix/Mini fans
      • Cleaning and Maintenance for the Helix & Mini
      • How to clean the Helix encoder strip
      • How to Clean the X-axis Encoder Strip
      • Linear Encoder Cleaning on the Epilog Mini/Helix
      • Fan Replacement on the Epilog Mini and Helix Systems
      • Control Board Replacement on the Mini and Helix Systems
      • Checking Table Level on the Mini and Helix Lasers
      • Aligning the Laser Beam of the Mini and Helix
      • Adjusting Table Level for the Mini and Helix
      • Loss of Power in a Epilog Mini/Helix
      • Y-Axis Belt Replacement on the Epilog Mini/Helix/FiberMark
      • Setting Manual Focus and Auto Focus on the Mini/Helix
      • Z-Motor Replacement in the Mini/Helix
      • Squaring the Ruler Guides on the Mini/Helix
      • X-Axis Encoder Strip Replacement for the Mini/Helix
      • Setting the X-Y Home Position on the Mini/Helix
      • Power Supply Replacement (Meanwell) in the Epilog Helix
      • Power Supply (IPXQ to Meanwell) Replacement in the Epilog Helix
      • Auto Focus Plunger Replacement on the Mini/Helix
      • Display Installation on the Mini/Helix
      • Laser Tube Replacement in the Epilog Mini and Helix
      • Super-Silent Fans Installation Instructions for the Epilog Mini and Helix
    • FiberMark 20 Articles
      • How to replace the FiberMark slider blocks
      • How to align the laser for the Fusion FiberMark
      • How the Diagnostic LEDs function for the Fusion and FiberMark
      • How to set the X-Y home position on the FiberMark
      • How to set the FiberMark manual focus gauge
      • How to replace the FiberMark X-motor
      • How to replace the FiberMark Z-motor
      • How to replace the FiberMark Y-motor
      • How to replace the FiberMark Laser
      • How to replace the Interlocks on the FiberMark
      • How to Remove the FiberMark X-axis Assembly
      • How to replace the Optics in the FiberMark
      • How to Optically Align the FiberMark
      • How to replace the FiberMark Encoder Strip
      • How to replace x-axis belt on the FiberMark
      • How to replace the FiberMark Controller Board
      • How to align the FiberMark Laser
      • How to Clean the X-axis Encoder Strip
      • How to Install / Troubleshoot a USB Connection over Windows 7
      • Y-Axis Belt Replacement on the Epilog Mini/Helix/FiberMark
    • Legend 36EXT 2 Articles
      • Aligning the Laser in the 36EXT
      • Replacing the X-Motor on the Legend 36EXT
    • Fusion 34 Articles
      • X-Axis Motor Replacement for Fusion Pro 32 and Fusion Pro 48
      • X-Axis Drive Board Replacement For Fusion Pro 32 and Fusion Pro 48
      • X-Axis Belt Replacement for Fusion Pro 32 and Fusion Pro 48
      • Replacing the Top Door on the Fusion Edge 24
      • Aligning the CO2 Laser in the Fusion Edge
      • How to read the Fusion Safety Interlock Laser Status Indicators
      • How to replace the Fusion Y-axis drive
      • How to tension the Fusion X-axis belt
      • How to replace the Fusion X-axis idler
      • How to replace the Fusion X-axis sensor
      • How to replace the Fusion X-axis motor
      • How to fix vertical vector lines on all Fusion models
      • How to adjust the Fusion table level
      • How to replace the Fusion rotary motor
      • How to replace the Fusion Z-motor
      • How to replace the Door Assembly on all Fusion Models
      • How to replace the Fusion keyboard assembly
      • How to install the Fusion X-motor
      • How to replace the Fusion Power Supply
      • How to replace the Fusion Laser Tube
      • How to replace the Fusion Laser Safety Module
      • How to install the Fusion Keypad Assembly
      • How to correct an out of square arm assembly for Fusion
      • How to replace the Fusion Y-motor
      • How to calibrate the Fusion M2/32/40 focus
      • How to replace the Fusion X-Axis Belt
      • Fusion Menu Short Cuts
      • How to replace the lens on the Fusion
      • How to align the laser for the Fusion FiberMark
      • How the Diagnostic LEDs function for the Fusion and FiberMark
      • How to install the Epilog Control Center & Dashboard Print Driver
      • How to align the laser for the Fusion CO2
      • How to install the Fusion 3-Jaw Chuck Rotary Attachment
      • Fusion Diagnostic LED Reference
    • Aligning the Laser Beam on the Epilog Zing
    • Leveling the Table in the Fusion Pro 48
    • Aligning the CO2 Laser in the Zing 24
    • Aligning the CO2 Laser in the Zing 16
    • Aligning the Laser in the 36EXT
    • Aligning the CO2 Laser in the Fusion Edge
    • How to replace the Zing lens carriage roller
    • How to replace the Zing Y-motor
    • Troubleshooting the Zing Engraver
    • How to replace the Zing power supply
    • How to replace the Zing mirrors
    • How to replace the Mini X-axis encoder strip
    • How to replace the Mini/Helix Z-motor
    • How to replace the Mini Z-belt
    • How to replace the Mini Y-axis belt
    • How to replace the Mini X-axis motor
    • How to install the Mini keyboard
    • How to replace the Mini X-axis encoder reader
    • How to replace the Mini controller board
    • How to align the Mini/Helix MT laser
    • How to square the Mini/Helix ruler guides
    • How to set the Mini/Helix manual & auto focus
    • Cleaning and Maintenance for the Helix & Mini
    • Job Manager Error Message
    • How to replace the Fusion Laser Safety Module
    • How to correct an out of square arm assembly for Fusion
    • Fusion Diagnostic LED Reference
    • Checking the Auto Focus Plunger Assembly
    • Job Position Error
    • CorelDRAW X6 Settings: Fix Engraved Bars Extending Past Right Side of Image
  • Replacing Optics 3 Articles

    • How to replace the lens on the Fusion
    • How to replace the Optics in the FiberMark
    • Replacing the Legend 36EXT Lens Assembly
  • CorelDRAW Questions 46 Articles

    • Print Merge in CorelDRAW
    • Printing from CorelDRAW - Dashboard Not Recognizing Hairlines or Outlines
    • CorelDRAW 2019 Epilog Software Suite Fix
    • Photo Laser Engraving on Wood - CorelDRAW X5 - 2018
    • Laser Engrave or Cut a City Map (CorelDRAW)
    • Find and Replace a Color in CorelDRAW
    • How to Create a Jig for the Laser
    • Installing CorelDRAW - Previous Version Installed Error
    • Converting Vector Artwork from CMYK to RGB - CorelDRAW
    • CorelDraw Zooming Issue
    • Placing Text on a Path in CorelDRAW
    • Adding an Italic / Oblique Effect to a non-Italic Font - CorelDRAW X7
    • Tracing Clipart to Remove a White Background from Clipart
    • Tracing a Logo in CorelDRAW 13
    • Creating an Outline Around a Clipart Image in Corel
    • Color Management Settings CorelDRAW X5, X6, X7
    • Removing the Background from a Photo
    • Tiling a Graphic in CorelDRAW
    • Printing Mulitple Items with CorelDRAW's Imposition Layout Feature
    • Changing the Default Pen Width in CorelDRAW X6
    • Creating Wood Veneer Inlays
    • Laser Resolution and How it Affects Engraving
    • Layering a Clip Art Image
    • Creating a 3D Effect With the Laser on Acrylic and Glass
    • Photo Engraving Do's and Don'ts
    • Everything You Wanted to Know about Fonts...and Then Some!
    • Make Your Own FontBot
    • Manipulating Clip Art to Create Unique Designs
    • Design Tips for Non-Designers
    • Using the Dithering Option in the Epilog Laser Dashboard
    • Working with Single Line Fonts in CorelDRAW X4
    • Using What the Font to Identify Fonts
    • Creating 3D Artwork
    • Using the Straighten Image Tool in Corel X4
    • Setting up a Gun Stock for Engraving
    • Duplicating Around a Center Point in CorelDRAW
    • Using the Weld Tool in CorelDRAW
    • Creating a Quick Bounding Box for the Red Dot Pointer
    • Creating a Vignette in CorelDRAW
    • How to Create Monograms for Your Laser
    • Creating a Skateboard Jig in CorelDRAW X5
    • How to Create a Snowflake Ornament in Corel X6
    • Cutting and Engraving Different Line Weights
    • Smaller fonts with hairline outline will not cut (beeps, job done) in CorelDRAW X6.
    • Large Fonts Automatically Vector Cut in CorelDRAW X6
    • Flattening Two Lines Into One
  • Graphic Program Questions 16 Articles

    • Laser Engrave or Cut a City Map (Adobe Illustrator)
    • Laser Engrave or Cut a City Map (CorelDRAW)
    • Converting Vector Artwork from CMYK to RGB - CorelDRAW
    • Printing to your Laser from AutoCAD
    • Laser 3D Model Making with 123D Make
    • Laser Resolution and How it Affects Engraving
    • Layering a Clip Art Image
    • Creating a 3D Effect With the Laser on Acrylic and Glass
    • Photo Engraving Do's and Don'ts
    • Everything You Wanted to Know about Fonts...and Then Some!
    • Make Your Own FontBot
    • Manipulating Clip Art to Create Unique Designs
    • Design Tips for Non-Designers
    • How to Set Up Artwork for Engraving with the Rotary Attachment
    • Creating a Quick Bounding Box for the Red Dot Pointer
    • Cutting and Engraving Different Line Weights
  • Materials 8 Articles

    • Photo Laser Engraving on Wood - CorelDRAW X5 - 2018
    • Laser Systems and Printed Circuit Boards
    • Laser 3D Model Making with 123D Make
    • How to Laser Engrave and Cut Fabrics
    • Easily Remove Engraving Residue from Wood
    • Creating an Applique
    • Different Marks You Can Achieve on the FiberMark
    • Mirror Engraving
  • PhotoLaser Plus 8 Articles

    • Creating a Multiple Name Badge Layout using Print Merge
    • PhotoLaser Plus Quick Start
    • Exporting from PhotoLaser Plus
    • Exporting from PhotoLaser Plus
    • Engraving Small Wood Photos with PhotoLaser Plus
    • Problem Installing PhotoLaser Plus
    • Creating a Serial Tag with Variable Data in PhotoLaser Plus
    • Transforming a Vignette in PhotoLaser Plus
  • Epilog Job Manager 2 Articles

    • Job Manager Error Message
    • How do I use the Job Manager?
  • Adobe Illustrator 2 Articles

    • Laser Engrave or Cut a City Map (Adobe Illustrator)
    • Expanding Thin Shapes for Laser Cutting - Adobe Illustrator CC 2014
  • Fusion Pro 3 Articles

    • Leveling the Table in the Fusion Pro 48
    • X-Axis Assembly Replacement for Fusion Pro 32 and Fusion Pro 48
    • X-Axis Home Switch Replacement for Fusion Pro 32 and Fusion Pro 48
  • General Questions 29 Articles

    • Laser Exhaust Requirements
    • Maximum Rotary Attachment Diameters
    • Power Consumption and Your Laser
    • How to read the Fusion Safety Interlock Laser Status Indicators
    • Laser Engrave or Cut a City Map (Adobe Illustrator)
    • Laser Engrave or Cut a City Map (CorelDRAW)
    • Blurry Driver Screen
    • Fusion Diagnostic LED Reference
    • How Much Combustible Gas is Released From Laser Engraving
    • How Do I Choose My Laser System's Wattage?
    • Laser Systems and Printed Circuit Boards
    • Bar Code Engraving Suggestions
    • Lens Cleaner - How to Purchase More
    • Material Safety and your Laser
    • Selecting an Uninterrupted Power Supply for your Epilog Laser System
    • Incremental Movement of the Engraving Table Up and Down
    • Warning from AVAST Antivirus Software
    • Maximum Table Weight
    • Focus Lens 101
    • Laser Resolution and How it Affects Engraving
    • YAG Laser vs. CO2 Lasers
    • How to set up a project on the Vector Pin Table
    • Using the Stop/Focus Feature
    • Setting up a Gun Stock for Engraving
    • Moving the Laser System
    • Using a Mask to Create a Color Fill
    • Power Requirements by Laser Wattage
    • 220VAC Power Connections: Core End Type and Photo
    • Purchase or Print a New Laser Alignment Target

Popular Knowledgebase Articles

  • Aligning the Laser Beam on the Epilog Zing
    • 33331
    • 6
  • Control/Display Unit Replacement on the Epilog Zing
    • 31395
    • 3
  • Control Board Replacement on the Mini and Helix Systems
    • 35621
    • 1
  • X-Axis Flex Cable Replacement on the Epilog Mini
    • 20640
    • 1

Creating a Skateboard Jig in CorelDRAW X5

  • Date updated 2013-05-24
  • Rating
  • Categories
  • CorelDRAW Questions
  • Tags
  • jig

How can I create a custom jig to hold a skateboard for laser engraving?

How to Create a Skateboard Jig using CorelDRAW X5

Because of their large work area and laser-friendly material, skateboards are becoming a fast favorite for custom engraving.
While the task can seem a bit challenging, we'll show you how, with just a few supplies from your hardware store you can create a very useful jig  that will  hold your skateboard in place  during the engraving process. This valuable tool will also allow you to locate the center of the skateboard for perfect artwork alignment each and every time.
skateboard jig parts and hardware
 
Parts You'll Need:
  • Epilog Legend 36EXT - this project requires a larger bed size.
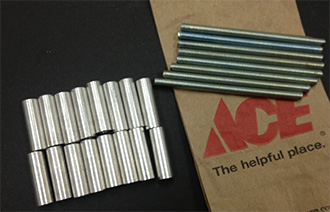
  • 8 - 3" Threaded Rods (#10-32)
  • 16 - 1" Threaded Barrels (#10-32)
  • A piece of 1/4" x 8" x 33" MDF or plywood (laser cut or precut to size)
  • Skateboard (Popsicle style)
skateboard jig parts and hardware
 
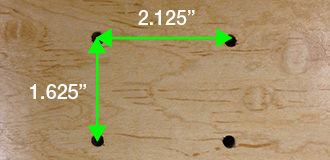
Measure the skateboard truck holes and the distance between the truck hole sets.
Start by measuring the distance between the truck holes in the skateboard - measure from the center of the holes.
Measurements:
Horizontal Holes = 2.125"
Vertical Holes = 1.625"

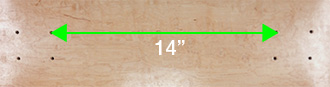
Then measure the distance between the two sets of truck holes.
Measurement:
Distance between trucks = 14"
measure the skateboard truck holes
distance between skateboard truck set holes
Create a  template for the truck holes using the measurements from Step 2.
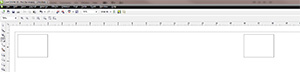
Using CorelDRAW,  create a new page that is 33" by 8" (the same size as the skateboard jig.) Using the Rectangle Tool, create a rectangle that is 2.125" wide and 1.625" tall.
 
rectangle for truck holes
Create a second set of truck holes.
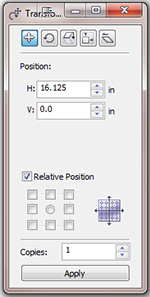
Now we are going to create a duplicate of the rectangle using the Position Palette in the Transformation Tools section.

Open the Transformation Palette, Window / Dockers / Transformations / Position.
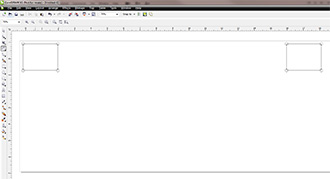
Enter 16.125 in the Horizontal Position dialog box, and 1 in the Copies dialog box (pictured to the right).
The boxes need to be 14 inches apart from the inside edges, so we added 14 and 2.125 to get our final measurement. A visual representation is included below.

Results:
skateboard truck alignment
 
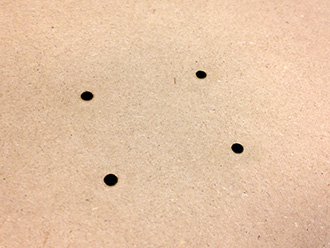
Creating the truck holes for the rod and barrel standoffs
A #10 threaded rod is 0.190" in diameter, so we need to laser cut the holes just a bit smaller than the rods.

Create eight circles, each 0.175" in diameter. Set the  outline size to hairline, and place each of the circles on the corners of the two boxes. Align the center of each circle on the corners of each of the rectangles, (pictured below and to the right).

Once you're finished placing all the circles, group both sets of  rectangles and all the circles. 

truck holes up close
2 sets of skateboard truck holes
Center the truck hole templates on the page
Select the two sets of truck holes and center them on the page by choosing Center to Page in the  Arrange > Align and Distribute drop-down menu, or by pressing P.

Then Ungroup all of the holes and rectangles, and delete the rectangles.
centering the skateboard truck sets
 
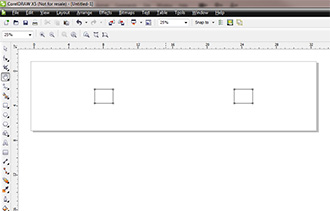
Cut the truck holes from the MDF jig board
Select all of the holes and print to the laser using the settings suggested in the  manual. We used a 120-watt 36EXT at 20% speed and 60% power.
laser cut skateboard truck holes
 
 
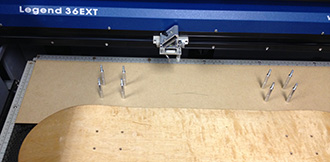
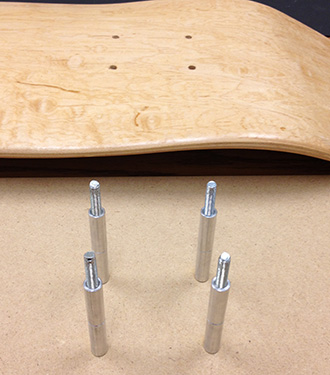
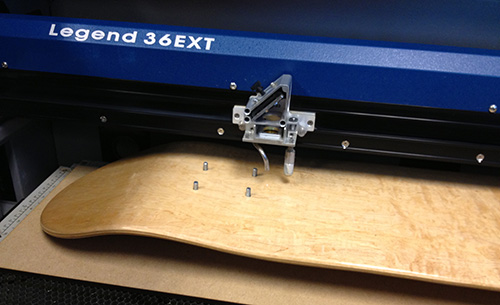
Screw in the rod and barrel standoffs.
First, thread two of the barrels on to each  rod, then simply screw the rods into the board. Once you're finished be sure to screw the barrels down so they are snug against the board (pictured to the right).
jig rod and barrel standoffs
 
 
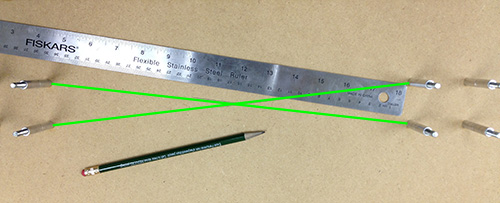
Find the center point of the jig
To find the center point of the skateboard jig, use a ruler and a pencil and draw a line from the center of the top left inside standoff to the center of the inside bottom right standoff, then repeat the process from the top right inside standoff to the bottom left inside standoff. Where these lines intersect is the center point of the skateboard jig.

Now you can expand your operation to engrave custom skateboards with consistent results every time!
skateboard jig center point


related articles

  • Large Fonts Automatically Vector Cut in CorelDRAW X6
    • 22275
    • 2
  • Smaller fonts with hairline outline will not cut (beeps, job done) in CorelDRAW X6.
    • 27955
    • 3
  • Cutting and Engraving Different Line Weights
    • 70214
    • 5
  • How to Create a Snowflake Ornament in Corel X6
    • 28210
    • 4
  • How to Create Monograms for Your Laser
    • 69055
    • 9
  • How to Create a Jig for the Laser
    • 53381
    • 7
  • Creating Wood Veneer Inlays
    • 32147
    • 5
  • Changing the Default Pen Width in CorelDRAW X6
    • 34569
    • 4
  • Find and Replace a Color in CorelDRAW
    • 260315
    • 24
  • Creating a Vignette in CorelDRAW
    • 27224
    • 7
  • How can I create a custom jig to hold a skateboard for laser engraving?
Rate this article
Subscribe to alerts for this article below
Your email is now subscribed to alerts for this article
Your email is not subscribed to alerts for this article
Unsubscribe to alerts for this article below

Company Sites

Home

Knowledge Base Categories

  • Drivers and Firmware
  • System Maintenance
  • Troubleshooting
  • Replacing Optics
  • CorelDRAW Questions
  • -- All Categories --

Connect With Us

  • Epilog Laser
  • 16371 Table Mountain Parkway
    Golden, CO 80403, USA

  • Phone: +1 303 277 1188
  • Email: sales@epiloglaser.com
  • https://www.epiloglaser.com/
    Powered by LiveHelpNow customer support suite