Ga naar de hoofdinhoud
Configuratiescherm
19000

Filters


Getting Started (8)
Usage and Operation (9)
Service and Repair (12)
Handleiding (62)

Jog-menu

Inleiding

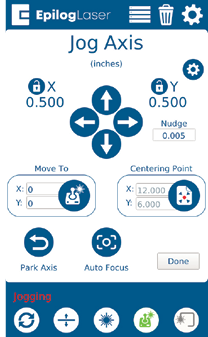
Access the Jog Menu by pressing the Jog key, which will turn green when active. The Jog Menu allows you to adjust the current X and Y axis positions of the laser head. You may change the current position of the laser head either using the Joystick, or by entering precise coordinates under “Move To”.

Locking Coordinates

The X and Y coordinates may be locked and unlocked to help you fine-tune the laser head’s position. Tap the lock icons to lock or unlock the X and Y coordinates. When only the X coordinate is locked, the joystick will only move the laser head in the Y direction (toward the front or back of the machine). When only the Y coordinate is locked, the joystick will only move the laser head in the X direction (left or right). If both the X and Y coordinates are locked, the laser head will not move until they are unlocked.
Jog-menu

Move To

Enter X and Y coordinates to move the laser to a specific location on the table.

Centering Point

Pressing this button tells the laser where you want the center of your artwork to be. While jogging the laser head across the table, use the red dot pointer to help identify the center point of your engraving. The Centering Point feature is used with Center-Engraving enabled jobs. To return to the Centering Point you have previously set, long-press the Centering Point button and the laser head will return to that point.

Park Axis

Park Axis returns the laser head to the default home position in the upper left corner of the table.

Home Axis

The Home Axis button homes the laser head and then returns it back to the home position, the default every time you turn on the machine.

Nudge

The Nudge arrows allow you to fine-tune the position of the laser down to a thousandth of an inch. To change the increments you want to nudge the laser’s position, click the text box under “Nudge” and enter an amount.

Automatische scherpstelling

The Auto Focus button is in the bottom center of the Jog Axis menu screen. When you have jogged the lens carriage above your material, press the Auto Focus button to use the plunger Auto Focus. The table will rise until the material touches the plunger, then set the table to the correct height. Your job should now be in focus.

[handig]
  • Datum:
    07/30/2026

Ga verder met je laseravontuur

Bekijk een eerdere les nog eens of ga verder om te ontdekken wat er daarna komt.
/* === Aggressive removal of PrintFriendly injected header elements === */ #printfriendly #pf-title, #printfriendly #pf-src, #printfriendly .pf-header, #printfriendly header, #printfriendly .printfriendly-header, #printfriendly h1:first-of-type, #printfriendly .page-header, #printfriendly [class*="header"], #printfriendly [id*="header"] { display: none !important; visibility: hidden !important; height: 0 !important; margin: 0 !important; padding: 0 !important; } /* Hide any top bar or source URL container */ #printfriendly #pf-src, #printfriendly .pf-src, #printfriendly [class*="src"], #printfriendly [class*="url"] { display: none !important; } /* Force page margins and centered page numbers */ @page { size: letter portrait; margin: 0.7in 0.5in; } @page :left, @page :right { @top-left { content: none !important; } @top-center { content: none !important; } @top-right { content: none !important; } @bottom-center { content: counter(page); font-size: 0.95em; padding-bottom: 25px; } }