Epilog Knowledge Base - Support Center

Imagine. Design. Create.

basic search

advanced search

Exact phrase:

  • Home
  • Knowledge Base Categories
  • Home
  • Knowledge Base Categories
  • |
  1. Home
  2. Laser Engrave or Cut a City Map (Adobe Illustrator)
  • Drivers and Firmware 20 Articles

    • Printing from CorelDRAW - Dashboard Not Recognizing Hairlines or Outlines
    • How to install the Epilog Control Center & Dashboard Print Driver
    • Laser Engrave or Cut a City Map (CorelDRAW)
    • Blurry Driver Screen
    • Driver and Firmware Downloads
    • Symantec / Windows SmartScreen Warnings after Driver Downloads
    • Warning from AVAST Antivirus Software
    • How do I use the Job Manager?
    • Upgrading Firmware in Your Laser
    • Installing Firmware Updates with FlashMaster
    • Using the Dithering Option in the Epilog Laser Dashboard
    • Using an Apple Computer with Laser
    • Windows 8 Driver Install Using a Crossover Ethernet Cable
    • Using the Bottom-Up Engraving Option in the Laser Dashboard
    • Using the Center-Center Option in the Epilog Laser Dashboard
    • Saving Configuration Settings in the Epilog Laser Dashboard
    • Uninstalling a Windows Print Driver
    • 64 Bit Drivers for older Epilog Laser Systems
    • How to Set the Default Settings in the Print Driver
    • How to Install / Troubleshoot a USB Connection over Windows 7
  • System Maintenance 95 Articles

    • X-Axis Belt Replacement for Fusion Pro 32 and Fusion Pro 48
    • Aligning the CO2 Laser in the Zing 24
    • Aligning the CO2 Laser in the Zing 16
    • Aligning the CO2 Laser in the Fusion Edge
    • Cleaning the Laser's Vector Cutting Grid
    • How to replace the Zing lens carriage roller
    • How to replace the Zing Y-motor
    • How to replace the Zing X-motor
    • How to remove and install the Zing X-axis assembly
    • How to tension the Zing X-axis belt
    • How to replace the Zing table motor
    • How to replace the Zing power supply
    • How to remove and install the Zing lens carriage
    • How to replace the Zing laser assembly
    • How to replace the Zing control and display unit
    • How to check and adjust the Helix table level
    • How to check and adjust the Zing table level
    • How to replace the Zing mirrors
    • How to replace the Zing backplane board
    • How to replace the Zing X-axis belt
    • How to replace the Mini X-axis encoder strip
    • How to set the Mini X-Y home
    • How to replace the Mini/Helix Z-motor
    • How to replace the Mini Z-belt
    • How to replace the Mini power supply
    • How to replace the Mini Y-axis belt
    • How to replace the Mini X-axis motor
    • How to replace the Mini X-axis belt
    • How to install the Mini keyboard
    • How to replace the Mini X-axis encoder reader
    • How to replace the Mini controller board
    • How to align the Mini/Helix MT laser
    • How to align the Mini/Helix MX laser
    • How to replace the Mini & Helix X/Y Combo PCB
    • How to install the Mini/Helix super silent fans
    • How to square the Mini/Helix ruler guides
    • How to replace the Mini/Helix slider blocks
    • How to replace the FiberMark slider blocks
    • How to set the Mini/Helix manual & auto focus
    • How to replace the Helix Z-belt
    • How to replace the Helix/Mini Y-motor assembly
    • How to replace the Helix X-beam belt
    • How to replace the Helix X-axis assembly
    • How to replace the Mini linear rail assembly
    • How to replace the Helix double power supply
    • How to replace the Helix power supply
    • How to replace the Helix/Mini interlocks
    • How to upgrade the Helix double power supply
    • How to replace the Mini/Helix auto focus plunger
    • How to replace the Helix controller board
    • How to replace the Mini/Helix X-axis motor
    • How to upgrade the Mini/Helix fan assembly
    • How to upgrade the Mini/Helix laser tube
    • How to replace the Mini laser tube
    • How to replace the Helix/Mini fans
    • Cleaning and Maintenance for the Helix & Mini
    • How to clean the Helix encoder strip
    • How to replace the Fusion Y-axis drive
    • How to tension the Fusion X-axis belt
    • How to replace the Fusion X-axis idler
    • How to replace the Fusion X-axis sensor
    • How to replace the Fusion X-axis motor
    • How to adjust the Fusion table level
    • How to replace the Fusion rotary motor
    • How to replace the Fusion Z-motor
    • How to replace the Door Assembly on all Fusion Models
    • How to replace the Fusion keyboard assembly
    • How to install the Fusion X-motor
    • How to replace the Fusion Power Supply
    • How to replace the Fusion Laser Safety Module
    • How to install the Fusion Keypad Assembly
    • How to replace the Fusion Y-motor
    • How to calibrate the Fusion M2/32/40 focus
    • How to replace the Fusion X-Axis Belt
    • How to replace the lens on the Fusion
    • How to align the laser for the Fusion CO2
    • How to install the Fusion 3-Jaw Chuck Rotary Attachment
    • How to set the X-Y home position on the FiberMark
    • How to set the FiberMark manual focus gauge
    • How to replace the FiberMark X-motor
    • How to replace the FiberMark Z-motor
    • How to replace the FiberMark Y-motor
    • How to replace the FiberMark Laser
    • How to replace the Interlocks on the FiberMark
    • How to Remove the FiberMark X-axis Assembly
    • How to replace the Optics in the FiberMark
    • How to Optically Align the FiberMark
    • How to replace the FiberMark Encoder Strip
    • How to replace x-axis belt on the FiberMark
    • How to replace the FiberMark Controller Board
    • How to align the FiberMark Laser
    • How to Clean the X-axis Encoder Strip
    • Cleaning the X-Axis Linear Encoder
    • Cleaning Your Optics
    • Reducing Fire Hazards with your Laser
  • Troubleshooting 29 Articles

    • Networking 3 Articles
      • Troubleshooting a Crossover Cable Connection
      • Wireless Printing to an Epilog Laser
      • How to Install / Troubleshoot a USB Connection over Windows 7
    • Air Assist 1 Articles
      • Troubleshooting the Air Assist Feature
    • Epilog Zing 26 Articles
      • Aligning the Laser Beam on the Epilog Zing
      • Aligning the CO2 Laser in the Zing 24
      • Aligning the CO2 Laser in the Zing 16
      • How to replace the Zing lens carriage roller
      • How to replace the Zing Y-motor
      • How to replace the Zing X-motor
      • How to remove and install the Zing X-axis assembly
      • How to tension the Zing X-axis belt
      • Troubleshooting the Zing Engraver
      • How to replace the Zing table motor
      • How to replace the Zing power supply
      • How to remove and install the Zing lens carriage
      • How to replace the Zing laser assembly
      • How to replace the Zing control and display unit
      • How to check and adjust the Zing table level
      • How to replace the Zing mirrors
      • How to replace the Zing backplane board
      • How to replace the Zing X-axis belt
      • Y-Axis Motor Replacement on the Epilog Zing
      • X-Axis Assembly Removal and Installation for the Epilog Zing
      • Power Supply Replacement for the Epilog Zing
      • Lens Carriage Removal and Installation on the Epilog Zing
      • Laser Tube Assembly Replacement for the Zing Laser
      • Incorrect Carriage Roller Size
      • Control/Display Unit Replacement on the Epilog Zing
      • Lens Carriage Roller Replacement on the Zing Laser
    • Epilog Mini 56 Articles
      • How to replace the Mini X-axis encoder strip
      • How to set the Mini X-Y home
      • How to replace the Mini/Helix Z-motor
      • How to replace the Mini Z-belt
      • How to replace the Mini power supply
      • How to replace the Mini Y-axis belt
      • How to replace the Mini X-axis motor
      • How to replace the Mini X-axis belt
      • How to install the Mini keyboard
      • How to replace the Mini X-axis encoder reader
      • How to replace the Mini controller board
      • How to align the Mini/Helix MT laser
      • How to align the Mini/Helix MX laser
      • How to replace the Mini & Helix X/Y Combo PCB
      • How to install the Mini/Helix super silent fans
      • How to square the Mini/Helix ruler guides
      • How to replace the Mini/Helix slider blocks
      • How to set the Mini/Helix manual & auto focus
      • How to replace the Helix/Mini Y-motor assembly
      • How to replace the Mini linear rail assembly
      • How to replace the Helix/Mini interlocks
      • How to replace the Mini/Helix auto focus plunger
      • How to replace the Mini/Helix X-axis motor
      • How to upgrade the Mini/Helix fan assembly
      • How to upgrade the Mini/Helix laser tube
      • How to replace the Mini laser tube
      • How to replace the Helix/Mini fans
      • Cleaning and Maintenance for the Helix & Mini
      • How to Clean the X-axis Encoder Strip
      • Linear Encoder Cleaning on the Epilog Mini/Helix
      • Fan Replacement on the Epilog Mini and Helix Systems
      • Control Board Replacement on the Mini and Helix Systems
      • Checking Table Level on the Mini and Helix Lasers
      • Aligning the Laser Beam of the Mini and Helix
      • Adjusting Table Level for the Mini and Helix
      • Loss of Power in a Epilog Mini/Helix
      • X-Axis Rail Assembly Replacement on the Epilog Mini
      • Z-Axis Belt Replacement in the Epilog Mini
      • Y-Axis Belt Replacement on the Epilog Mini/Helix/FiberMark
      • Setting Manual Focus and Auto Focus on the Mini/Helix
      • Z-Motor Replacement in the Mini/Helix
      • Squaring the Ruler Guides on the Mini/Helix
      • X-Axis Encoder Strip Replacement for the Mini/Helix
      • Setting the X-Y Home Position on the Mini/Helix
      • X-Axis IKO Bearing Set Replacement in the Mini
      • Power Supply Replacement (IPXQ) on the Epilog Mini
      • Auto Focus Plunger Replacement on the Mini/Helix
      • Display Installation on the Mini/Helix
      • I-Beam Replacement on the Epilog Mini
      • X-Axis Motor Replacement on the Epilog Mini
      • Laser Tube Replacement in the Epilog Mini and Helix
      • Super-Silent Fans Installation Instructions for the Epilog Mini and Helix
      • Keyboard Installation on the Mini
      • X-Axis Flex Cable Replacement on the Epilog Mini
      • X-Axis Belt Replacement on the Mini
      • X-Axis Encoder Read Head Replacement on the Mini
    • Epilog Helix 44 Articles
      • How to check and adjust the Helix table level
      • How to align the Mini/Helix MT laser
      • How to align the Mini/Helix MX laser
      • How to replace the Mini & Helix X/Y Combo PCB
      • How to install the Mini/Helix super silent fans
      • How to square the Mini/Helix ruler guides
      • How to replace the Mini/Helix slider blocks
      • How to set the Mini/Helix manual & auto focus
      • How to replace the Helix Z-belt
      • How to replace the Helix/Mini Y-motor assembly
      • How to replace the Helix X-beam belt
      • How to replace the Helix X-axis assembly
      • How to replace the Helix double power supply
      • How to replace the Helix power supply
      • How to replace the Helix/Mini interlocks
      • How to upgrade the Helix double power supply
      • How to replace the Mini/Helix auto focus plunger
      • How to replace the Helix controller board
      • How to replace the Mini/Helix X-axis motor
      • How to upgrade the Mini/Helix fan assembly
      • How to upgrade the Mini/Helix laser tube
      • How to replace the Helix/Mini fans
      • Cleaning and Maintenance for the Helix & Mini
      • How to clean the Helix encoder strip
      • How to Clean the X-axis Encoder Strip
      • Linear Encoder Cleaning on the Epilog Mini/Helix
      • Fan Replacement on the Epilog Mini and Helix Systems
      • Control Board Replacement on the Mini and Helix Systems
      • Checking Table Level on the Mini and Helix Lasers
      • Aligning the Laser Beam of the Mini and Helix
      • Adjusting Table Level for the Mini and Helix
      • Loss of Power in a Epilog Mini/Helix
      • Y-Axis Belt Replacement on the Epilog Mini/Helix/FiberMark
      • Setting Manual Focus and Auto Focus on the Mini/Helix
      • Z-Motor Replacement in the Mini/Helix
      • Squaring the Ruler Guides on the Mini/Helix
      • X-Axis Encoder Strip Replacement for the Mini/Helix
      • Setting the X-Y Home Position on the Mini/Helix
      • Power Supply Replacement (Meanwell) in the Epilog Helix
      • Power Supply (IPXQ to Meanwell) Replacement in the Epilog Helix
      • Auto Focus Plunger Replacement on the Mini/Helix
      • Display Installation on the Mini/Helix
      • Laser Tube Replacement in the Epilog Mini and Helix
      • Super-Silent Fans Installation Instructions for the Epilog Mini and Helix
    • FiberMark 20 Articles
      • How to replace the FiberMark slider blocks
      • How to align the laser for the Fusion FiberMark
      • How the Diagnostic LEDs function for the Fusion and FiberMark
      • How to set the X-Y home position on the FiberMark
      • How to set the FiberMark manual focus gauge
      • How to replace the FiberMark X-motor
      • How to replace the FiberMark Z-motor
      • How to replace the FiberMark Y-motor
      • How to replace the FiberMark Laser
      • How to replace the Interlocks on the FiberMark
      • How to Remove the FiberMark X-axis Assembly
      • How to replace the Optics in the FiberMark
      • How to Optically Align the FiberMark
      • How to replace the FiberMark Encoder Strip
      • How to replace x-axis belt on the FiberMark
      • How to replace the FiberMark Controller Board
      • How to align the FiberMark Laser
      • How to Clean the X-axis Encoder Strip
      • How to Install / Troubleshoot a USB Connection over Windows 7
      • Y-Axis Belt Replacement on the Epilog Mini/Helix/FiberMark
    • Legend 36EXT 2 Articles
      • Aligning the Laser in the 36EXT
      • Replacing the X-Motor on the Legend 36EXT
    • Fusion 34 Articles
      • X-Axis Motor Replacement for Fusion Pro 32 and Fusion Pro 48
      • X-Axis Drive Board Replacement For Fusion Pro 32 and Fusion Pro 48
      • X-Axis Belt Replacement for Fusion Pro 32 and Fusion Pro 48
      • Replacing the Top Door on the Fusion Edge 24
      • Aligning the CO2 Laser in the Fusion Edge
      • How to read the Fusion Safety Interlock Laser Status Indicators
      • How to replace the Fusion Y-axis drive
      • How to tension the Fusion X-axis belt
      • How to replace the Fusion X-axis idler
      • How to replace the Fusion X-axis sensor
      • How to replace the Fusion X-axis motor
      • How to fix vertical vector lines on all Fusion models
      • How to adjust the Fusion table level
      • How to replace the Fusion rotary motor
      • How to replace the Fusion Z-motor
      • How to replace the Door Assembly on all Fusion Models
      • How to replace the Fusion keyboard assembly
      • How to install the Fusion X-motor
      • How to replace the Fusion Power Supply
      • How to replace the Fusion Laser Tube
      • How to replace the Fusion Laser Safety Module
      • How to install the Fusion Keypad Assembly
      • How to correct an out of square arm assembly for Fusion
      • How to replace the Fusion Y-motor
      • How to calibrate the Fusion M2/32/40 focus
      • How to replace the Fusion X-Axis Belt
      • Fusion Menu Short Cuts
      • How to replace the lens on the Fusion
      • How to align the laser for the Fusion FiberMark
      • How the Diagnostic LEDs function for the Fusion and FiberMark
      • How to install the Epilog Control Center & Dashboard Print Driver
      • How to align the laser for the Fusion CO2
      • How to install the Fusion 3-Jaw Chuck Rotary Attachment
      • Fusion Diagnostic LED Reference
    • Aligning the Laser Beam on the Epilog Zing
    • Aligning the CO2 Laser in the Zing 24
    • Aligning the CO2 Laser in the Zing 16
    • Aligning the Laser in the 36EXT
    • Aligning the CO2 Laser in the Fusion Edge
    • How to replace the Zing lens carriage roller
    • How to replace the Zing Y-motor
    • Troubleshooting the Zing Engraver
    • How to replace the Zing power supply
    • How to replace the Zing mirrors
    • How to replace the Mini X-axis encoder strip
    • How to replace the Mini/Helix Z-motor
    • How to replace the Mini Z-belt
    • How to replace the Mini Y-axis belt
    • How to replace the Mini X-axis motor
    • How to install the Mini keyboard
    • How to replace the Mini X-axis encoder reader
    • How to replace the Mini controller board
    • How to align the Mini/Helix MT laser
    • How to square the Mini/Helix ruler guides
    • How to set the Mini/Helix manual & auto focus
    • Cleaning and Maintenance for the Helix & Mini
    • Job Manager Error Message
    • How to replace the Fusion Laser Safety Module
    • How to correct an out of square arm assembly for Fusion
    • Fusion Diagnostic LED Reference
    • Checking the Auto Focus Plunger Assembly
    • Job Position Error
    • CorelDRAW X6 Settings: Fix Engraved Bars Extending Past Right Side of Image
  • Replacing Optics 3 Articles

    • How to replace the lens on the Fusion
    • How to replace the Optics in the FiberMark
    • Replacing the Legend 36EXT Lens Assembly
  • CorelDRAW Questions 46 Articles

    • Print Merge in CorelDRAW
    • Printing from CorelDRAW - Dashboard Not Recognizing Hairlines or Outlines
    • CorelDRAW 2019 Epilog Software Suite Fix
    • Photo Laser Engraving on Wood - CorelDRAW X5 - 2018
    • Laser Engrave or Cut a City Map (CorelDRAW)
    • Find and Replace a Color in CorelDRAW
    • How to Create a Jig for the Laser
    • Installing CorelDRAW - Previous Version Installed Error
    • Converting Vector Artwork from CMYK to RGB - CorelDRAW
    • CorelDraw Zooming Issue
    • Placing Text on a Path in CorelDRAW
    • Adding an Italic / Oblique Effect to a non-Italic Font - CorelDRAW X7
    • Tracing Clipart to Remove a White Background from Clipart
    • Tracing a Logo in CorelDRAW 13
    • Creating an Outline Around a Clipart Image in Corel
    • Color Management Settings CorelDRAW X5, X6, X7
    • Removing the Background from a Photo
    • Tiling a Graphic in CorelDRAW
    • Printing Mulitple Items with CorelDRAW's Imposition Layout Feature
    • Changing the Default Pen Width in CorelDRAW X6
    • Creating Wood Veneer Inlays
    • Laser Resolution and How it Affects Engraving
    • Layering a Clip Art Image
    • Creating a 3D Effect With the Laser on Acrylic and Glass
    • Photo Engraving Do's and Don'ts
    • Everything You Wanted to Know about Fonts...and Then Some!
    • Make Your Own FontBot
    • Manipulating Clip Art to Create Unique Designs
    • Design Tips for Non-Designers
    • Using the Dithering Option in the Epilog Laser Dashboard
    • Working with Single Line Fonts in CorelDRAW X4
    • Using What the Font to Identify Fonts
    • Creating 3D Artwork
    • Using the Straighten Image Tool in Corel X4
    • Setting up a Gun Stock for Engraving
    • Duplicating Around a Center Point in CorelDRAW
    • Using the Weld Tool in CorelDRAW
    • Creating a Quick Bounding Box for the Red Dot Pointer
    • Creating a Vignette in CorelDRAW
    • How to Create Monograms for Your Laser
    • Creating a Skateboard Jig in CorelDRAW X5
    • How to Create a Snowflake Ornament in Corel X6
    • Cutting and Engraving Different Line Weights
    • Smaller fonts with hairline outline will not cut (beeps, job done) in CorelDRAW X6.
    • Large Fonts Automatically Vector Cut in CorelDRAW X6
    • Flattening Two Lines Into One
  • Graphic Program Questions 16 Articles

    • Laser Engrave or Cut a City Map (Adobe Illustrator)
    • Laser Engrave or Cut a City Map (CorelDRAW)
    • Converting Vector Artwork from CMYK to RGB - CorelDRAW
    • Printing to your Laser from AutoCAD
    • Laser 3D Model Making with 123D Make
    • Laser Resolution and How it Affects Engraving
    • Layering a Clip Art Image
    • Creating a 3D Effect With the Laser on Acrylic and Glass
    • Photo Engraving Do's and Don'ts
    • Everything You Wanted to Know about Fonts...and Then Some!
    • Make Your Own FontBot
    • Manipulating Clip Art to Create Unique Designs
    • Design Tips for Non-Designers
    • How to Set Up Artwork for Engraving with the Rotary Attachment
    • Creating a Quick Bounding Box for the Red Dot Pointer
    • Cutting and Engraving Different Line Weights
  • Materials 8 Articles

    • Photo Laser Engraving on Wood - CorelDRAW X5 - 2018
    • Laser Systems and Printed Circuit Boards
    • Laser 3D Model Making with 123D Make
    • How to Laser Engrave and Cut Fabrics
    • Easily Remove Engraving Residue from Wood
    • Creating an Applique
    • Different Marks You Can Achieve on the FiberMark
    • Mirror Engraving
  • PhotoLaser Plus 8 Articles

    • Creating a Multiple Name Badge Layout using Print Merge
    • PhotoLaser Plus Quick Start
    • Exporting from PhotoLaser Plus
    • Exporting from PhotoLaser Plus
    • Engraving Small Wood Photos with PhotoLaser Plus
    • Problem Installing PhotoLaser Plus
    • Creating a Serial Tag with Variable Data in PhotoLaser Plus
    • Transforming a Vignette in PhotoLaser Plus
  • Epilog Job Manager 2 Articles

    • Job Manager Error Message
    • How do I use the Job Manager?
  • Adobe Illustrator 2 Articles

    • Laser Engrave or Cut a City Map (Adobe Illustrator)
    • Expanding Thin Shapes for Laser Cutting - Adobe Illustrator CC 2014
  • Fusion Pro 2 Articles

    • X-Axis Assembly Replacement for Fusion Pro 32 and Fusion Pro 48
    • X-Axis Home Switch Replacement for Fusion Pro 32 and Fusion Pro 48
  • General Questions 29 Articles

    • Laser Exhaust Requirements
    • Maximum Rotary Attachment Diameters
    • Power Consumption and Your Laser
    • How to read the Fusion Safety Interlock Laser Status Indicators
    • Laser Engrave or Cut a City Map (Adobe Illustrator)
    • Laser Engrave or Cut a City Map (CorelDRAW)
    • Blurry Driver Screen
    • Fusion Diagnostic LED Reference
    • How Much Combustible Gas is Released From Laser Engraving
    • How Do I Choose My Laser System's Wattage?
    • Laser Systems and Printed Circuit Boards
    • Bar Code Engraving Suggestions
    • Lens Cleaner - How to Purchase More
    • Material Safety and your Laser
    • Selecting an Uninterrupted Power Supply for your Epilog Laser System
    • Incremental Movement of the Engraving Table Up and Down
    • Warning from AVAST Antivirus Software
    • Maximum Table Weight
    • Focus Lens 101
    • Laser Resolution and How it Affects Engraving
    • YAG Laser vs. CO2 Lasers
    • How to set up a project on the Vector Pin Table
    • Using the Stop/Focus Feature
    • Setting up a Gun Stock for Engraving
    • Moving the Laser System
    • Using a Mask to Create a Color Fill
    • Power Requirements by Laser Wattage
    • 220VAC Power Connections: Core End Type and Photo
    • Purchase or Print a New Laser Alignment Target

Popular Knowledgebase Articles

  • Aligning the Laser Beam on the Epilog Zing
    • 32836
    • 6
  • Control/Display Unit Replacement on the Epilog Zing
    • 31136
    • 3
  • Control Board Replacement on the Mini and Helix Systems
    • 35153
    • 1
  • X-Axis Flex Cable Replacement on the Epilog Mini
    • 20252
    • 1

Laser Engrave or Cut a City Map (Adobe Illustrator)

  • Date updated 2018-05-08
  • Rating
  • Categories
  • General Questions
  • Graphic Program Questions
  • Adobe Illustrator
  • Tags
  • vector
  • design
  • adobe illustrator
  • artwork manipulation
  • vector trace

How do I create city map artwork for cutting or engraving with my Epilog Laser? (Adobe Illustrator)

Laser Engrave or Cut a City Map (Adobe Illustrator)


Laser engraved or cut city maps are easy to create and will quickly become a great new addition to your popular laser engraved and cut products. Create your own local city maps and laser engrave them on cutting boards, marble tiles, and small tables, or create laser cut versions using paper, wood, and acrylic or hang them as wall art - the possibilities and combinations of materials are endless!

City Map Image Capture

Laser Engrave or Cut a City Map

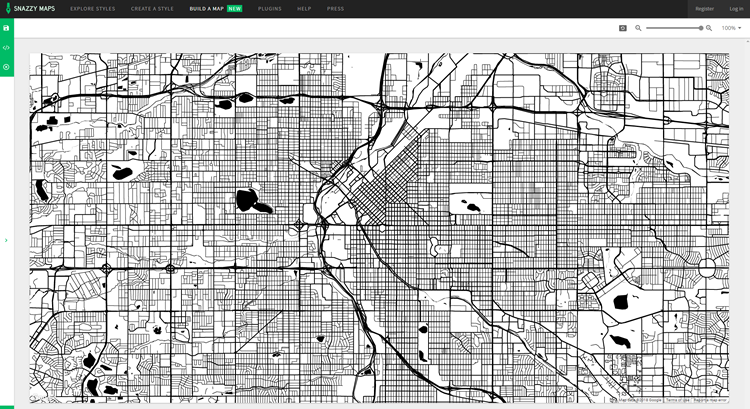
  1. Start off by visiting snazzymaps.com to create a custom map for laser engraving or cutting. Creating an account is not required, but if you are interested in creating different maps for customers or friends, signing up will give you the ability to save map locations and custom styles for later use, and don’t worry it’s completely free!  


  2. Once you’re on the Snazzy Maps website, click on the Build a Map button near the top of the page.


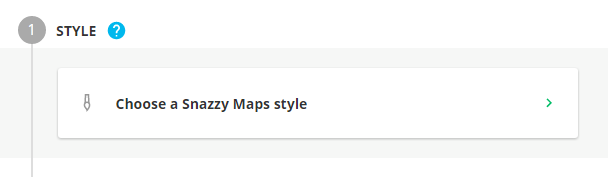
  3. Now you’re ready to create a custom map. Begin by clicking on Choose a Snazzy Maps style button under Style.


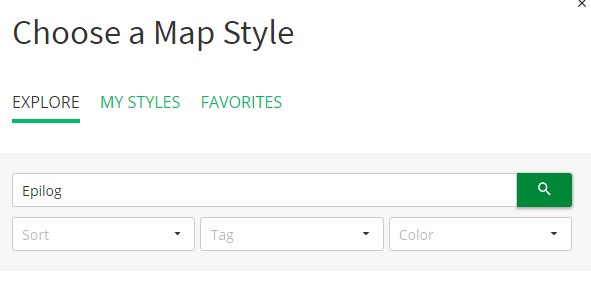
  4. In the Search field type Epilog and then click the Search button.


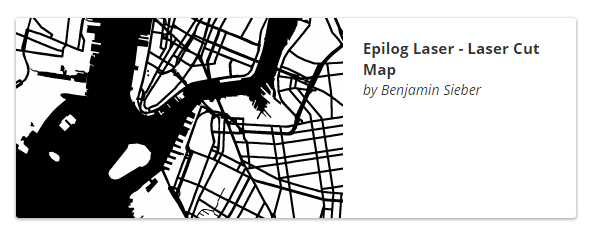
  5. Select the “Epilog Laser – Laser Cut Maps” style in the results section by Clicking on the option, then click on Apply Style at the bottom of the page.


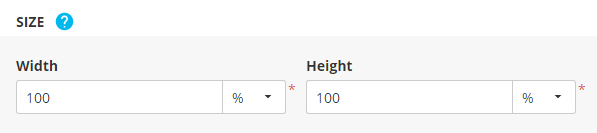
  6. Now click on the Size & Location option in the Build a Map panel.


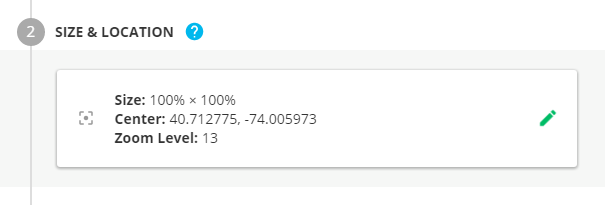
  7. In the Size section change the Height option to 100%.


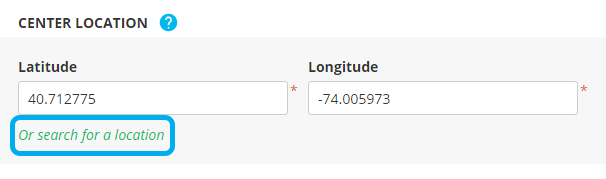
  8. In the Center Location section, click the “Or search for a location” button below the latitude and longitude coordinates.

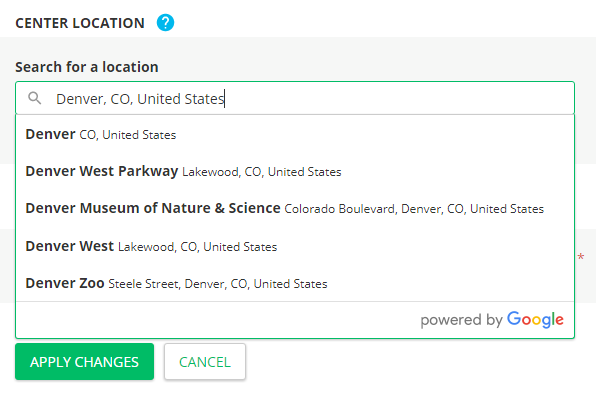
  9. Fill in the city name and press Enter, or select your city from the prefilled drop-down options.


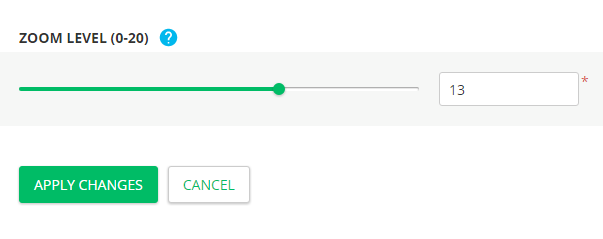
  10. In the Zoom Level section set the Zoom to 13, then click Apply Changes. This might need to be adjusted by the overall size of the city you are working with and the crop you would like to achieve. You’ll be able to adjust the Zoom Level later, by using your scroll wheel with the mouse over the map screen.


  11. We won’t be using the Markers section for this map, but we’ll go over a good use for them that you might find useful. Click on the Markers section and give you a brief tour and ideas for how to use it.


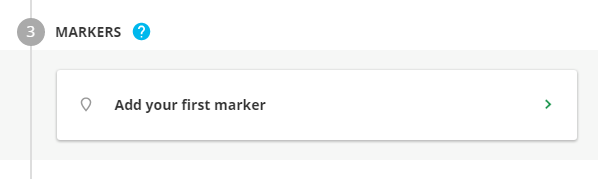
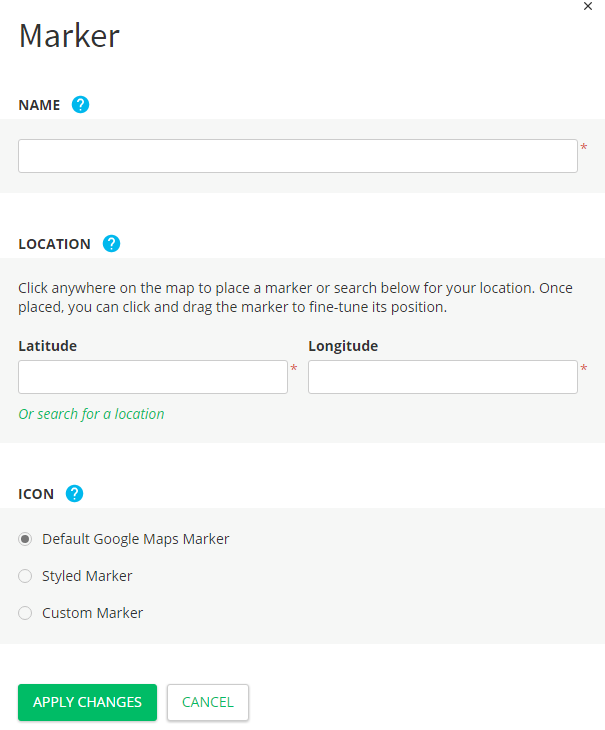
  12. The Markers section includes a Name, Location, and Icon style that can be used to add custom locations to your map. We could add markers for a home, favorite restaurants, wedding location, etc. to add an additional level of personalization.


  13. Click cancel to back of the Marker section.


  14. Next click the Advanced Settings section.


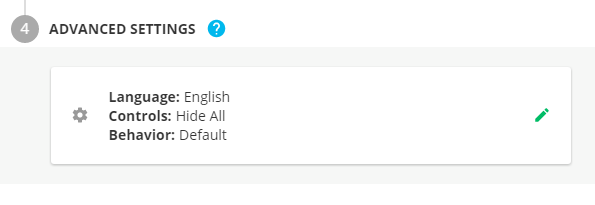
  15. Most of the settings in this section apply to using maps on a website, so you can ignore most of them. Under the Controls section, click on the button next to Hide all controls – this will make it easier to capture an image of the map. Then click Apply Changes.


  16. Now click on the Hide Panel button on the right side of the Build a Map panel.


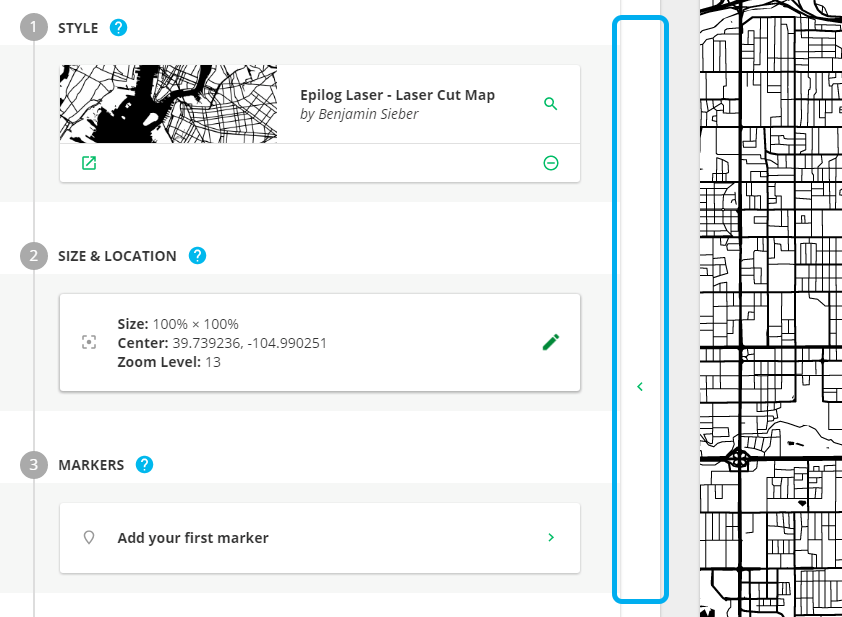
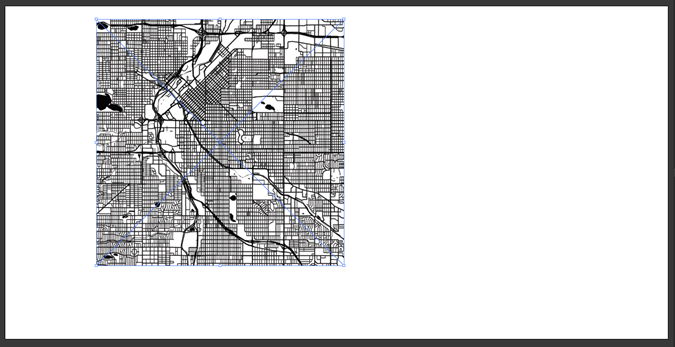
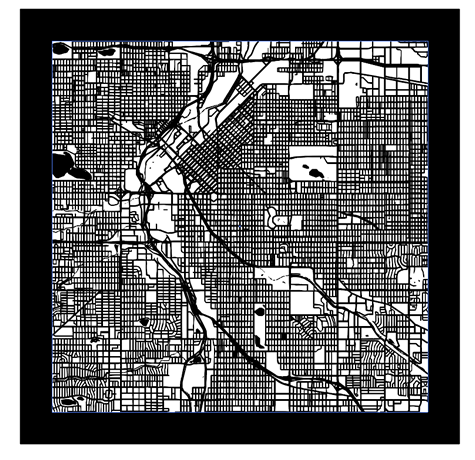
  17. At this point we are ready to capture an image of the map, which we will later bring into CorelDRAW or Adobe Illustrator and vector trace.


  18. Open the Windows Snipping Tool app.


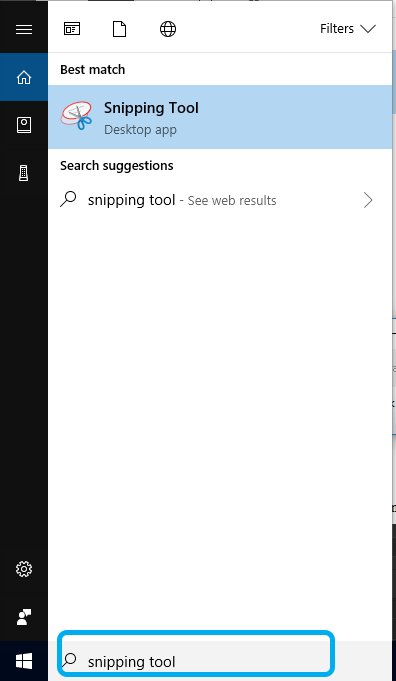
  19. Select the New option.


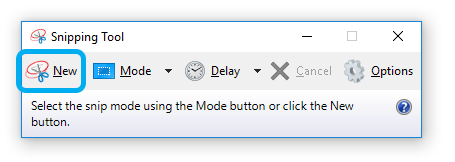
  20. Then click and drag over the top of the map section on the screen to create a Snip capture (screen shot) of the map.


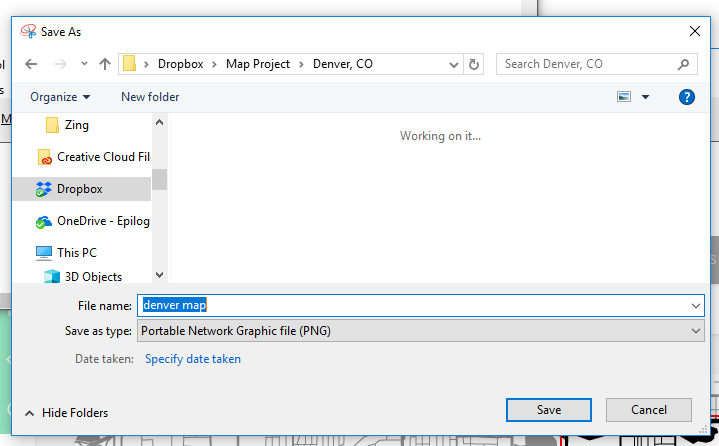
  21. Next click the Save Snip option (Disk icon) near the top of the screen.


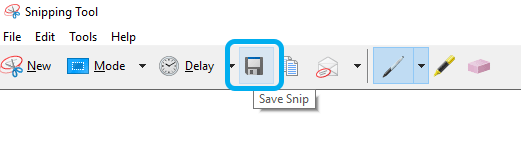
  22. Name the file and select the .PNG option from the Save as type drop-down menu, then click Save. Note: the .PNG file format will give you the best image, with little compression, for the vector trace in CorelDRAW or Illustrator.


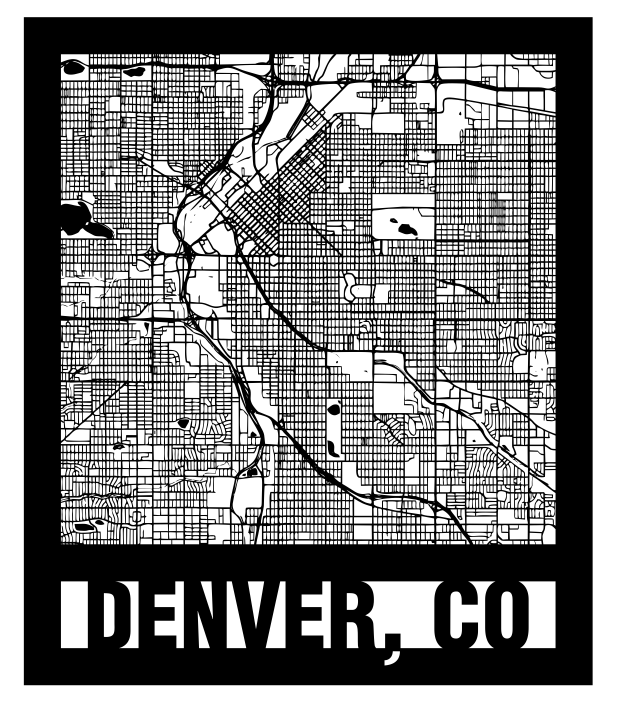
  23. To finalize the map for laser engraving or cutting with your Epilog Laser system, we’ll use Adobe Illustrator to create a quick vector trace of our screen capture image, add a frame, and city name text to the frame.


Vector Trace – Adobe Illustrator (Windows)

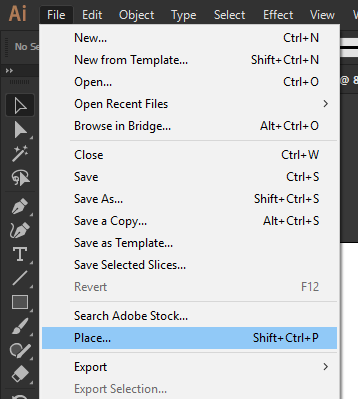
  1. With Adobe Illustrator open and a new page created, start by selecting the Place option from the File menu at the top of the page (Ctrl + Shift + P).


  2. Using the file browser window, navigate to where you saved the map Snip, click the .PNG file, and then the Place button.


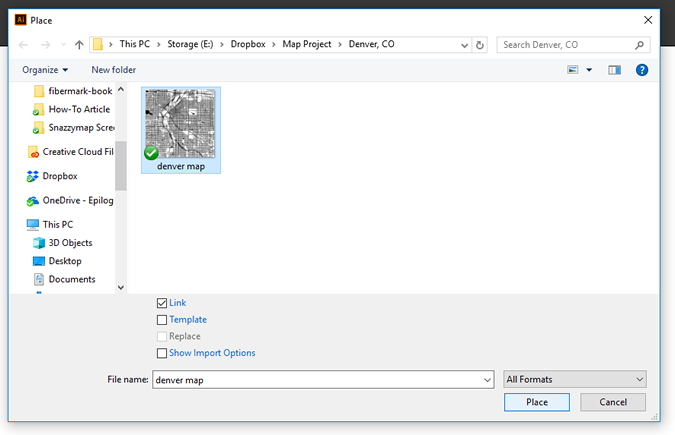
  3. Click anywhere on the page to Place the artwork.


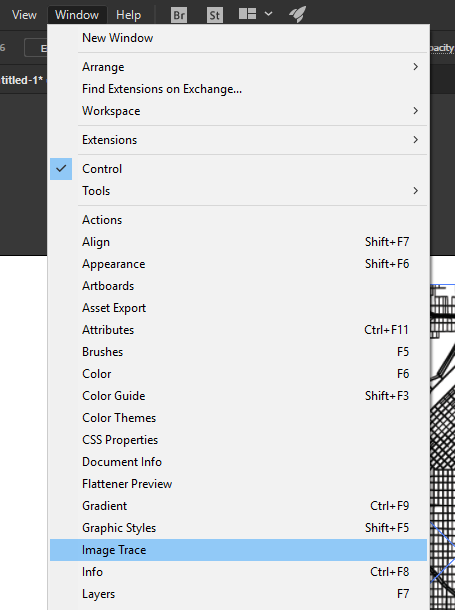
  4. With the artwork still selected, open the Image Trace panel by clicking Window from the menu at the top of the page, then click on Image Trace.


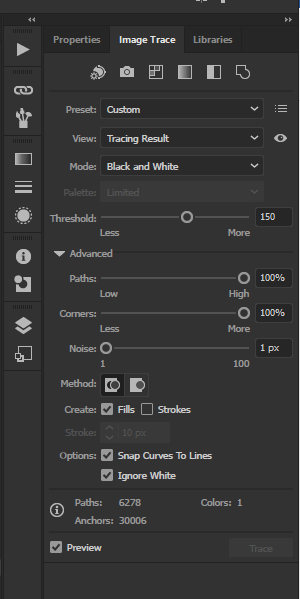
  5. In the Image Trace Panel change the following settings:
    1. Change Preset to Black and White Logo (this will change to Custom when you start editing the other settings)
    2. Set Threshold to 150
    3. Click on Advanced to open the Advanced options
    4. Set Paths to 100%
    5. Set Corners to 100%
    6. Set Noise to 1 px
    7. And turn on Ignore White


  6. Then click on the Expand button, near the top of the screen in the Control Bar, to finalize the live preview of the Image Trace.


  7. Now we’ll create the frame that goes around the map using the Rectangle tool.


  8. Select the Rectangle Tool (M) and draw a rectangle overlapping the city map. Make sure the rectangle is just inside the outer bounds of the map.


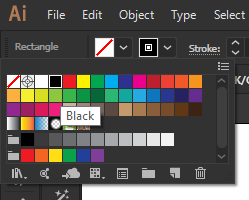
  9. With the Rectangles still selected, change the Rectangle Fill color to none, and Stroke to black using the Control bar options at the top of the screen.


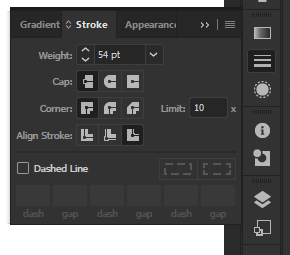
  10. Open the Stroke panel (Ctrl + F10) by selecting Window / Stroke from the menu at the top of the screen, then change the line Weight to 0.75 in (or 54 pt), and select Align Stroke to Outside, next to Align Stroke.


  11. Now we’ll create a frame for the city text. Select the Rectangle tool and draw a rectangle starting from the inside lower corner of the frame created around the city map. Then move the top of the text frame rectangle to overlap with the bottom of the map frame. This rectangle will become the frame for the city text.

    Note: It may help to turn on Smart Guides with Snap to Point set to on for this step to make aligning the rectangles easier.


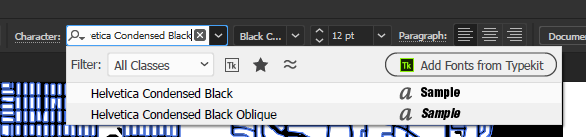
  12. Next we’ll create the city text. Using a typeface with a bold condensed font will work well for this design, so we'll be using Helvetica Condensed Black for this example. Start by selecting the text tool, click in the Font Name search box in the Control bar at the top of the screen, and type “Helvetica Condensed Black”, then press Enter. If you do not have Helvetica, Arial or Myriad Pro make good alternatives.


  13. With the Type tool still selected, click inside the text frame you created in an earlier step, then type the city name in all caps, and adjust the size so there is approximately .5” to 1” of space between the text and the frame on either side of the text. Then position the text so the top of the text is slightly overlapping the bottom of the map frame.


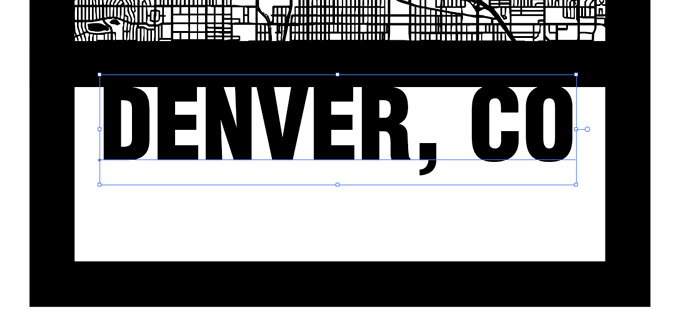
  14. Now create a copy of the city text and drag it to the side. We’ll use the copy of the city text to add the comma descender back to the artwork once we Unite the text with the frame in a later step.


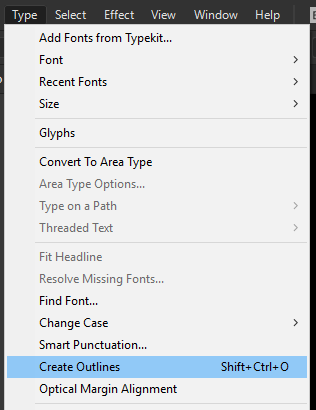
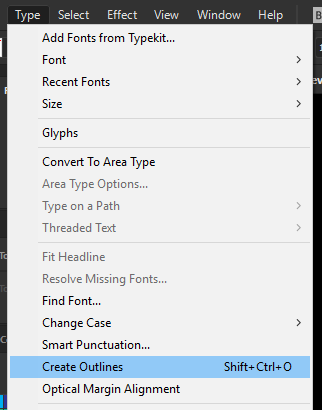
  15. With the text still selected, convert the text to outlines by selecting Type / Create Outlines (Ctrl + Shift + O) from the menu at the top of the screen.


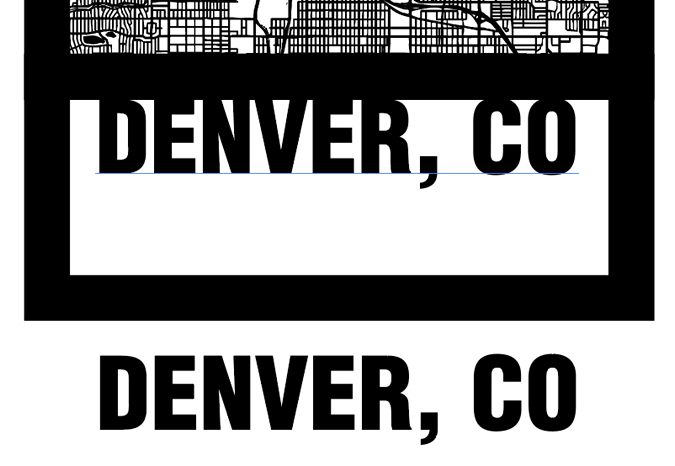
  16. Use the Direct Selection Tool to select the text frame and drag the bottom of the frame up to overlap the bottom of the text objects.


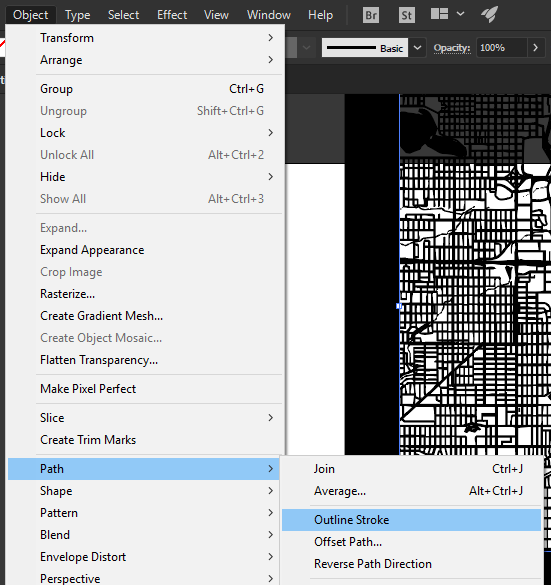
  17. Next, we’re going to outline the frame stroke by selecting both the map frame and text frame lines with the Selection Tool. With the Selection Tool selected, hold Shift key, then click on both of the frames. Now select Object / Path / Outline Stroke from the menu at the top of the screen to convert the strokes to outlined objects. 


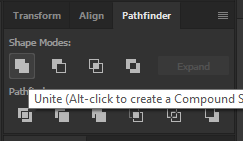
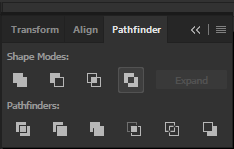
  18. With all the objects for the city map completed, all that is left is to Unite the objects together. Start by using the Selection Tool to select all the city map objects, then open the Pathfinder Panel by going to Window / Pathfinder (Ctrl + Shift + F9).


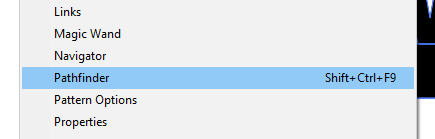
  19. In the Pathfinder Panel, under Shape Modes click the Unite option to combine all of the vector objects together.


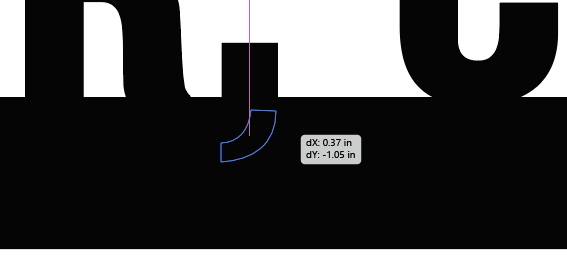
  20. As a final detail, we’re going to add back the comma descender, by using the Exclude feature. Start by deleting all characters but the comma from the city text copy you created in the earlier step.

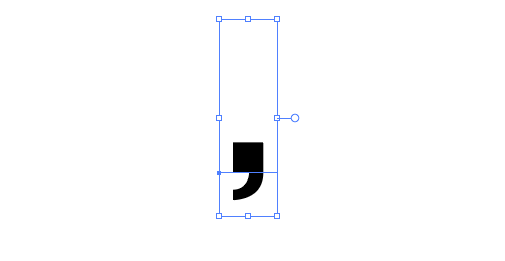
  21. Next select the comma and convert the comma to outlines by selecting Type / Create Outlines (Ctrl + Shift + O) from the menu at the top of the screen.


  22. Click and hold on the Pen Tool in the Tools panel to reveal the hidden tools options, then select the Delete Anchor Point Tool option.


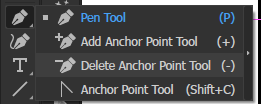
  23. Now click on the top 3 nodes of the comma to delete the top section of the comma, and leave only the comma descender.


  24. With the Selection Tool, move the comma descender just under the comma attached to the city map frame.


  25. Select both the city map artwork and the comma descender, with the Selection Tool, and in the Pathfinder panel, under Shape Modes click the Exclude option to knock out the object from the frame.


  26. At this point if you’d like to engrave the artwork, you’re finished. If you’d like to cut out a version of the map, change the Fill color to None, change the Stroke Color to Black, then set the Stroke Weight to .001” for cutting with your Epilog Laser system.


related articles

  • Lens Cleaner - How to Purchase More
    • 27818
    • 4
  • Incremental Movement of the Engraving Table Up and Down
    • 17372
    • 0
  • Purchase or Print a New Laser Alignment Target
    • 26776
    • 1
  • 220VAC Power Connections: Core End Type and Photo
    • 25774
    • 3
  • Laser Exhaust Requirements
    • 37768
    • 8
  • Power Requirements by Laser Wattage
    • 35215
    • 4
  • Cutting and Engraving Different Line Weights
    • 69332
    • 5
  • Creating a Quick Bounding Box for the Red Dot Pointer
    • 24741
    • 3
  • Using a Mask to Create a Color Fill
    • 22925
    • 5
  • Printing to your Laser from AutoCAD
    • 39387
    • 5
  • How do I create city map artwork for cutting or engraving with my Epilog Laser? (Adobe Illustrator)
Rate this article
Subscribe to alerts for this article below
Your email is now subscribed to alerts for this article
Your email is not subscribed to alerts for this article
Unsubscribe to alerts for this article below

Company Sites

Home

Knowledge Base Categories

  • Drivers and Firmware
  • System Maintenance
  • Troubleshooting
  • Replacing Optics
  • CorelDRAW Questions
  • -- All Categories --

Connect With Us

  • Epilog Laser
  • 16371 Table Mountain Parkway
    Golden, CO 80403, USA

  • Phone: +1 303 277 1188
  • Email: sales@epiloglaser.com
  • https://www.epiloglaser.com/
    Powered by LiveHelpNow customer support suite