Inhaltsverzeichnis
- Einführung
- Sicherheit
- Erste Schritte
- Setting Up Your Laser System
- Unpacking the Fusion Ascent
- Choose Where to Locate the System
- Connecting the Exhaust
- Connecting Electrical Power
- Connecting the Laser to Your Computer
- Power on the Laser
- Set the IP Address
- Install the Software Suite & Set Up Your Laser
- Sign Up for Driver Updates and Register Your System
- Systemsteuerung
- System Features
- Machine Maintenance
- Specifications
- Technical Support
- Warranty
- Material-Einstellungen
- Calibration
Focus Menu
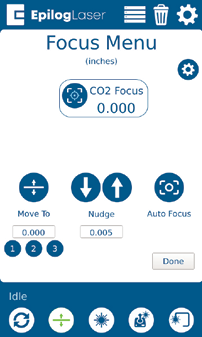
To access the Focus Menu press the Focus key, which turns green when active. The Focus Menu is used for raising or lowering the table level to focus the laser precisely to your engraving or cutting material using the Focus Gauge. The height of the table is adjustable by either using the Joystick, or using the Nudge arrows. Once you are finished using the Focus Menu, press the Focus key again to return to the main Job menu.
Move To
Enter an amount to focus the table to the laser at a specific height.
Nudge
The nudge arrows allow you to fine-tune the position of the laser down to a thousandth of an inch. To change the increments you want to nudge the laser’s position, click the text box under “Nudge” and enter an amount.
Auto Focus
When you have jogged the lens carriage above your material, press the Auto Focus button to use the plunger Auto Focus. The table will rise until the material touches the plunger, then set the table to the correct height. Your job should now be in focus.
Einstellungen
Pressing the gear icon on the Focus menu allows you to save “Thickness Presets” which can be useful for items you work with regularly that have a consistent thickness. Simply type in the table height you wish to use and save the presets by pressing the save icon. Now when you press the numbers 1, 2, or 3 on the focus menu, and then press “Move To”, your machine will adjust the table to that height.