メインコンテンツへスキップ
校正

フィルター


Getting Started (48)
使用方法および操作 (125)
サービスおよび修理 (270)
Manual (66)

キャリッジカメラのキャリブレーション

はじめに

The following procedure must be performed first for all Fusion Ascent machines. Turn on the engraver, and let it complete the startup process.

  1. On the display, press the gear icon to enter the Settings Menu.
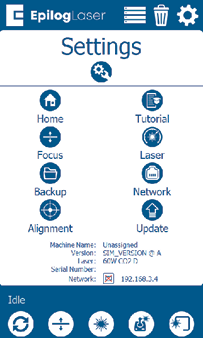
    設定メニュー
  2. Long Press the “Settings” text for 2-3 seconds to enter the Advanced Settings Menu.
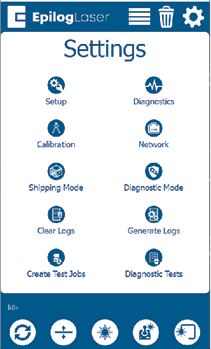
    詳細設定メニュー

  1. Click on “Calibration” followed by “Calibrate Cameras” to enter the Camera Calibration menu. If using 1.1.2.8 or older, just tap “Calibrate Cameras”.
  2. テーブルの左上隅に、陽極酸化処理されたアルミニウムの板(8インチ×5インチ/200mm×125mm)を配置してください。
  3. 彫刻機の上部ドアを閉めてください。
  4. OKを押すとキャリッジカメラのキャリブレーションが開始され、彫刻機がテーブルを適切な焦点高さに移動させます。
  5. 彫刻機は陽極酸化アルミニウムにパターンを刻印し、キャリッジカメラがこれを分析してキャリブレーションを行います。作業が完了すると、成功メッセージが表示されるはずです。
  6. 画面の指示に従って、上空カメラのキャリブレーションに進んでください。
[参考になる]
  • 日付:
    08/10/2026
/* === Aggressive removal of PrintFriendly injected header elements === */ #printfriendly #pf-title, #printfriendly #pf-src, #printfriendly .pf-header, #printfriendly header, #printfriendly .printfriendly-header, #printfriendly h1:first-of-type, #printfriendly .page-header, #printfriendly [class*="header"], #printfriendly [id*="header"] { display: none !important; visibility: hidden !important; height: 0 !important; margin: 0 !important; padding: 0 !important; } /* Hide any top bar or source URL container */ #printfriendly #pf-src, #printfriendly .pf-src, #printfriendly [class*="src"], #printfriendly [class*="url"] { display: none !important; } /* Force page margins and centered page numbers */ @page { size: letter portrait; margin: 0.7in 0.5in; } @page :left, @page :right { @top-left { content: none !important; } @top-center { content: none !important; } @top-right { content: none !important; } @bottom-center { content: counter(page); font-size: 0.95em; padding-bottom: 25px; } }