このガイドでは、Epilog Laser 用のネットワーク設定、接続の確立、および制御ソフトウェアのインストール手順について解説します。開始するには、以下からご使用の機種を選択してください。
接続の設定
ステップ1:レーザーシステムを選択する
どのEpilog Laser を設定していますか?
レガシーシステム
旧式のレーザーシステム。
- ミニ /Helix Fibermark
- EXT
- Zing
- オリジナル・フュージョン / M2
現代のシステム
現行世代のレーザーシステム。
- メーカー
- エッジ
- プロ
- ガルボ
- 上昇
ステップ 2: ネットワーク設定 (TCP/IP)
まず、イーサネットケーブルを使ってレーザーとコンピューターを接続し、レーザーの電源が入っていることを確認してください。コンピューターがレーザーと通信するには、固定IPアドレスが必要です。
どのオペレーティングシステムをお使いですか?
Windows のセットアップ:ネットワークセンター
コントロールパネルからネットワークと共有センターを開きます。

Windows のセットアップ:アダプターの設定
アダプター設定の変更をクリックします。

Windows のセットアップ:接続のプロパティ
ローカルエリア接続(または「未識別ネットワーク」と表示されている接続)を右クリックし、[プロパティ] を選択します。

Windows のセットアップ:IPv4 の設定
インターネットプロトコル バージョン 4 (TCP/IPv4)を選択し、[プロパティ] をクリックします。

Windows のセットアップ:IP アドレスの割り当てと保存
「次のIPアドレスを使う」を選択し、IPアドレスとして192.168.3.3を入力してください。
サブネットマスクを255.255.255.0に設定し、[OK]をクリックして設定を保存します。

Windows のセットアップ:[設定] を開く
画面下部の検索バーに「設定」と入力し、「開く」をクリックします。

Windows のセットアップ:[設定] を起動する
開くをクリックしてください。

Windows のセットアップ:ネットワークとインターネット
ネットワークとインターネットをクリックします。

Windows のセットアップ:詳細設定
詳細ネットワーク設定をクリックします。

Windows のセットアップ:アダプターを選択する
レーザーのイーサネット接続の横にあるドロップダウン矢印を選択してください。

Windows のセットアップ:設定の編集
「その他のアダプター設定」の横にある「編集」をクリックします。

Windows のセットアップ:IPv4 のプロパティ
インターネット プロトコル バージョン 4 (TCP/IPv4) を選択し、[プロパティ] をクリックします。

Windows のセットアップ:IP アドレスの割り当てと保存
「次のIPアドレスを使う」を選択し、IPアドレスとして192.168.3.3を入力してください。
サブネットマスクを255.255.255.0に設定し、[OK]をクリックして設定を保存します。

ソフトウェアの選定
ネットワークの設定が完了しました!レーザーへのジョブの管理や送信には、どのソフトウェアを使用しますか?
ドライバーのセットアップ:ダウンロードと解凍
- Epilog Laser レガシードライバーのページにアクセスし、お使いの機種に適したドライバーをダウンロードしてください。
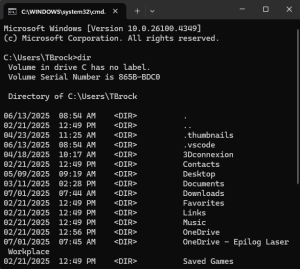
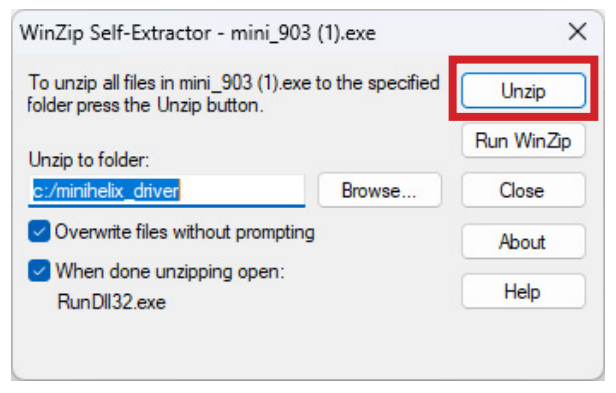
- ダウンロードしたファイルを開き、その内容をコンピューターに解凍してください。
ドライバーの設定:プリンターの追加
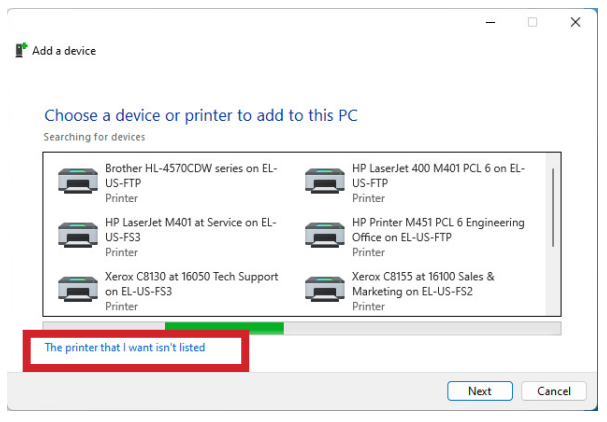
「デバイスの追加」ウィンドウが開きます。「必要なプリンターが一覧にない」をクリックしてください。
ドライバーの設定:ローカルプリンターの追加
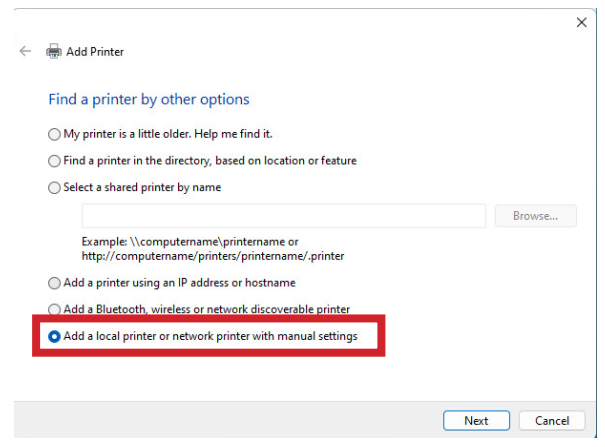
「手動設定でローカルプリンターまたはネットワークプリンターを追加する」を選択し、「次へ」をクリックします。
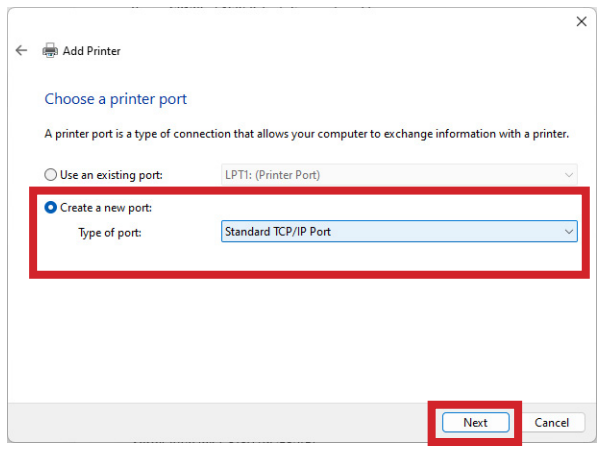
ドライバの設定:ポートの作成
「新しいポートを作成」を選択し、ドロップダウンメニューから「標準TCP/IPポート」を選択します。
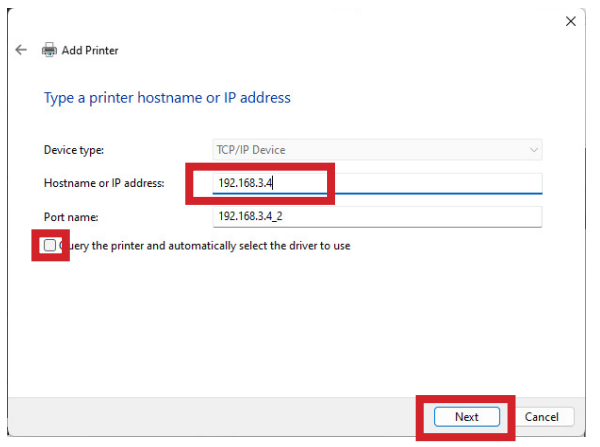
ドライバの設定:ポートの設定
お使いのレーザープリンターのIPアドレスを入力し(デフォルトは192.168.3.4です)、「プリンターを検索して使用するドライバーを自動的に選択する」のチェックを外してください。
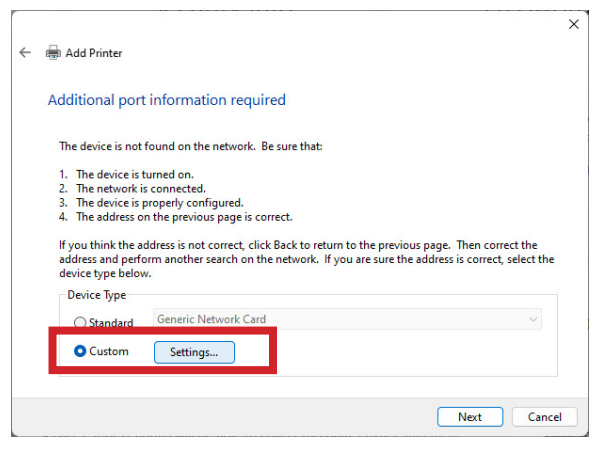
ドライバー設定:カスタム設定
「カスタム設定」を選択し、「設定」をクリックします。
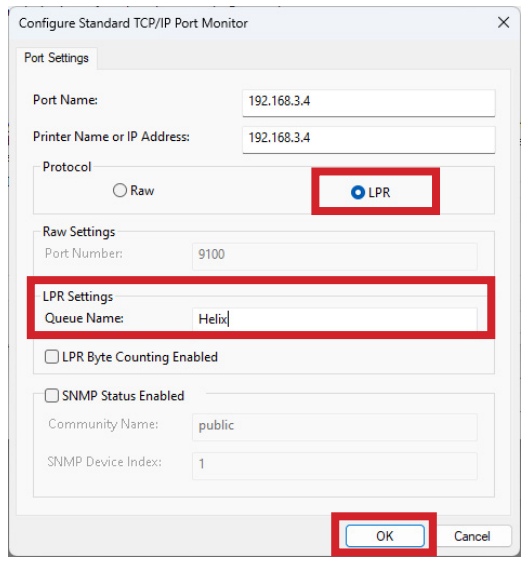
ドライバの設定:ポート設定
LPRプロトコルを選択し、「キュー名」フィールドにマシンのモデル名を入力します。「OK」をクリックしてから、「次へ」をクリックします。
ドライバーの設定:ドライバーのインストール
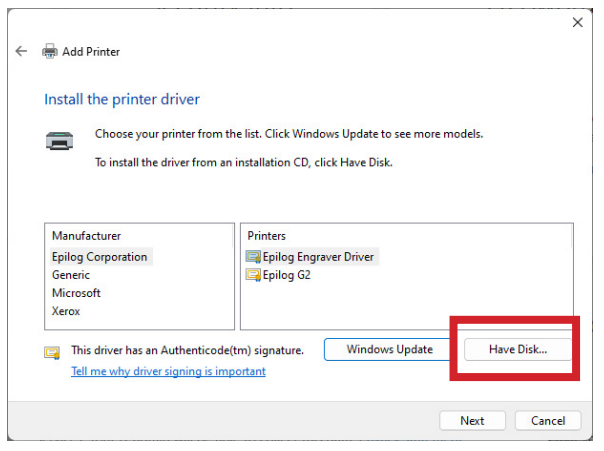
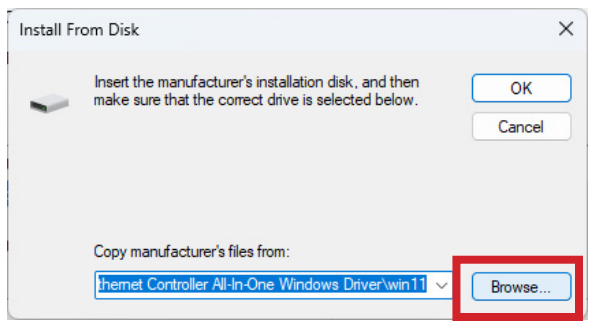
「ディスクからインストール」をクリックし、先ほどダウンロードして解凍したドライバファイルの場所を指定して、お使いのモデルに対応する.infファイルを選択してください。
ドライバー設定:設定を完了する
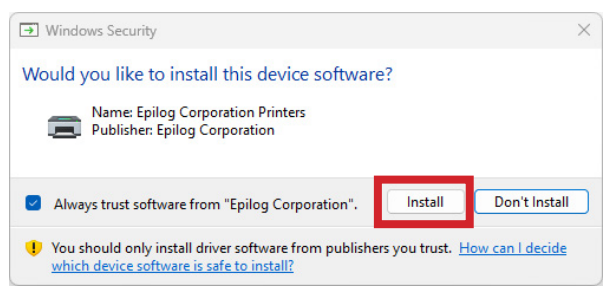
残りのプロンプトに従ってプリンタに名前を付け、インストールを完了してください。
ソフトウェアスイート:インストール状況
お使いのパソコンには、すでにEpilog Software Suiteがインストールされていますか?
ソフトウェアのセットアップ:解凍して実行
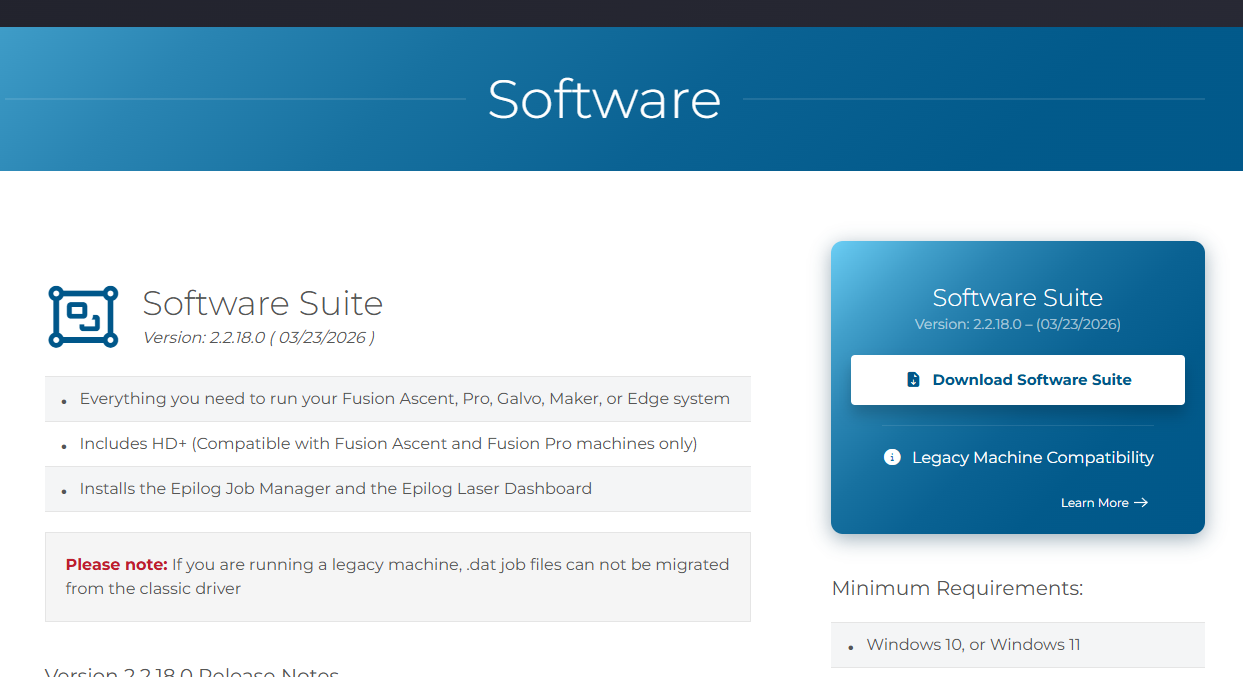
インストールファイルは.zip形式のフォルダとしてダウンロードされますので、解凍する必要があります。フォルダを右クリックし、「すべて展開」を選択してください。完了したら、「EpilogSuite」ファイルをダブルクリックしてください。
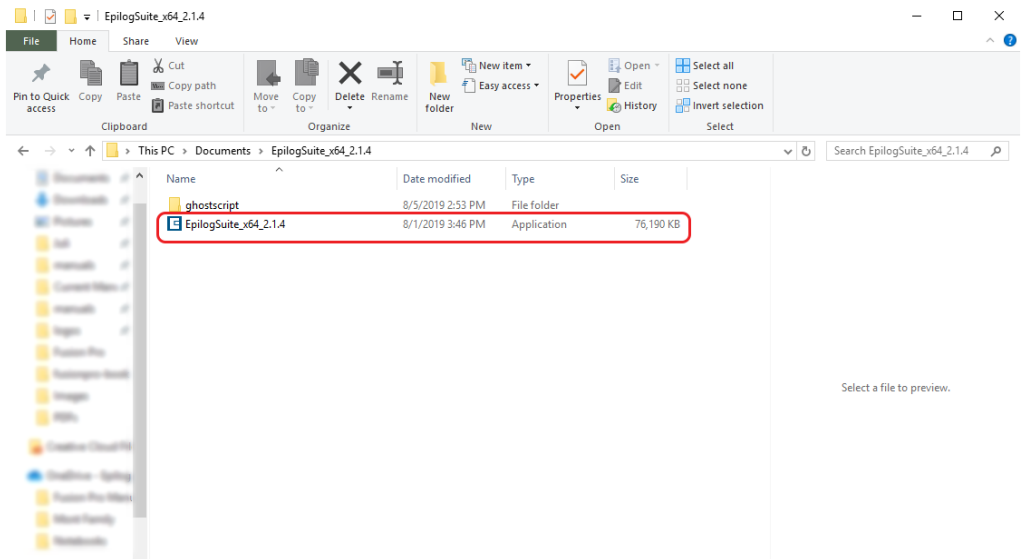
ソフトウェアの設定:ようこそ
ウェルカム画面が表示されたら、「次へ」をクリックします。
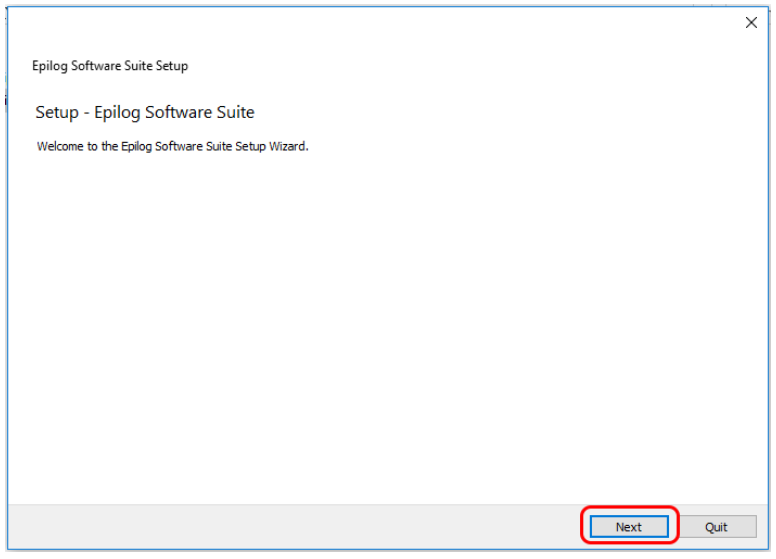
ソフトウェアの設定:ディレクトリを選択
「標準インストール」を選択し、「次へ」をクリックします。

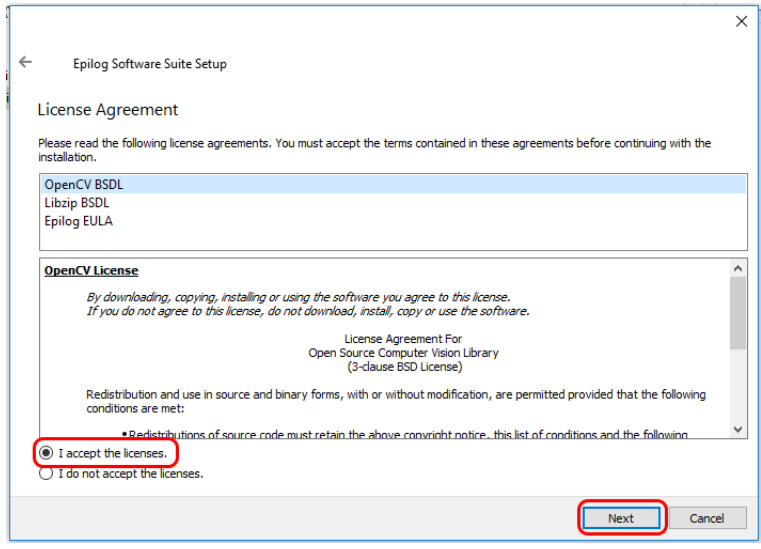
ソフトウェアのセットアップ:使用許諾契約書
使用許諾契約書を読み、同意して、「次へ」をクリックしてください。
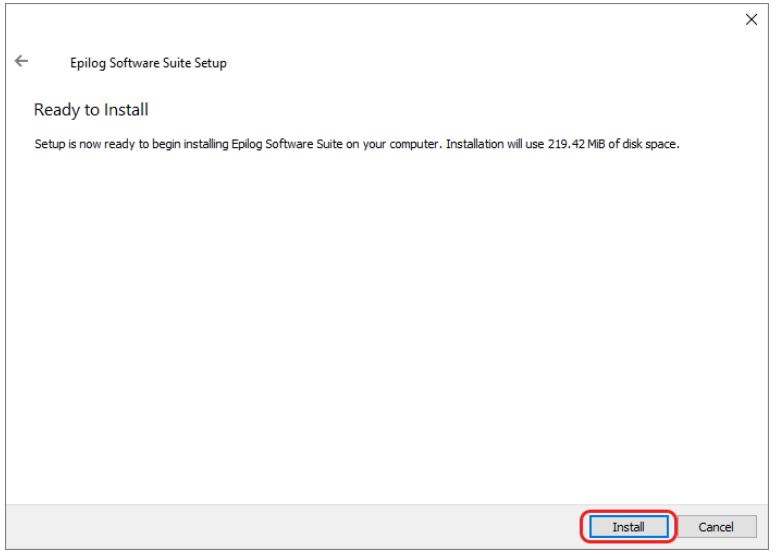
ソフトウェアの設定:インストール準備完了
「インストール」をクリックして、インストールを開始してください。
ソフトウェアの設定:Ghostscriptのインストール
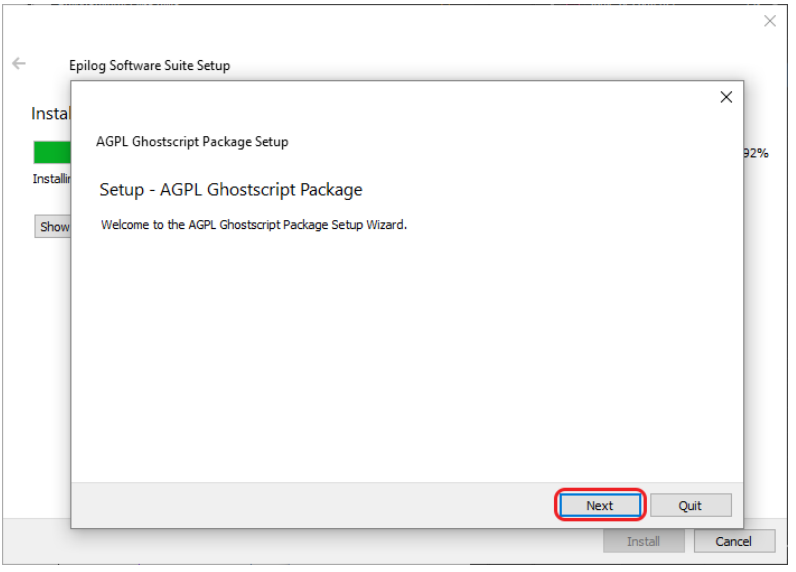
Epilog Software Suite のインストールが開始されます。インストール中に、AGPL Ghostscript パッケージもインストールするかどうかを確認するダイアログボックスが表示されます。「次へ」をクリックしてください。
ソフトウェアの設定:Ghostscriptのライセンス
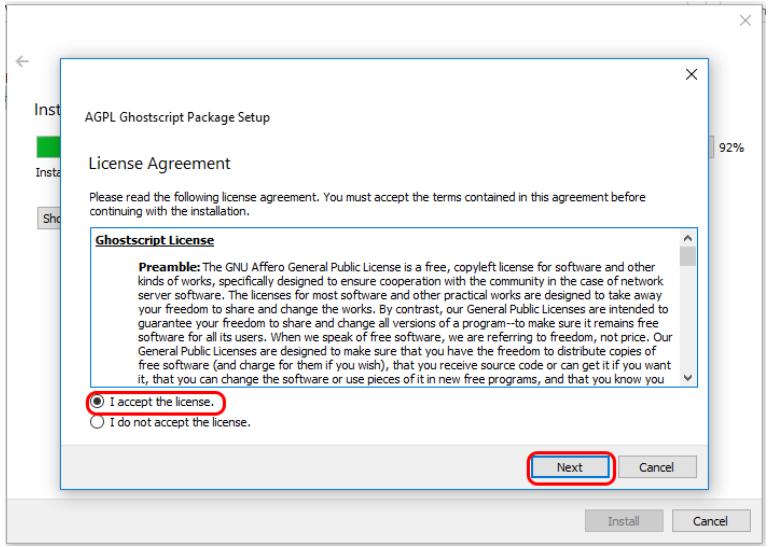
AGPL Ghostscript ライセンス契約書を読み、同意してから、「次へ」をクリックしてください。
ソフトウェアの設定:Ghostscript の設定を完了する
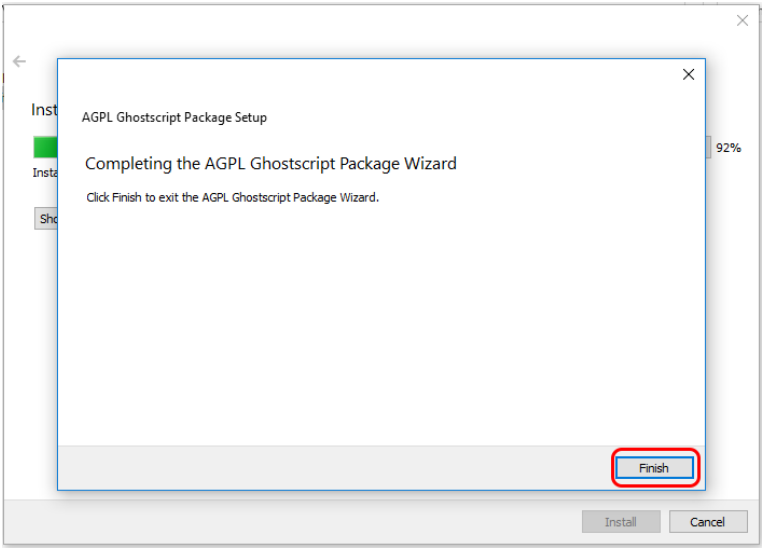
「完了」をクリックして、AGPL Ghostscript のインストールを完了し、Epilog Software Suite のインストールを再開してください。
ソフトウェアの設定:インストールの完了
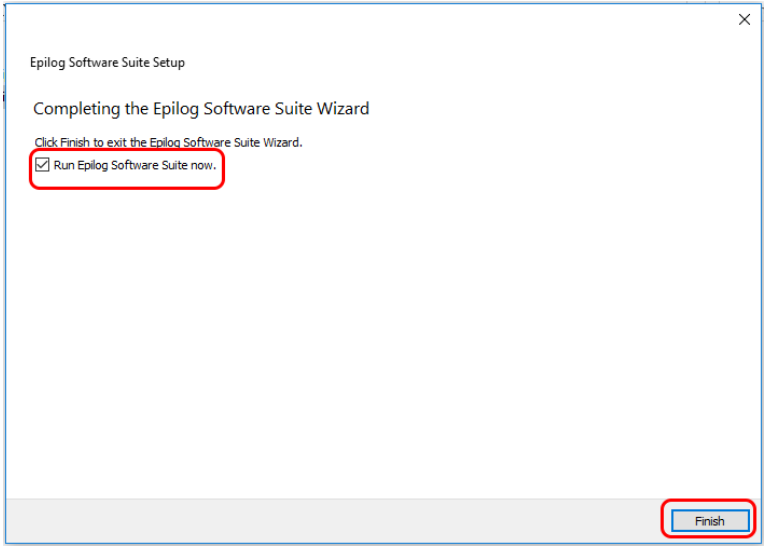
今すぐプログラムを実行するかどうかを選択してください。「完了」をクリックしてインストールを終了します。
ソフトウェアの設定:システムの追加
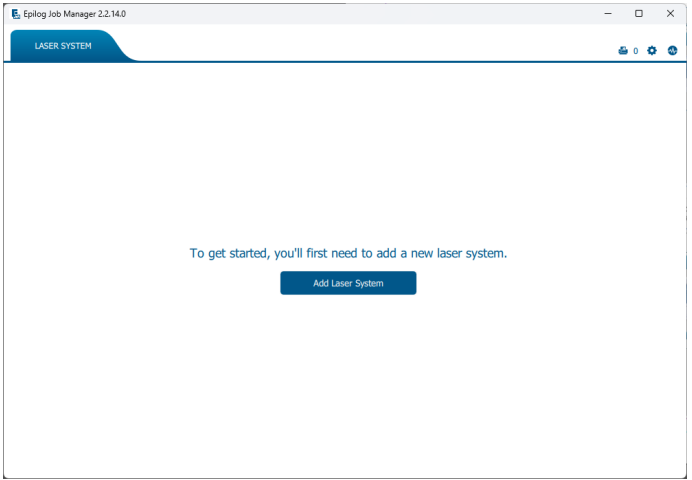
ジョブマネージャーを初めて開くと、この画面が表示されます。「レーザーシステムを追加」をクリックして、作業を開始してください。
ソフトウェアの設定:検出
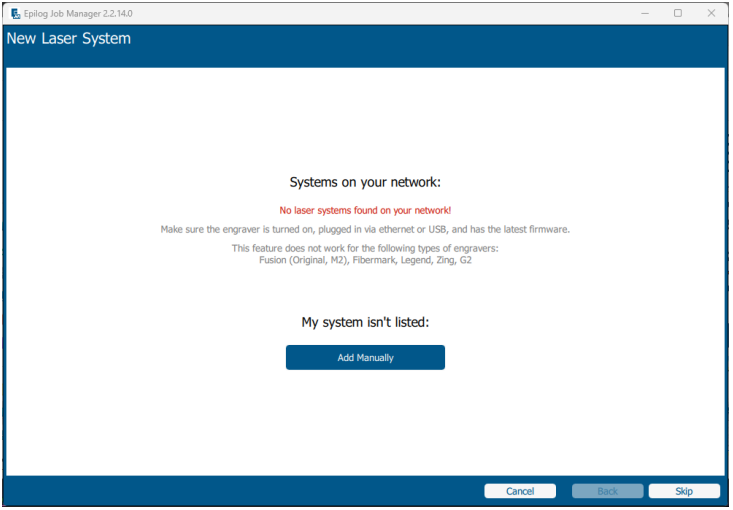
マシンが電源が入っており、コンピュータに接続されている場合、ジョブマネージャーがそれを検出し、マシンを追加できるようになります。「手動で追加」を選択して、手動で追加することも可能です。
ソフトウェアの設定:構成
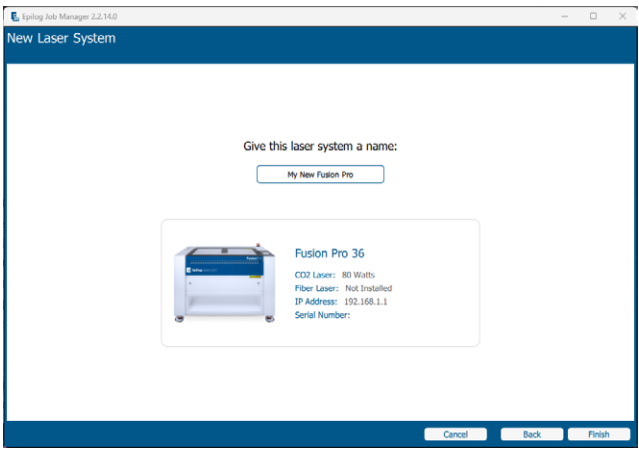
モデル一覧からご使用の機種を選択し、詳細な設定を行ってください:
- 機種・定格出力:お使いの機種を選択してください。
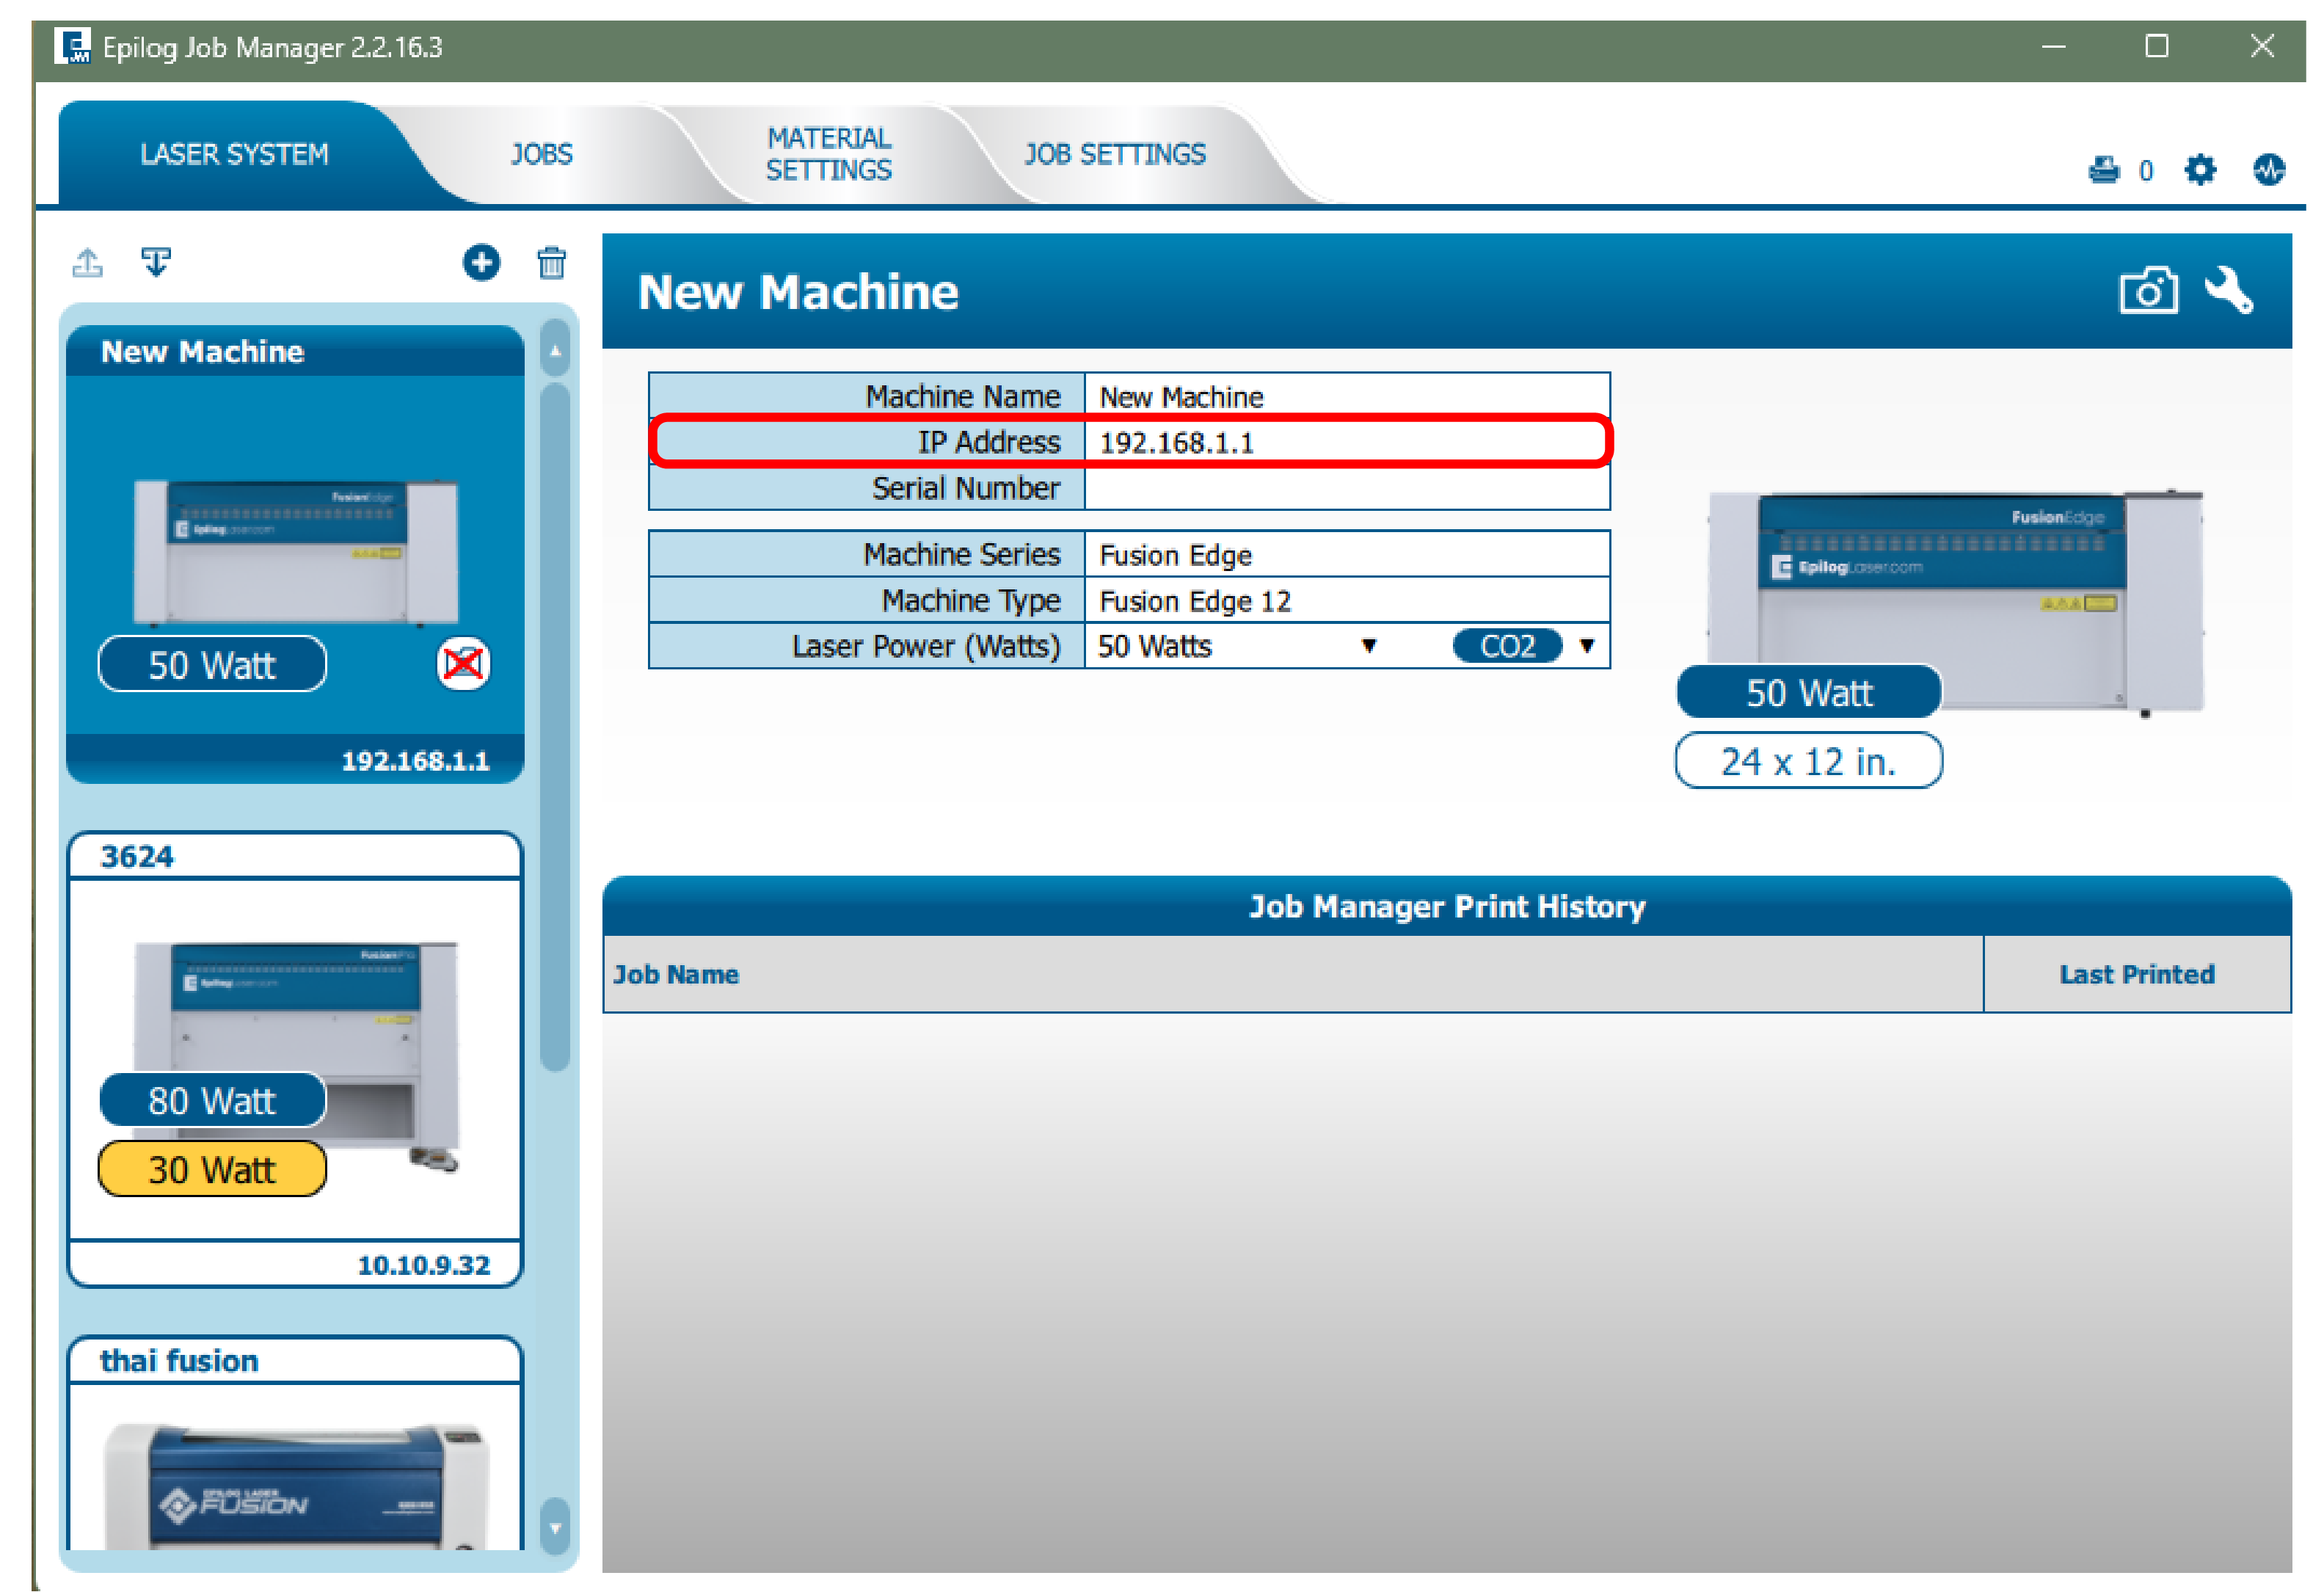
- IPアドレス:先ほど設定したIPアドレスを入力してください。
- シリアル番号と名前:お使いのマシンのシリアル番号を入力し、任意の名前を付けてください。
この情報を入力したら、「完了」をクリックしてください。
ソフトウェアの設定:アクティベーション
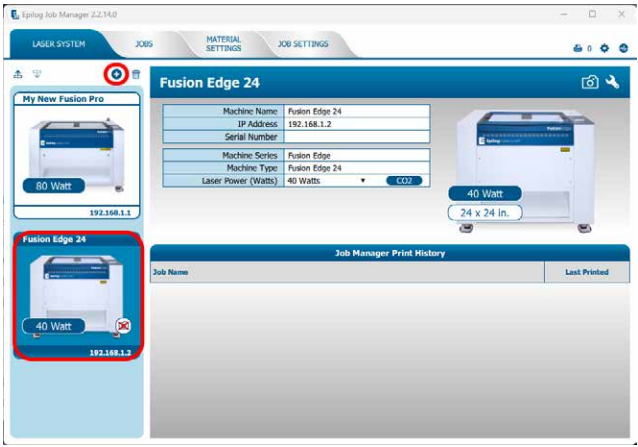
レーザーがジョブマネージャーに追加され、左側のパネルに表示されています。これでジョブを受け入れる準備が整いました。
ソフトウェアの設定:IPアドレスを入力してください
ソフトウェアスイートはすでにインストール済みですので、ジョブマネージャーに表示されているIPアドレスが、先ほどレーザーに割り当てたIPアドレスと一致していることを確認してください。
準備完了!
おめでとうございます!ソフトウェアの設定が完了しました。
トラブルシューティングのヒント:
- レーザーのIPアドレスが、ドライバーまたはソフトウェアのインストール時に入力したものと一致しているか確認してください。
- イーサネットを使用する際は、USBケーブルが接続されていないことを確認してください。
- 接続の問題が解決しない場合は、イーサネットケーブルを確認してください。
- ファイアウォールの設定でプリンターとの通信が許可されていることを確認してください。
ステップ 2:接続タイプを選択する
レーザーシステムをどのように接続しますか?
- USB:1台のコンピュータに直接、ケーブルで簡単に接続します。
- イーサネット:有線接続(PCに直接接続するか、ローカルネットワークルーターを経由するかのいずれか)。
- ワイヤレス(Wi-Fi):お使いのローカルWi-Fiネットワークへの有線接続なしの接続。
イーサネットの設定:接続タイプ
イーサネットケーブルはどのように配線されていますか?
- 直接接続:レーザーはコンピュータに直接接続されます。
- ネットワーク接続:レーザーはローカルネットワーク/ルーター/スイッチに接続されています。
USBの設定:電源と接続
- 本機の電源を入れてください。
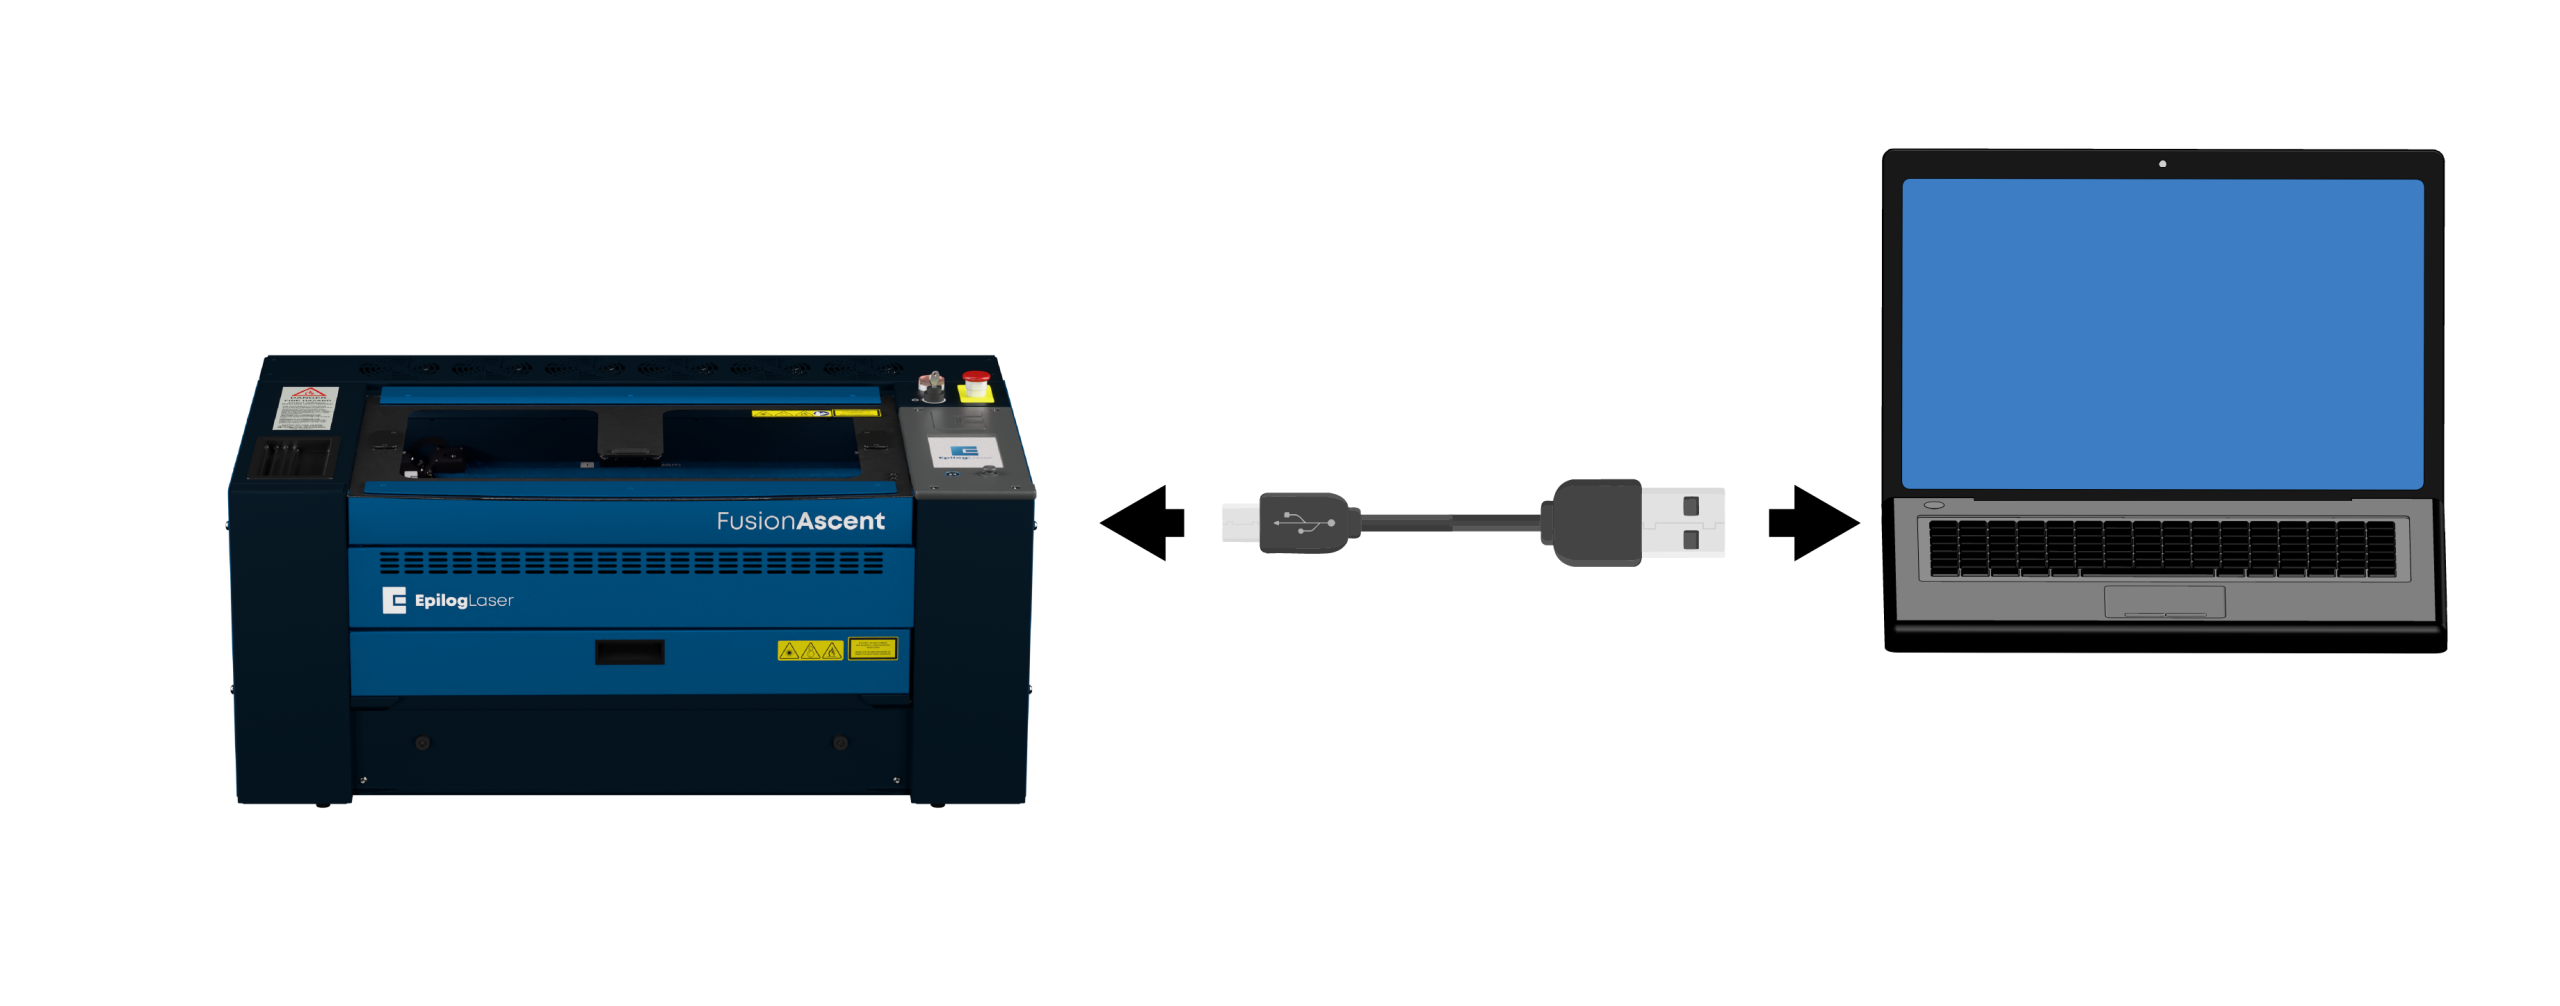
- レーザーをUSBケーブルでコンピューターに接続してください。
USBの設定:設定
表示パネルの右上隅にある歯車アイコンをクリックしてください。

USB設定:ネットワークメニュー
ネットワークを選択してください。

USBの設定:USBを選択
接続タイプとしてUSBを選択してください。
注:そのオプションが表示されない場合は、画面下部中央にある「編集」ボタンをクリックする必要があるかもしれません。

USB設定:デフォルトのIPアドレス
USB接続のデフォルトのIPアドレスは169.254.7.2です。緑色の矢印をクリックして設定を完了してください。
注:これは USB接続用の標準IPアドレスです。ソフトウェアの設定時に必要となるため、このIPアドレスをメモしておいてください。

USBの設定:マシンの設定が完了しました
これで、お使いのコンピュータとレーザーがUSB経由で通信できるようになりました。
ワイヤレス設定:設定
ワイヤレス設定:設定
表示パネルの右上隅にある歯車アイコンをクリックしてください。
ワイヤレス設定:ネットワークメニュー
ネットワークを選択してください。
ワイヤレス設定:ワイヤレスメニュー
ワイヤレスを選択してください。
注:そのオプションが表示されない場合は、画面下部中央にある「編集」ボタンをクリックする必要があるかもしれません。
ワイヤレスの設定:ネットワークを選択
リストからご利用の無線ネットワークを選択し、緑色の矢印をクリックして次に進んでください。
注:お使いのパソコンが接続しているのと同じWi-Fiネットワークを選択してください。

ワイヤレスの設定:セキュリティとパスワード
ネットワークのセキュリティプロトコルを選択し、パスワードを入力してください。最も一般的なタイプはWPA2 Personalです。

ワイヤレス設定:IPアドレス
「IPアドレスを自動的に取得する」を選択し、緑色の矢印をクリックして設定を完了してください。

ワイヤレス設定:機器の設定が完了しました
これで、お使いのレーザーはWi-Fiネットワーク経由で通信できるようになりました。
直接セットアップ:電源を入れて接続する
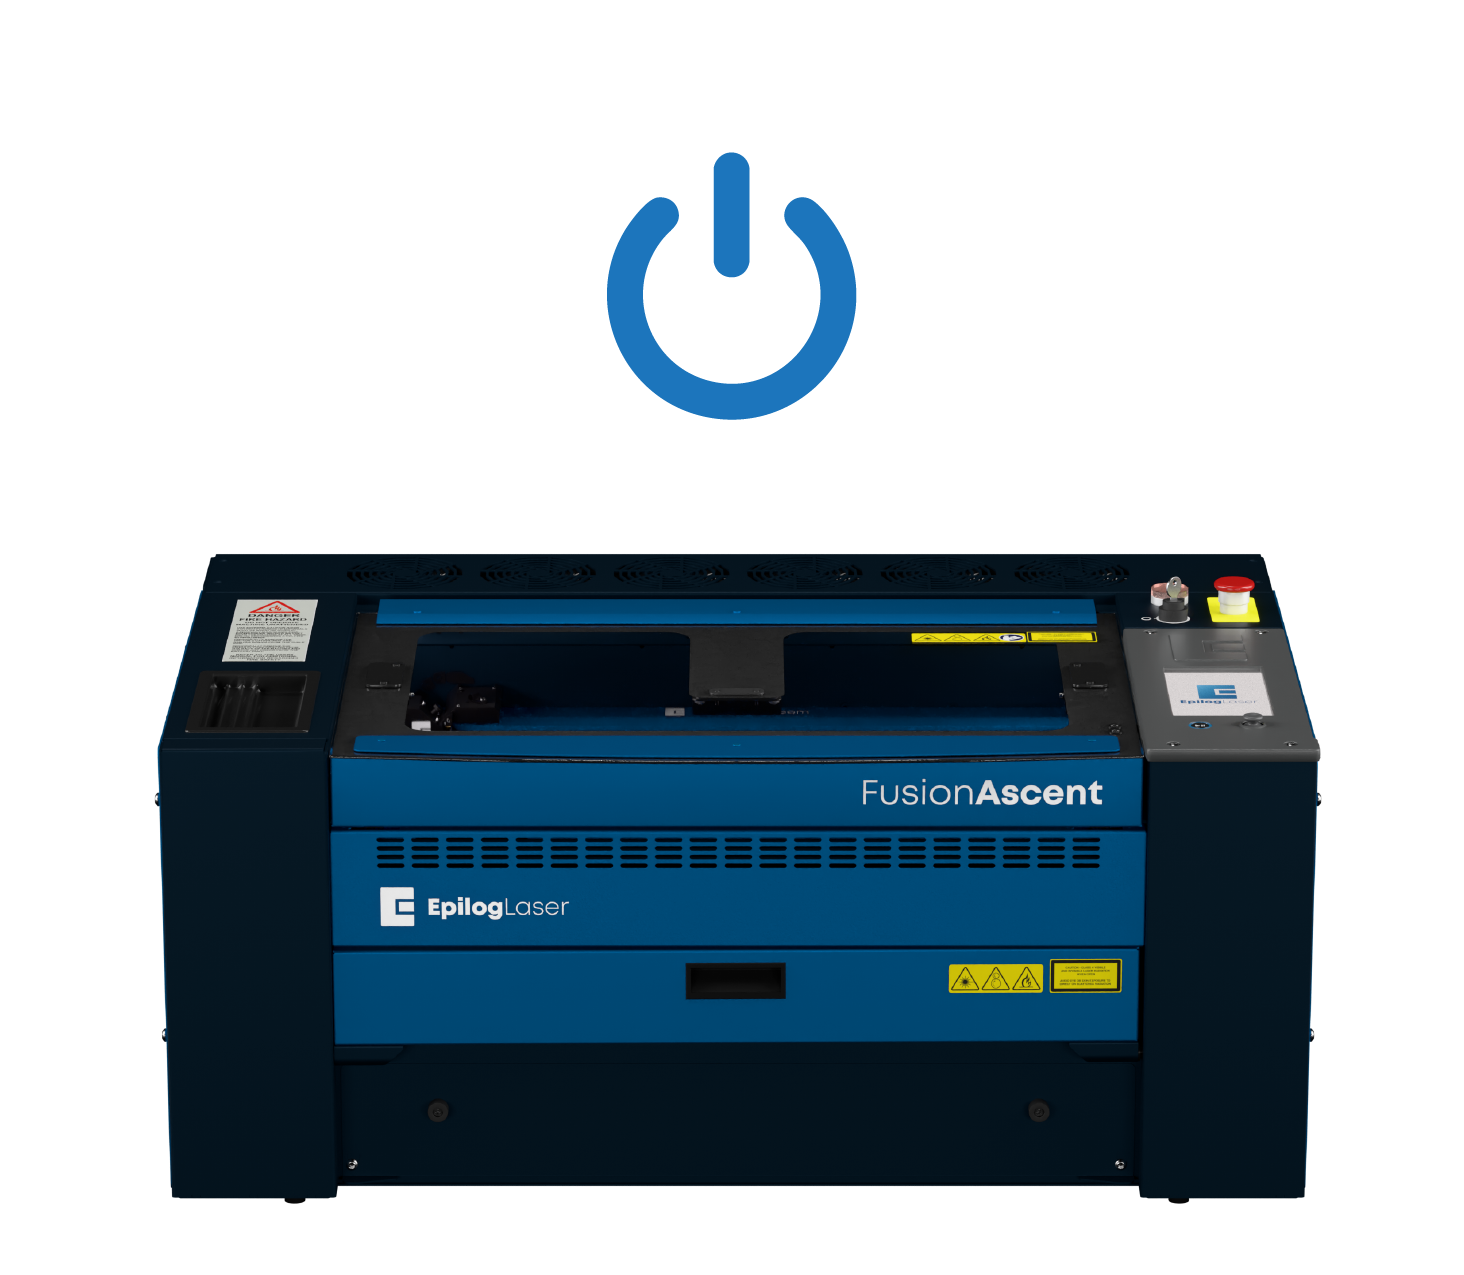
- 本機の電源を入れてください。
- レーザーをイーサネットケーブルでコンピューターに接続してください。
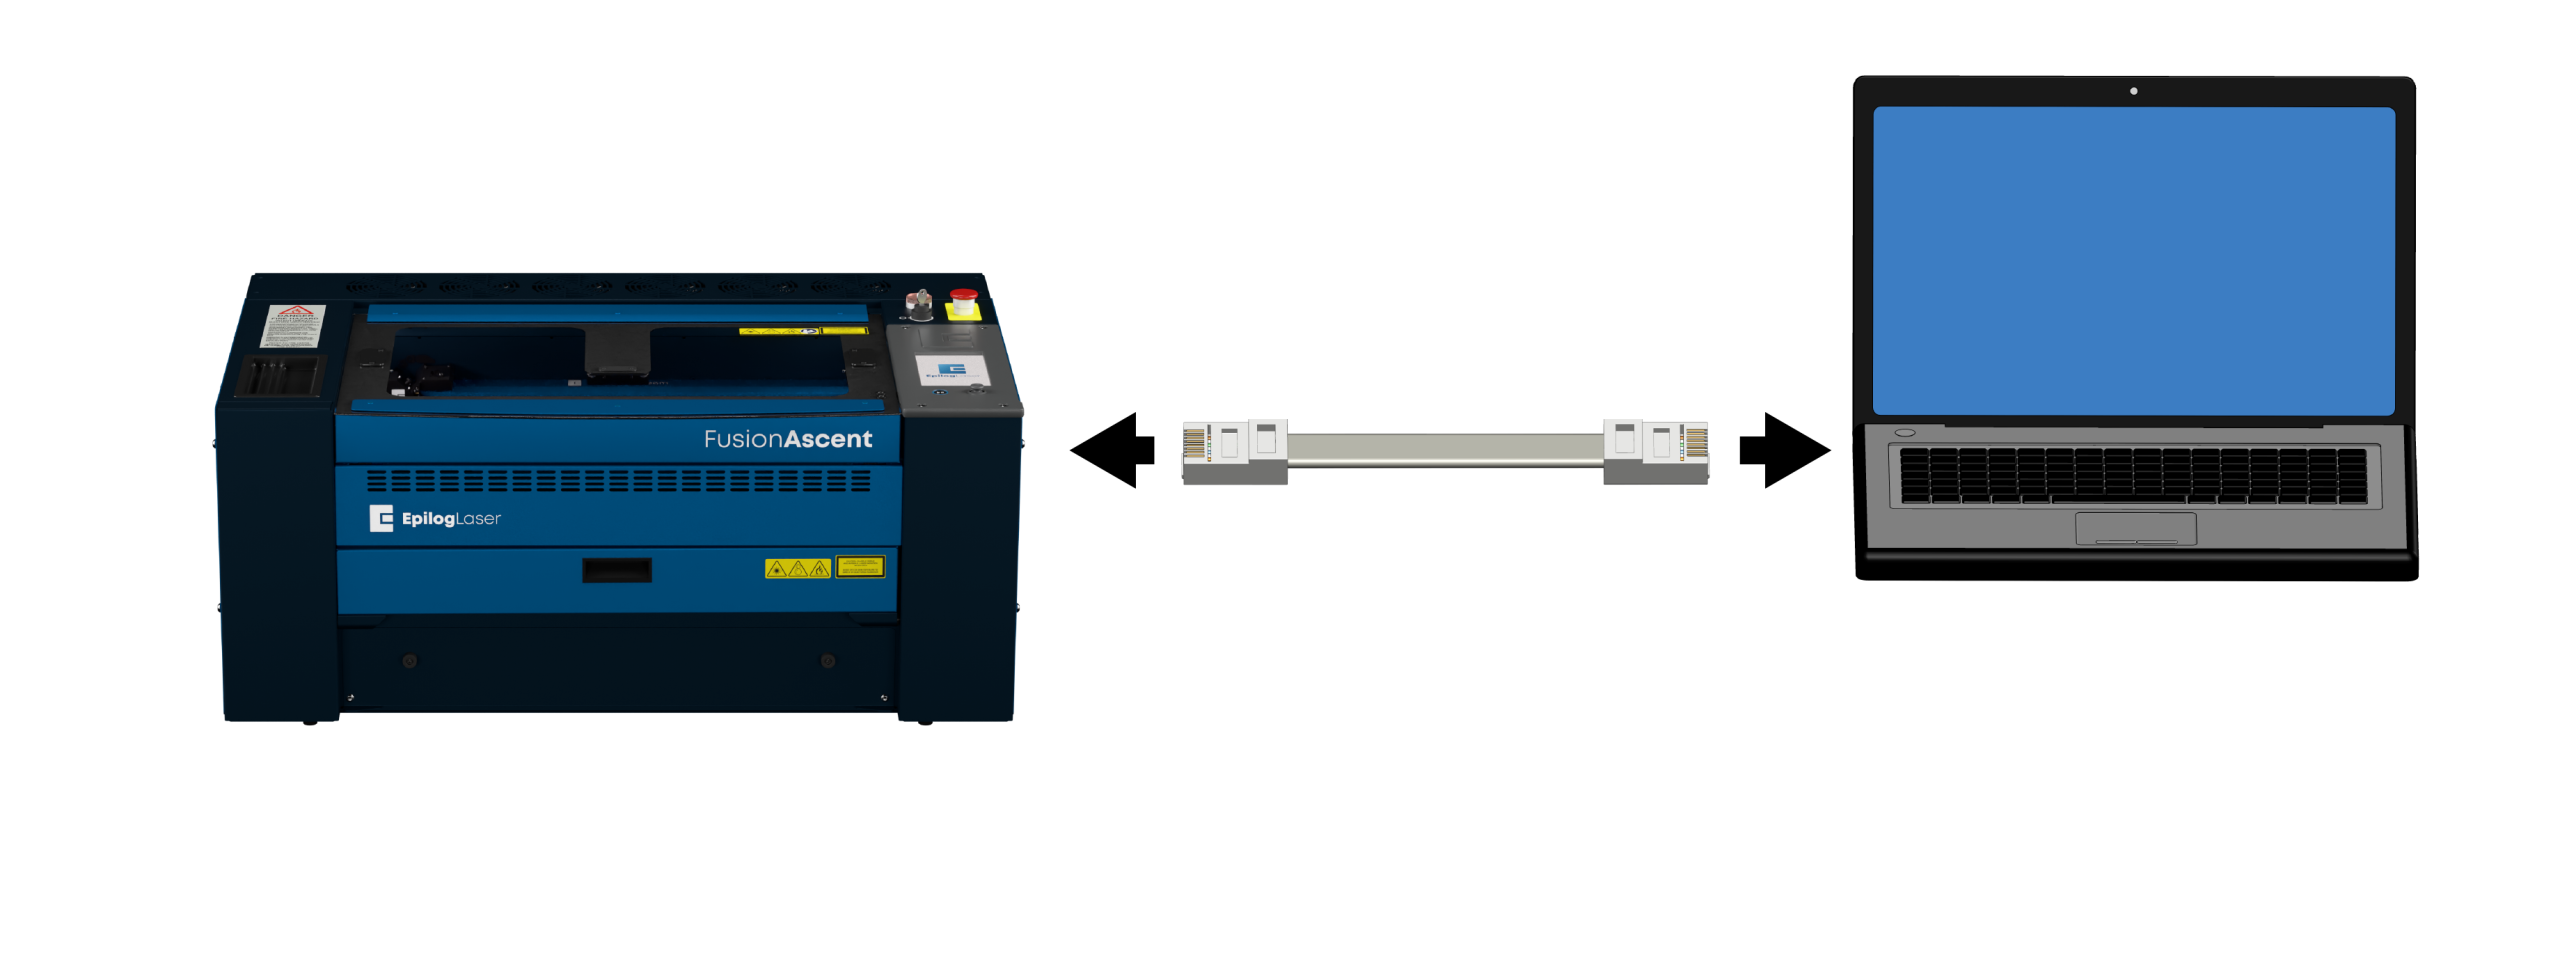
ダイレクトセットアップ:設定
表示パネルの右上隅にある歯車アイコンをクリックしてください。
直接設定:ネットワークメニュー
ネットワークを選択してください。
直接設定:イーサネットメニュー
イーサネットを選択してください。
注:そのオプションが表示されない場合は、画面下部中央にある「編集」ボタンをクリックする必要があるかもしれません。

直接設定:IPアドレスの割り当て
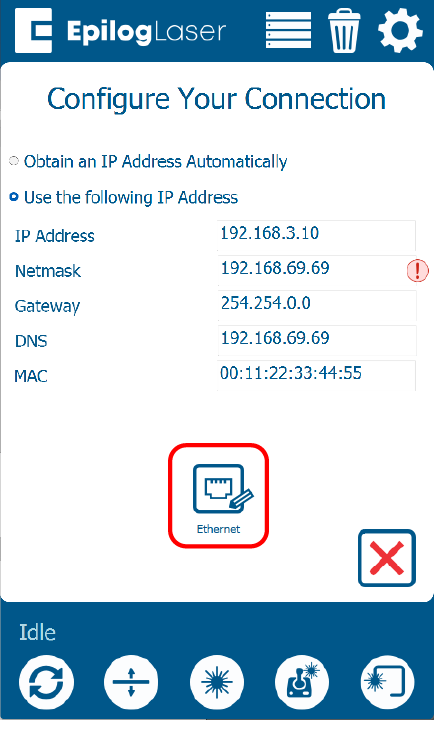
「次のIPアドレスを使用する」を選択します。「IPアドレス」フィールドに「192.168.3.4」と入力します。緑色の矢印をクリックしてIPアドレスを保存します。
注:これは 直接接続用の標準IPアドレスです。ソフトウェアの設定時に必要となるため、このIPアドレスをメモしておいてください。

直接設定:TCP/IPポートの設定
お使いのコンピューターでTCP/IPのポート設定を行ってください。
- TCP/IPポートの設定は、直接接続の場合にのみ必要です。
- コンピュータでTCP/IPポートの設定を行っていない場合は、お使いのオペレーティングシステムに応じて、以下の手順に従ってください。
Windows のセットアップ:ネットワークセンター
Epilog laserとイーサネットを直接接続するには、お使いのコンピュータに静的IPアドレスを割り当てる必要があります。PCで設定するTCP/IPのポートアドレスは、レーザーのIPアドレスとは異なります。
コントロールパネルからネットワークと共有センターを開きます。
Windows のセットアップ:アダプターの設定
アダプター設定の変更をクリックします。
Windows のセットアップ:接続のプロパティ
ローカルエリア接続(または「未識別ネットワーク」と表示されている接続)を右クリックし、[プロパティ] を選択します。
Windows のセットアップ:IPv4 の設定
インターネットプロトコル バージョン 4 (TCP/IPv4)を選択し、[プロパティ] をクリックします。
Windows のセットアップ:IP アドレスの割り当てと保存
「次のIPアドレスを使う」を選択し、IPアドレスとして192.168.3.3を入力してください。
サブネットマスクを255.255.255.0に設定し、[OK]をクリックして設定を保存します。
Windows のセットアップ:[設定] を開く
Epilog laserとイーサネットを直接接続するには、お使いのコンピュータに静的IPアドレスを割り当てる必要があります。PCで設定するTCP/IPのポートアドレスは、レーザーのIPアドレスとは異なります。
画面下部の検索バーに「設定」と入力してください。
Windows のセットアップ:[設定] を起動する
開くをクリックしてください。
Windows のセットアップ:ネットワークとインターネット
ネットワークとインターネットをクリックします。
Windows のセットアップ:詳細設定
詳細ネットワーク設定をクリックします。
Windows のセットアップ:アダプターを選択する
レーザーのイーサネット接続の横にあるドロップダウン矢印を選択してください。
Windows のセットアップ:設定の編集
「その他のアダプター設定」の横にある「編集」をクリックします。
Windows のセットアップ:IPv4 のプロパティ
インターネット プロトコル バージョン 4 (TCP/IPv4) を選択し、[プロパティ] をクリックします。
Windows のセットアップ:IP アドレスの割り当てと保存
「次のIPアドレスを使う」を選択し、IPアドレスとして192.168.3.3を入力してください。
サブネットマスクを255.255.255.0に設定し、[OK]をクリックして設定を保存します。
ダイレクトセットアップ:接続完了
これで、お使いのコンピュータとレーザーが直接通信できるようになりました。
ネットワーク設定:ケーブルを接続する
イーサネットケーブルを使って、レーザーをネットワーク(ルーターまたはスイッチ)に接続してください。
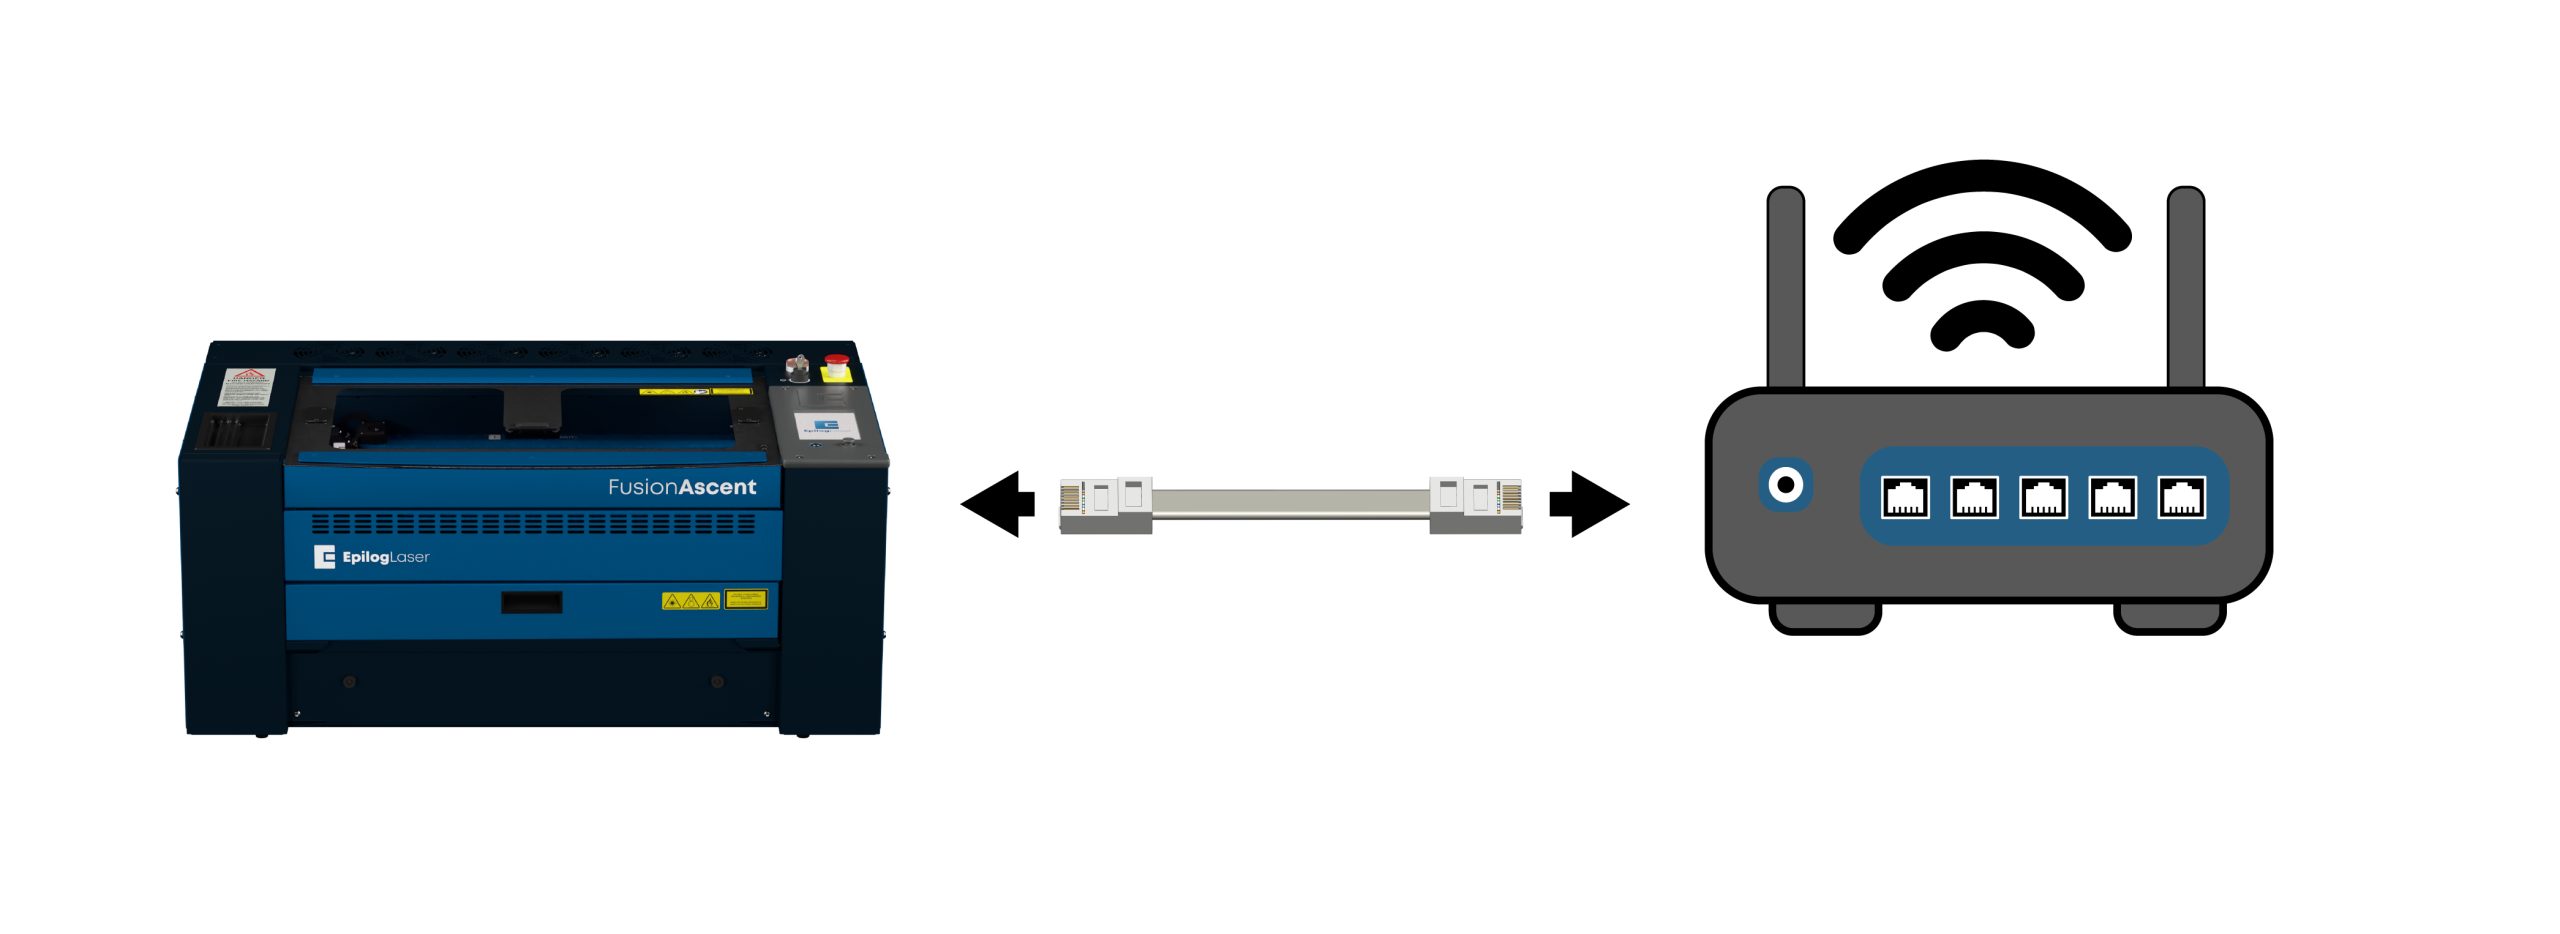
ネットワーク設定:設定
レーザーの表示パネルの右上隅にある歯車アイコンをクリックしてください。
ネットワーク設定:ネットワークメニュー
ネットワークを選択してください。
ネットワーク設定:イーサネットメニュー
イーサネットを選択してください。

ネットワーク設定:IPアドレスの取得
「IPアドレスを自動的に取得する」を選択します。緑色の矢印を押して設定を保存します。

ネットワーク設定:マシンの設定が完了しました
ハードウェア接続が確立されました。
ソフトウェアの設定:ソフトウェアを選択
レーザー加工機のセットアップが完了しました!次に、レーザー加工機へジョブを送信するために使用するソフトウェアを選択する必要があります。
- Epilog Software Suite: Windows 専用に設計された堅牢なデスクトップアプリケーション。
- Pulse App:標準的なウェブブラウザを使用すれば、あらゆるオペレーティングシステム(Mac、Windows、Linux、Chrome OS)で動作する、最新のブラウザベースのアプリケーションです。
どのソフトウェアを設定しますか?
ソフトウェアの設定:インストール状況
お使いのパソコンには、すでにEpilog Software Suiteがインストールされていますか?
ソフトウェアのセットアップ:解凍して実行
インストールファイルは.zip形式のフォルダとしてダウンロードされますので、解凍する必要があります。フォルダを右クリックし、「すべて展開」を選択してください。完了したら、「EpilogSuite」ファイルをダブルクリックしてください。
ソフトウェアの設定:ようこそ
ウェルカム画面が表示されたら、「次へ」をクリックします。
ソフトウェアの設定:ディレクトリを選択
「標準インストール」を選択し、「次へ」をクリックします。
ソフトウェアのセットアップ:使用許諾契約書
使用許諾契約書を読み、同意して、「次へ」をクリックしてください。
ソフトウェアの設定:インストール準備完了
「インストール」をクリックして、インストールを開始してください。
ソフトウェアの設定:Ghostscriptのインストール
Epilog Software Suite のインストールが開始されます。インストール中に、AGPL Ghostscript パッケージもインストールするかどうかを確認するダイアログボックスが表示されます。「次へ」をクリックしてください。
ソフトウェアの設定:Ghostscriptのライセンス
AGPL Ghostscript ライセンス契約書を読み、同意してから、「次へ」をクリックしてください。
ソフトウェアの設定:Ghostscript の設定を完了する
「完了」をクリックして、AGPL Ghostscript のインストールを完了し、Epilog Software Suite のインストールを再開してください。
ソフトウェアの設定:インストールの完了
今すぐプログラムを実行するかどうかを選択してください。「完了」をクリックしてインストールを終了します。
ソフトウェアの設定:システムの追加
ジョブマネージャーを初めて開くと、この画面が表示されます。「レーザーシステムを追加」をクリックして、作業を開始してください。
ソフトウェアの設定:検出
マシンが電源が入っており、コンピュータに接続されている場合、ジョブマネージャーがそれを検出し、マシンを追加できるようになります。「手動で追加」を選択して、手動で追加することも可能です。
ソフトウェアの設定:構成
モデル一覧からご使用の機種を選択し、詳細な設定を行ってください:
- 機種・定格出力:お使いの機種を選択してください。
- IPアドレス:先ほど設定したIPアドレスを入力してください。
- シリアル番号と名前:お使いのマシンのシリアル番号を入力し、任意の名前を付けてください。
この情報を入力したら、「完了」をクリックしてください。
-
IPアドレスの確認方法についてお困りですか?
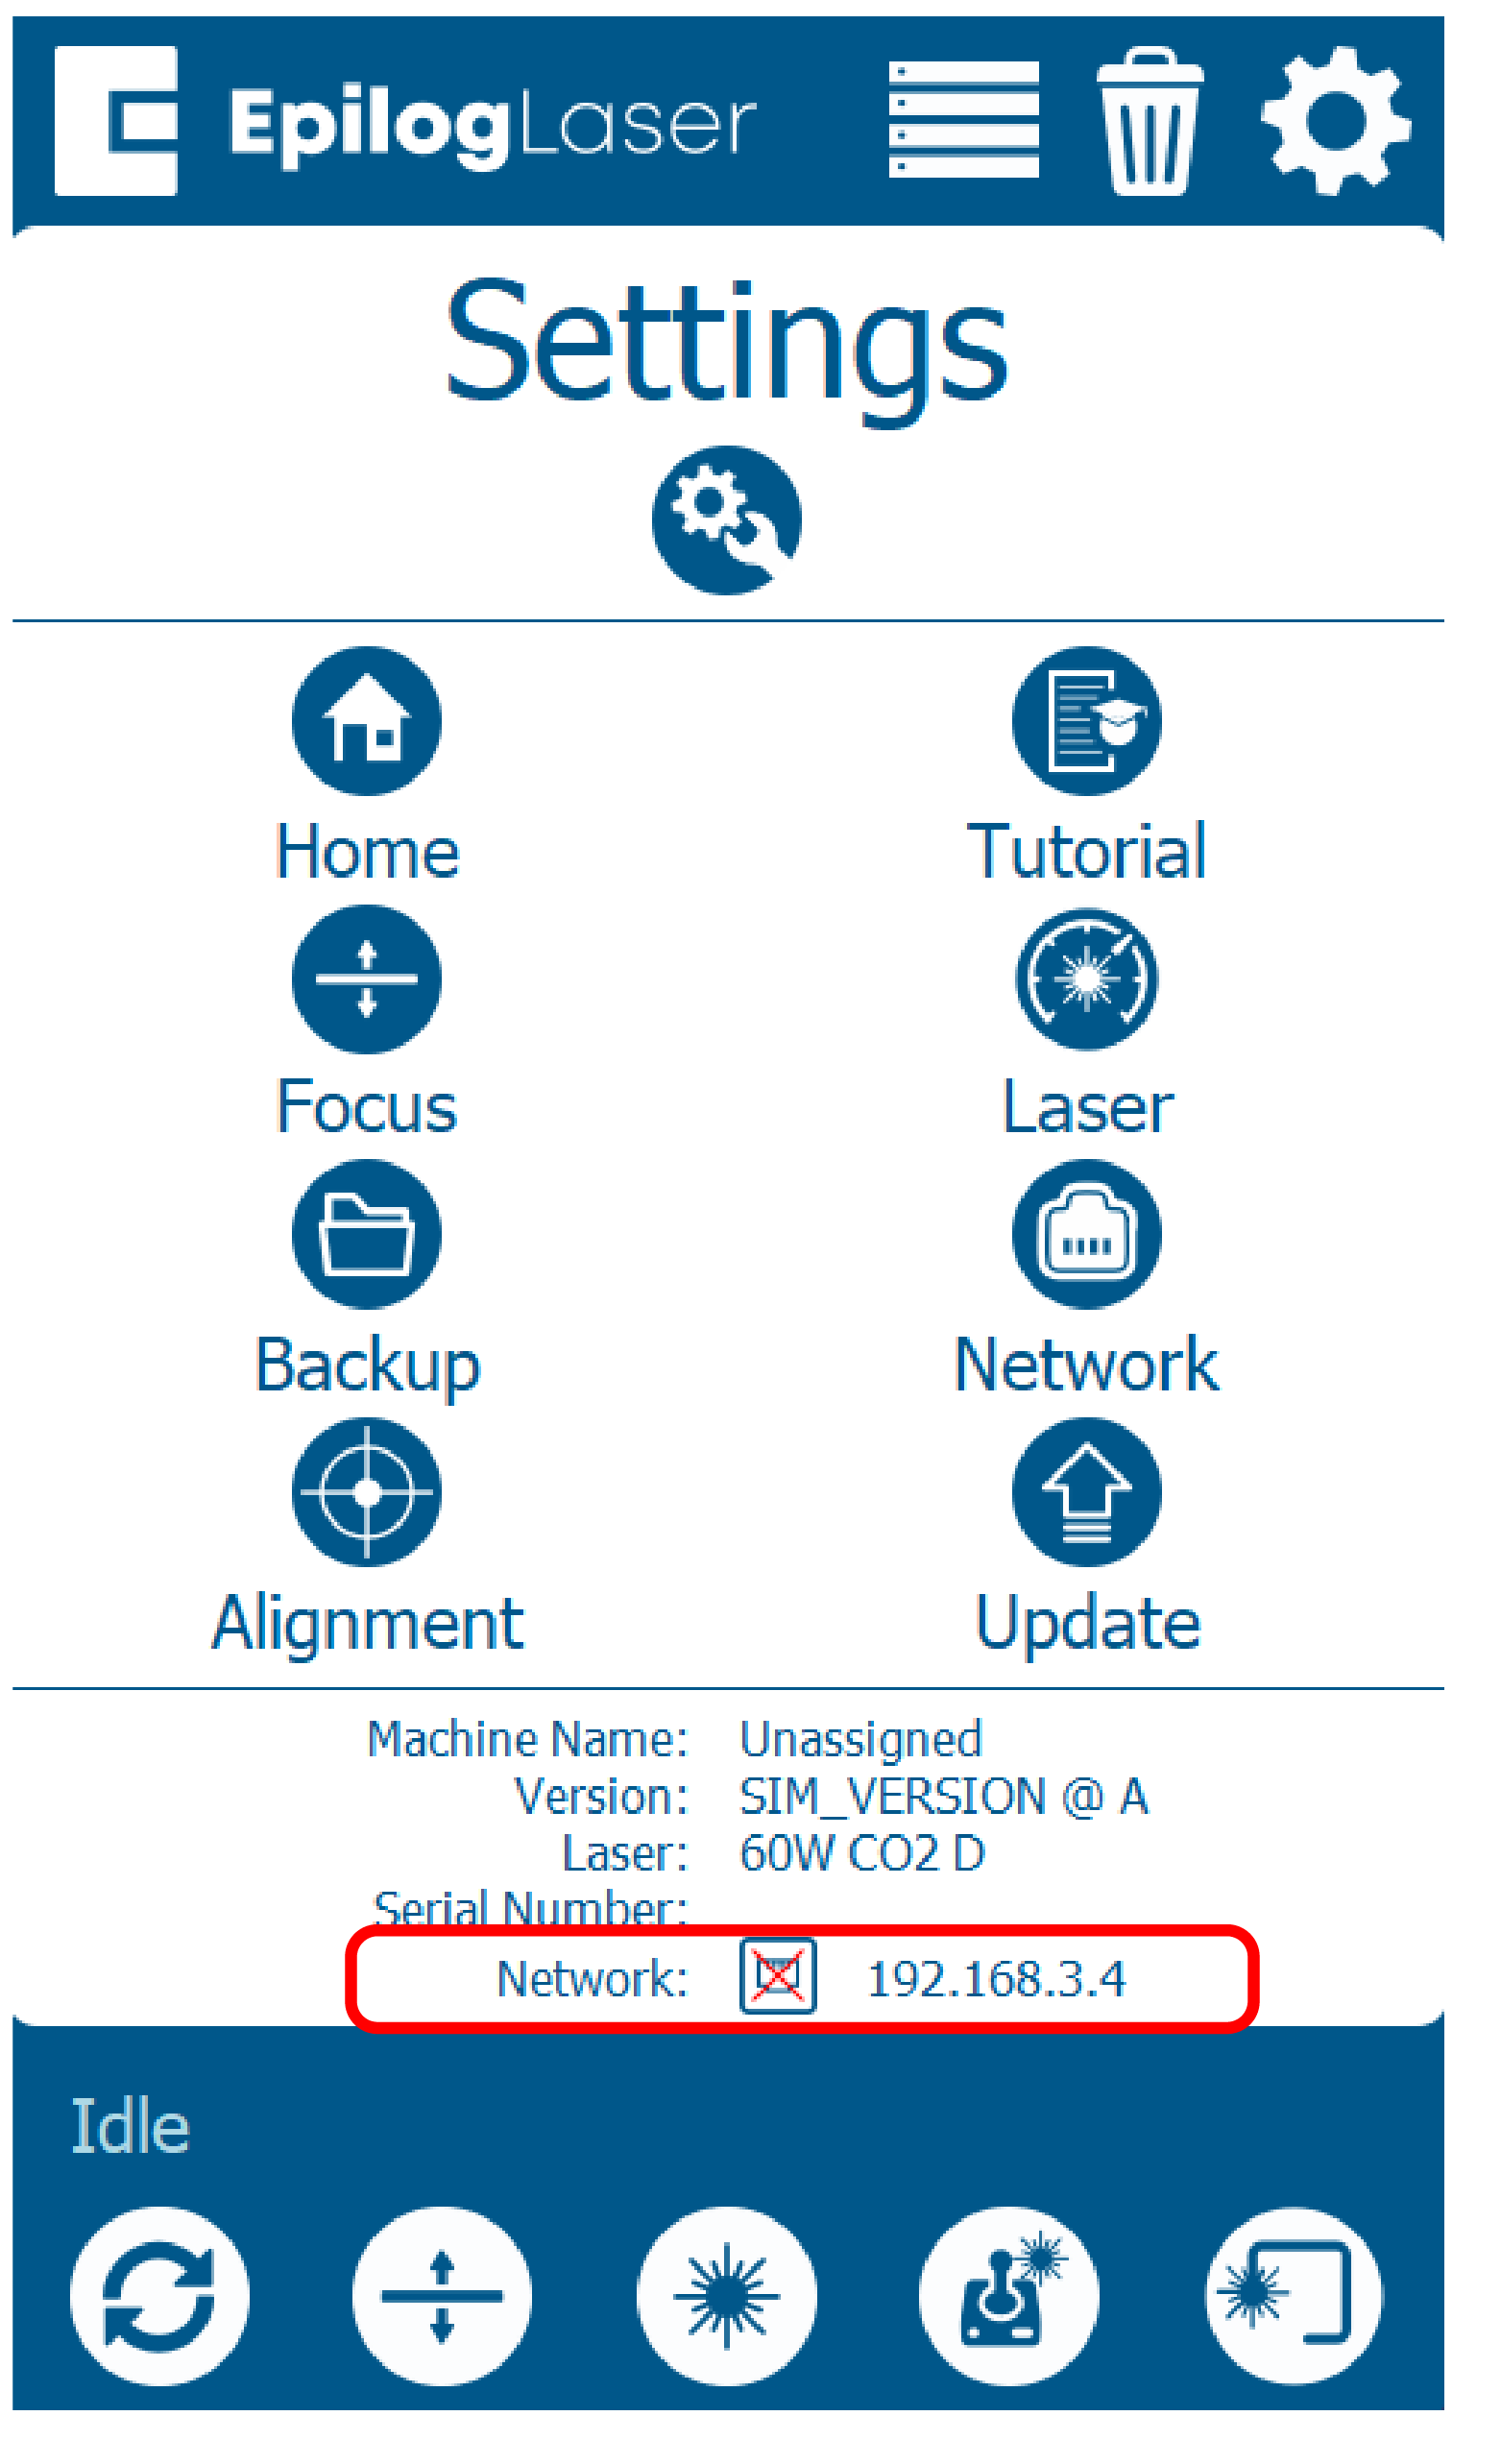
レーザーのIPアドレスを確認するには、レーザーのディスプレイパネルを表示してください:
- 歯車アイコンをクリックしてください。
- 現在のIPアドレスは、画面下部の「ネットワーク」の下に表示されます:
ソフトウェアの設定:アクティベーション
レーザーがジョブマネージャーに追加され、左側のパネルに表示されています。これでジョブを受け入れる準備が整いました。
「追加」または「削除」ボタンを使用して、マシンを追加または削除してください。
ソフトウェアの設定:IPアドレスを入力してください
ソフトウェアスイートはすでにインストール済みですので、ジョブマネージャーに表示されているIPアドレスが、先ほどレーザーに割り当てたIPアドレスと一致していることを確認してください。
-
IPアドレスの確認方法についてお困りですか?
レーザーのIPアドレスを確認するには、レーザーのディスプレイパネルを表示してください:
- 歯車アイコンをクリックしてください。
- 現在のIPアドレスは、画面下部の「ネットワーク」の下に表示されます:
パルスの設定:アプリケーションを起動する
- ウェブブラウザのウィンドウを開く。
- アドレスバーに「http://」と入力し、その後にレーザーのIPアドレスを入力してください。例:http://192.168.3.4
- Enterキーを押してください。
- Pulseアプリはウェブブラウザのウィンドウに読み込まれます。
-
IPアドレスの確認方法についてお困りですか?
レーザーのIPアドレスを確認するには、レーザーのディスプレイパネルを表示してください:
- 歯車アイコンをクリックしてください。
- 現在のIPアドレスは、画面下部の「ネットワーク」の下に表示されます:

パルスの設定:ファイルを開く
- 「ファイルを開く」を選択します。
- ファイルを選択し、「開く」をクリックしてください。


パルスの設定:設定と送信
- 「プロセス」の右側の列にある「彫刻/カット」のサムネイルをクリックします。速度と出力を設定し、「完了」をクリックします。
- 「送信」をクリックしてください。


パルスの設定:ジョブを実行
- ファイルがレーザーのディスプレイパネルに表示されていることを確認してください。
- 材料を装填してください。
- ジョブを選択してください。
- レーザーの再生/一時停止ボタンをクリックしてジョブを実行します。
準備完了!
おめでとうございます!レーザーとソフトウェアの設定が完了しました。