メインコンテンツへスキップ

定規ガイドの直角調整

Helix定規ガイドを再調整するにはどうすればよいですか?

はじめに

マシンタイプ:エピログ ミニ 18/24、Helix

定規が誤って、または意図的に移動された場合、元の位置に戻したいときは、以下の簡単な手順に従うことで操作をガイドします。

  • 電源を切ってください。
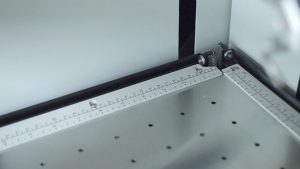
  • テーブルの全長にわたり幅2インチ(約5cm)のマスキングテープを貼り、さらにテーブルの左側面に幅2インチのテープを貼ります。テープは定規が現在置かれている位置にぴったりと密着させる必要があります。この作業を両側(後部と左側)で行い、貼るテープの長さは定規本体と同じ長さであるべきです。
  • お使いのコンピュータで、描画プログラム(Corel、AutoCAD)を使用し、ページ上部から1インチの位置にベクター線を1本、ページ左端から1インチの位置に別の線を1本描画してください。線は水平定規と垂直定規と同じ長さにしてください。その後、ジョブを彫刻機に送信し、ジョブが受信され緑色のランプが消灯したら「GO」を押してください。
  • レーザーが刻んだ線を定規から測定してください。線が正確に1インチであれば、その定規を調整する必要はありません。1インチでない場合は、定規を固定している3組のネジを緩める必要があります。ネジ穴は実際にはスロット状になっており、定規を前後にスライドさせて希望の位置に合わせ、その位置でネジを締め付けることができます。
  • 一つの定規にこの操作を完了したら、次の定規にも同じ手順を適用できます。
[helpful]
  • ID:
    KA-01019
  • 日付:
    2024年9月27日
/* === Aggressive removal of PrintFriendly injected header elements === */ #printfriendly #pf-title, #printfriendly #pf-src, #printfriendly .pf-header, #printfriendly header, #printfriendly .printfriendly-header, #printfriendly h1:first-of-type, #printfriendly .page-header, #printfriendly [class*="header"], #printfriendly [id*="header"] { display: none !important; visibility: hidden !important; height: 0 !important; margin: 0 !important; padding: 0 !important; } /* Hide any top bar or source URL container */ #printfriendly #pf-src, #printfriendly .pf-src, #printfriendly [class*="src"], #printfriendly [class*="url"] { display: none !important; } /* Force page margins and centered page numbers */ @page { size: letter portrait; margin: 0.7in 0.5in; } @page :left, @page :right { @top-left { content: none !important; } @top-center { content: none !important; } @top-right { content: none !important; } @bottom-center { content: counter(page); font-size: 0.95em; padding-bottom: 25px; } }