
所要時間:20~30分 •難易度:中級
この手順書は、Legend EXTレーザーシステムのメインコントローラーボードの取り外しと交換プロセスをガイドします。以下の手順に従うことで、精密電子機器の安全な取り扱い、適切な再接続、および設置後のダウンタイム最小化が保証されます。
重要:コントローラボードを取り扱う際は、必ず付属の静電気防止リストストラップを着用してください。静電気放電により、繊細な部品が永久的に損傷する恐れがあります。
注:マシンがまだ起動する場合は、セットアップ時間を節約するため、基板を取り外す前に手順1を完了してください。起動しない場合は、手順2に直接進んでください。新しい基板にはシステム設定が事前にプログラムされています。
準備
-
Record system settings (if the machine boots).
Before removing the controller board, record the following values from the Function and Configuration menus. These will need to be re-entered after installation:彫刻機の機能メニューにアクセスするには、コントロールパネルの「GO」ボタンと「ポインター」ボタンの両方を長押しします。利用可能なメニュー項目を切り替えるには、「GO」ボタンを繰り返し押してください。
設定 現在の価値 シリアル番号 IPアドレス サブネットマスク ゲートウェイ 設定メニューから、後で再入力するために以下の設定を記録してください。設定メニューを切り替えるには、コントロールパネルの右矢印(▶)を押してください。
設定 現在の価値 X-ホーム Yホーム
コントローラボードの取り外し
-
Power down the engraver.
Turn off the machine and unplug it from the power source before beginning. -
Remove the left side panel.
This provides access to the controller board assembly. -
Disconnect all five electrical connectors.
Carefully unplug each cable from the controller board. -
Remove the controller board screws.
Use a screwdriver to remove the four corner screws securing the board. -
Remove and replace the controller board.
Lift the old board out of the chassis, place the new board in position, and secure it with the four screws.
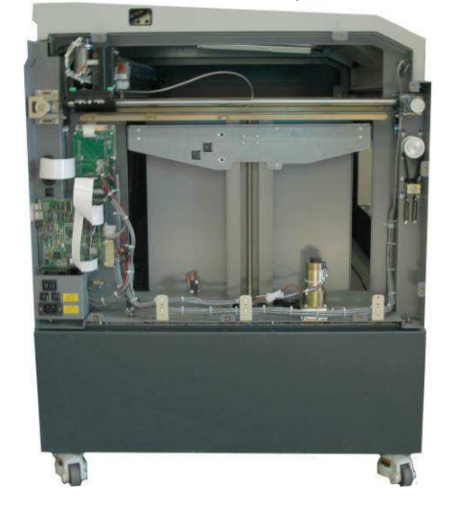
画像1:左側パネルを取り外した状態。
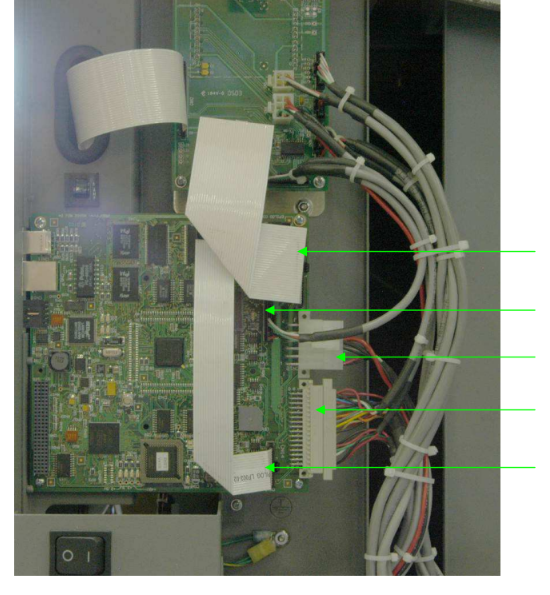
画像2:電気接続の切断
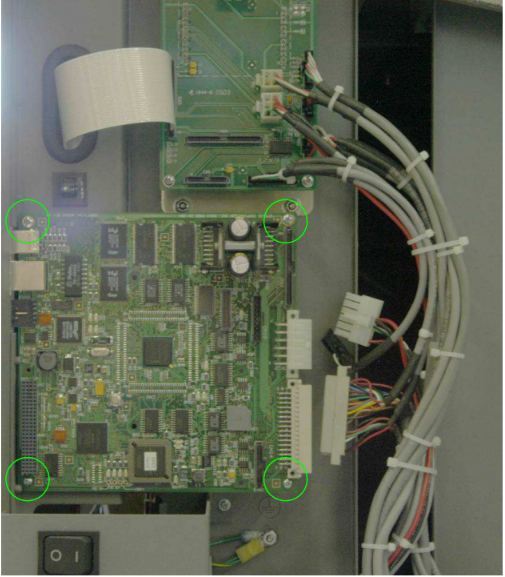
画像3:コントローラー基板のネジを外す。
画像4:新しい制御基板の取り付け完了。
コントローラボードの取り付け
-
Reconnect all five electrical connectors.
Ensure each cable is firmly seated in its correct port. -
Reinstall the side panel.
Secure the left panel back onto the engraver chassis. -
Power on the machine.
Reconnect power and turn the engraver back on. -
Re-enter saved settings.
Use the values recorded earlier to restore your network and configuration parameters.
画像5:電気接続の再接続。