Photo Laser Engraving on Wood - CorelDRAW X5 - 2018
How do I prepare a photo for laser engraving on wood using CorelDRAW?
Click the link below to download the .zip file for the Wood Photo Engraving Macro, then unzip the file. Instructions for installation are included with the download, and are located at the bottom of this page.
How to Process a Photo for Laser Engraving on Wood
Open the photo for laser engraving on wood in CorelDRAW, then resize and crop the photo to the final size you are going to engrave.
Note: It’s very important not to change the size of your photo once you convert the photo to a Black and White 1-bit photo in the final step of this process.
Example Photo:
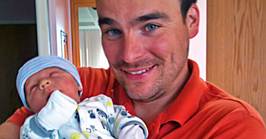
-
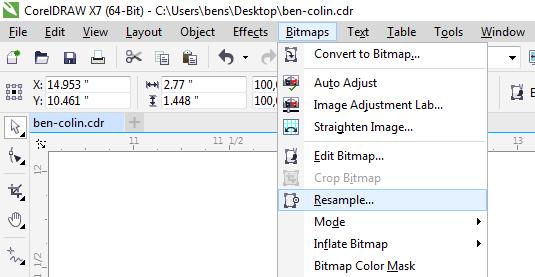
With your photo imported and selected in CorelDRAW, open the Resampling Palette by selecting Bitmaps/Resample from the drop down menu.
-
In the Resample Palette, change the DPI to 600, and then click OK.
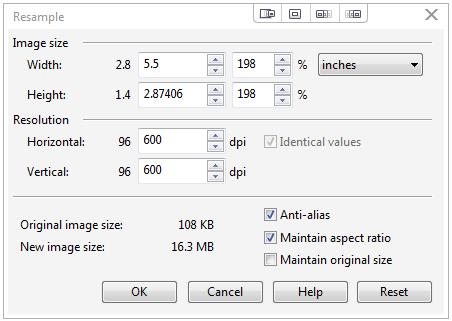
Now the real fun begins! There are 4 different CorelDRAW effects/filters we are going to apply to the photo.
- Gamma
- Unsharp Mask
- Sharpen
- Convert to Black & White (1-bit) with Halftone Dither
Gamma Adjustment Filter: The Gamma filter allows you reveal detail in the low-contrasting areas of a photo without significantly affecting the shadows or highlights.
With the photo still selected, start by opening the Gamma adjustment palette. Select Effects/Adjust/Gamma from the drop-down menu.
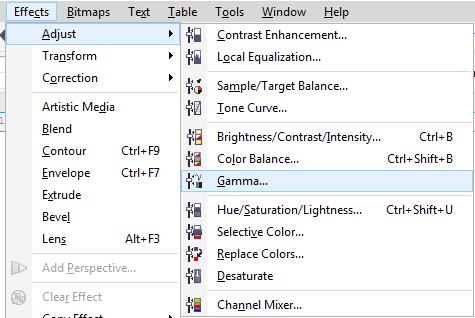
In the Gamma Palette enter the value 3.5, and then click OK. This will brighten every value in the photo and bring out detail in the dark or shadowed areas.

Results: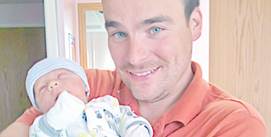
Unsharp Mask Filter: This filter accentuates edge detail and focus blurred areas in the photo without removing low-frequency areas. Low-frequency areas are the areas in a photo with subtle or smooth tonal changes - a good example is a portrait photo.
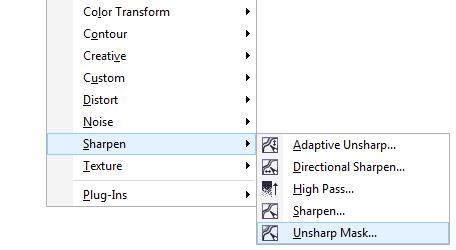
Select Bitmaps/Sharpen/Unsharp Mask from the drop-down menu, to open the Unsharp Mask palette.
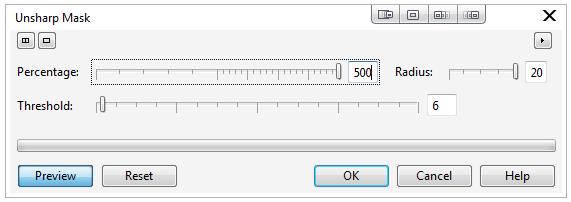
In the Unsharp Mask palette enter these values Percentage 500, Radius 20, and Threshold 6, and then click OK.
Results: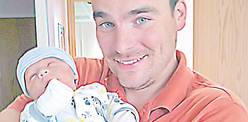
Sharpening: The Sharpen filter accentuates the edges of the photo by focusing on blurred areas and increasing the contrast between neighboring pixels. The result creates greater contrasted edges in the photo.
Open the Sharpening palette by selecting Bitmaps/Sharpen/Sharpen from the drop-down menu.
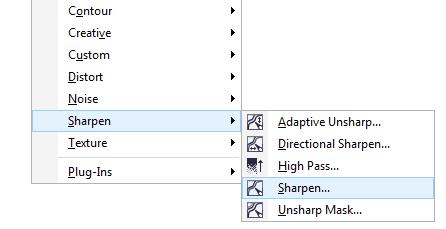
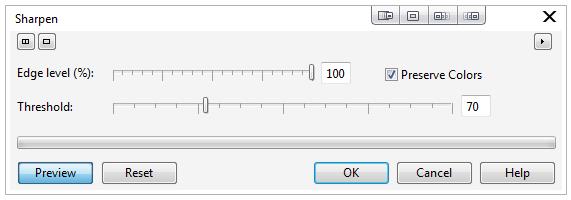
In the Sharpen filter palette enter these values, Edge Level (%) 100, check the box for Preserve Colors, and Threshold 70, and then click OK.
Convert to Black & White (1-bit) Photo (Halftone Dither): When a photo is converted to a Black and White photo, each pixel in the photo is either converted to black or white. There are different types of dithering patterns applied to black and white photos: Halftone, Line Art, Ordered, Jarvis, Stucki, Floyd-Steinberg, and Cardinality-Distribution. When engraving a photograph on wood, a Halftone dither works best. A Halftone dither tricks the eye into seeing different shades of gray by varying the pattern and density of black and white pixels in a photo. When applying a Halftone dither, we are able to vary the screen type, angle for the halftone, lines per unit, and the unit of measure.
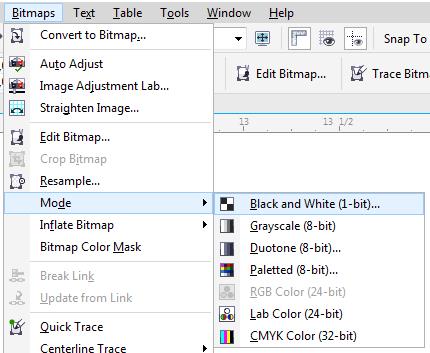
Open the Convert to 1 Bit palette by selecting Bitmaps/Mode/Black and White (1-bit) from the drop-down menu.
With the Black and White palette open, select Halftone for the Conversion Method, select Line as the Screen type, enter 0 degrees, and 100 lines per inch, and then click OK.
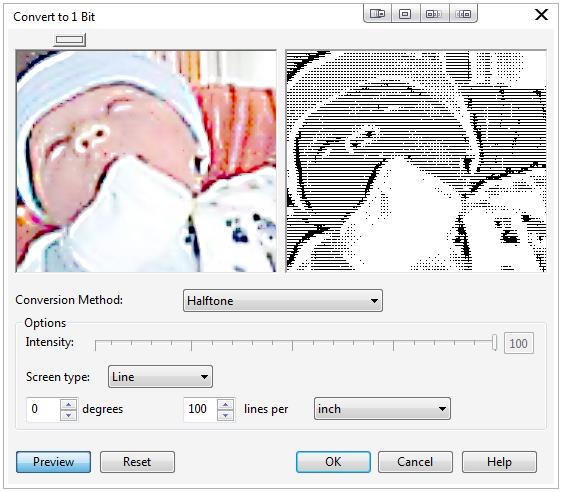
Results:
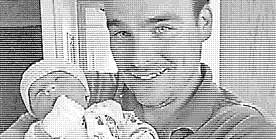
- The only thing left is to print to your Epilog Laser system!
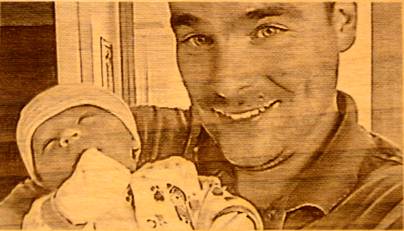
- The wood engraving below was engraved using the Epilog Mini 40-watt system.
- Speed 60%
- Power 100%
- 600 DPI
- Dithering: Jarvis
- Final Engraving:
How to install the Wood Photo Engraving Macro for CorelDRAW
Click the button below, to download the .zip file for the Wood Photo Engraving Macro, then unzip the file
-
Next, open the CorelDRAW GMS folder for your version of CorelDRAW (X5 - 2018). To open the GMS folder copy the folder address below that matches your version of CorelDRAW, and paste it into a Windows folder browser window.
Note: If you are having an issue installing the macro you may need to run the repair process to correct your version of CorelDRAW and install the Visual Basic Application tools which runs the macros within CorelDRAW. You'll need the original disc or downloaded install file to run the repair process.

CorelDRAW X5:
C:\Users\%USERPROFILE%\AppData\Roaming\Corel\CorelDRAW Graphics Suite X5\Draw\GMSCorelDRAW X6:
C:\Users\%USERPROFILE%\AppData\Roaming\Corel\CorelDRAW Graphics Suite X6\Draw\GMSCorelDRAW X7:
C:\Users\%USERPROFILE%\AppData\Roaming\Corel\CorelDRAW Graphics Suite X7\Draw\GMSCorelDRAW X8:
C:\Users\%USERPROFILE%\AppData\Roaming\Corel\CorelDRAW Graphics Suite X8\Draw\GMS -
Copy the Photo_Wood_EpilogLaser.gmsfile from the unzipped folder into the CorelDRAW GMS folder.
To check that the installation worked start CorelDRAW, open the Macro Manager (Windows/Dockers/Macro Manager or Alt + Shift + F11), and you should now see the Wood Photo Macro in the Macro Manager.
To use the Macro, select the photo you would like to process and in the Macro Manager select the macro and double click or push the play button near the bottom of the Macro Manager.
If further assistance is required, please visit www.epiloglaser.com/support to contact Epilog Laser Technical Support.
