
This guide covers focus calibration procedures for older firmware on the Fusion Maker, Fusion Edge and Fusion Pro 24, 32, 36 and 48. If your machine is running current firmware, refer to the Focus Calibration Wizard documentation instead. Focus calibrations keep the engraver working at the correct focal height.
Parts Required
- None
Tools / Materials Required
- Anodized aluminum, at least 3" x 3" (75 mm x 75 mm)
When to Calibrate
Run the focus calibrations if you see any of these problems:
- Autofocus is not working, or moves the table too high or too low.
- Laser power seems weak.
- Table movement does not match focus input, or the table crashes.
- Camera calibration problems.
They are also required after replacing the z-axis PCB (table switch board), the laser tube or the control module. Use the section that matches your engraver: CO2 only, fiber only, or dual source.
CO2-Only Engravers
Note: Complete the calibrations in the order shown. You need a piece of anodized aluminum at least 3" x 3" (75 mm x 75 mm).
Table Calibration
The table moves from the top to the bottom of the z-axis to locate the magnetic sensors on the z-axis PCB. This step is required for an accurate focus calibration.
Prepare the Table
Install the raster table if your engraver has one. Then use the Jog feature to move the lens carriage where the autofocus plunger and lens cone cannot hit the left or top ruler guides when the table rises.
Open Table Calibration
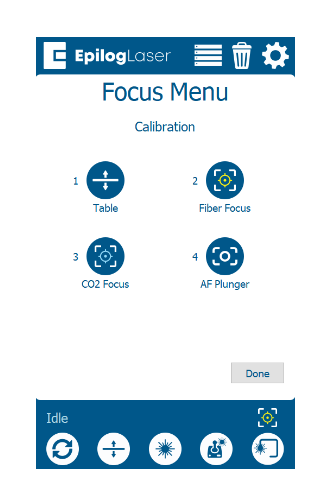
On the display, press the gear icon, then press Focus to open the Focus Commands/Calibrations menu. Press Table.
Run the Table Calibration
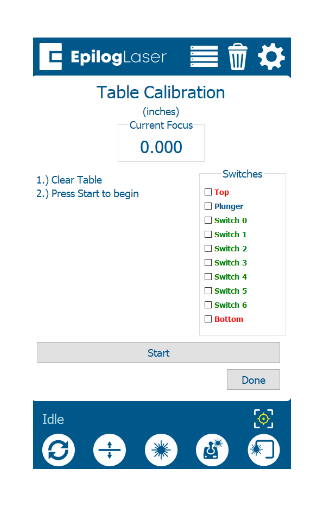
Press Start and let the engraver finish. A success message appears when it is done. Then move on to the CO2 focus calibration.
CO2 Focus Calibration
This calibration finds the focal height of the CO2 laser. You run a small job while raising and lowering the table to find the height where the laser is in focus.
Create the Test Job
In your preferred illustration program, create a black raster box about 2" x 2" (50 mm x 50 mm).
Set Up the Job
Send the job to the Software Suite. Make sure the process shows as an engraving job and set both power and speed to 5-10%. Place the anodized aluminum on the table and send the job to the engraver.
Find the Brightest Spark
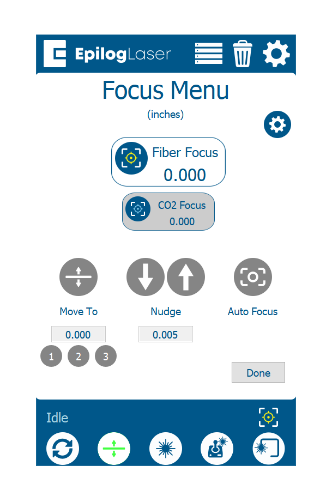
While the job runs, press the Focus button and use the joystick to raise and lower the table slightly while watching the spark where the laser hits the aluminum. Find the height where the spark is brightest.
Note: If the spark is hard to judge, turn off the overhead lights.
Lower the Power and Refine
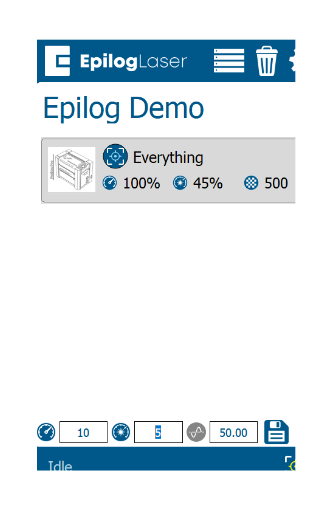
On the touchpad, lower the power to 3-5%. Keep raising and lowering the table to find the height where the spark is brightest.
Note: At low power the spark fades very quickly when the material goes out of focus, so you can find the focal height more precisely.
Stop the Job
When you have found the focal height, let go of the joystick and press Go/Stop to stop the job. Press Reset to send the laser head home, then remove the aluminum from the engraver.
Open CO2 Focus
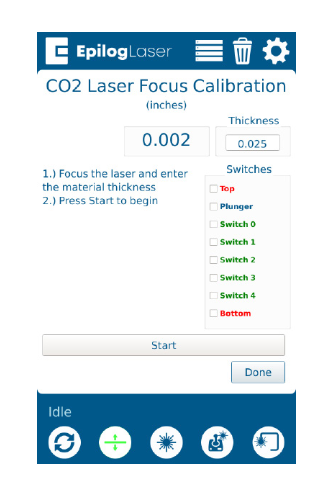
On the display, press the gear icon, then press Focus to open the Focus Commands/Calibrations menu. Press CO2 Focus.
Save the Focal Height
Make sure the material thickness is entered in the Thickness box (the default 0.025" matches Epilog-supplied anodized aluminum). Press Start, which simply saves the current table position, then press Done. Then move on to the autofocus calibration.
Autofocus Calibration
The autofocus calibration uses the CO2 focus value so the table moves to the correct focal height when autofocus is on. The table rises, presses the autofocus plunger and then moves back to the focal height.
Prepare the Table
Install the raster table if your engraver has one. Then use the Jog feature to move the lens carriage where the autofocus plunger and lens cone cannot hit the left or top ruler guides when the table rises.
Open AF Plunger
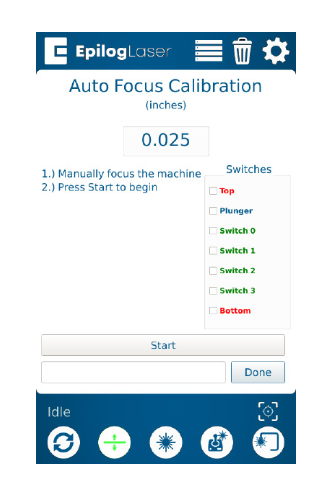
On the display, press the gear icon, then press Focus to open the Focus Commands/Calibrations menu. Press AF Plunger.
Run the Autofocus Calibration
Press Start and let the engraver finish. A success message appears when it is done.
Fiber-Only Engravers
Note: Complete the calibrations in the order shown. You need a piece of anodized aluminum at least 3" x 3" (75 mm x 75 mm).
Table Calibration
The table moves from the top to the bottom of the z-axis to locate the magnetic sensors on the z-axis PCB. This step is required for an accurate focus calibration.
Prepare the Table
Install the raster table if your engraver has one. Then use the Jog feature to move the lens carriage where the autofocus plunger and lens cone cannot hit the left or top ruler guides when the table rises.
Open Table Calibration
On the display, press the gear icon, then press Focus to open the Focus Commands/Calibrations menu. Press Table.
Run the Table Calibration
Press Start and let the engraver finish. A success message appears when it is done. Then move on to the fiber focus calibration.
Fiber Focus Calibration
This calibration finds the focal height of the Fiber laser. You run a small job while raising and lowering the table to find the height where the laser is in focus.
Create the Test Job
In your preferred illustration program, create a black raster box about 2" x 2" (50 mm x 50 mm).
Set Up the Job
Send the job to the Software Suite. Make sure the process shows as an engraving job and set both power and speed to 5-10%. Place the anodized aluminum on the table and send the job to the engraver.
Find the Brightest Spark
While the job runs, press the Focus button and use the joystick to raise and lower the table slightly while watching the spark where the laser hits the aluminum. Find the height where the spark is brightest.
Note: If the spark is hard to judge, turn off the overhead lights.
Lower the Power and Refine
On the touchpad, lower the power to the lowest setting that still makes a spark. Keep raising and lowering the table to find the height where the spark is brightest.
Note: At low power the spark fades very quickly when the material goes out of focus, so you can find the focal height more precisely.
Stop the Job
When you have found the focal height, let go of the joystick and press Go/Stop to stop the job. Press Reset to send the laser head home, then remove the aluminum from the engraver.
Open Fiber Focus
On the display, press the gear icon, then press Focus to open the Focus Commands/Calibrations menu. Press Fiber Focus.
Save the Focal Height
Make sure the material thickness is entered in the Thickness box (the default 0.025" matches Epilog-supplied anodized aluminum). Press Start, which simply saves the current table position, then press Done. Then move on to the autofocus calibration.
Autofocus Calibration
The autofocus calibration uses the fiber focus value so the table moves to the correct focal height when autofocus is on. The table rises, presses the autofocus plunger and then moves back to the focal height.
Prepare the Table
Install the raster table if your engraver has one. Then use the Jog feature to move the lens carriage where the autofocus plunger and lens cone cannot hit the left or top ruler guides when the table rises.
Open AF Plunger
On the display, press the gear icon, then press Focus to open the Focus Commands/Calibrations menu. Press AF Plunger.
Run the Autofocus Calibration
Press Start and let the engraver finish. A success message appears when it is done.
Dual Source Engravers
Note: Complete the calibrations in the order shown. You need a piece of anodized aluminum at least 3" x 3" (75 mm x 75 mm).
Table Calibration
The table moves from the top to the bottom of the z-axis to locate the magnetic sensors on the z-axis PCB. This step is required for an accurate focus calibration.
Prepare the Table
Install the raster table if your engraver has one. Then use the Jog feature to move the lens carriage where the autofocus plunger and lens cone cannot hit the left or top ruler guides when the table rises.
Open Table Calibration
On the display, press the gear icon, then press Focus to open the Focus Commands/Calibrations menu. Press Table.
Run the Table Calibration
Press Start and let the engraver finish. A success message appears when it is done. Then move on to the fiber focus calibration.
Fiber Focus Calibration
This calibration finds the focal height of the Fiber laser. You run a small job while raising and lowering the table to find the height where the laser is in focus.
Create the Test Job
In your preferred illustration program, create a black raster box about 2" x 2" (50 mm x 50 mm).
Set Up the Job
Send the job to the Software Suite. Make sure the process shows as an engraving job and set both power and speed to 5-10%. Place the anodized aluminum on the table and send the job to the engraver.
Find the Brightest Spark
While the job runs, press the Focus button and use the joystick to raise and lower the table slightly while watching the spark where the laser hits the aluminum. Find the height where the spark is brightest.
Note: If the spark is hard to judge, turn off the overhead lights.
Lower the Power and Refine
On the touchpad, lower the power to the lowest setting that still makes a spark. Keep raising and lowering the table to find the height where the spark is brightest.
Note: At low power the spark fades very quickly when the material goes out of focus, so you can find the focal height more precisely.
Stop the Job
When you have found the focal height, let go of the joystick and press Go/Stop to stop the job. Press Reset to send the laser head home, then remove the aluminum from the engraver.
Open Fiber Focus
On the display, press the gear icon, then press Focus to open the Focus Commands/Calibrations menu. Press Fiber Focus.
Save the Focal Height
Make sure the material thickness is entered in the Thickness box (the default 0.025" matches Epilog-supplied anodized aluminum). Press Start, which simply saves the current table position, then press Done. Then move on to the next step.
Hold the Table for CO2
Back in the Focus Commands/Calibrations menu, press Fiber Focus, then press CO2 Focus. Check the material thickness, press Start and then Done. Then move on to the CO2 focus calibration.
Note: A dual source engraver uses the fiber focus as its default and moves the table to the fiber focal height after every job. This step does not calibrate the CO2 focus; it only keeps the table from moving during the CO2 focus calibration, which you still need to complete.
CO2 Focus Calibration
This calibration finds the focal height of the CO2 laser. You run a small job while raising and lowering the table to find the height where the laser is in focus.
Create the Test Job
In your preferred illustration program, create a black raster box about 2" x 2" (50 mm x 50 mm).
Set Up the Job
Send the job to the Software Suite. Make sure the process shows as an engraving job and set both power and speed to 5-10%. Place the anodized aluminum on the table and send the job to the engraver.
Find the Brightest Spark
While the job runs, press the Focus button and use the joystick to raise and lower the table slightly while watching the spark where the laser hits the aluminum. Find the height where the spark is brightest.
Note: If the spark is hard to judge, turn off the overhead lights.
Lower the Power and Refine
On the touchpad, lower the power to 3-5%. Keep raising and lowering the table to find the height where the spark is brightest.
Note: At low power the spark fades very quickly when the material goes out of focus, so you can find the focal height more precisely.
Stop the Job
When you have found the focal height, let go of the joystick and press Go/Stop to stop the job. Press Reset to send the laser head home, then remove the aluminum from the engraver.
Open CO2 Focus
On the display, press the gear icon, then press Focus to open the Focus Commands/Calibrations menu. Press CO2 Focus.
Save the Focal Height
Make sure the material thickness is entered in the Thickness box (the default 0.025" matches Epilog-supplied anodized aluminum). Press Start, which simply saves the current table position, then press Done. Then move on to the autofocus calibration.
Autofocus Calibration
The autofocus calibration uses the CO2 focus value so the table moves to the correct focal height when autofocus is on. The table rises, presses the autofocus plunger and then moves back to the focal height.
Prepare the Table
Install the raster table if your engraver has one. Then use the Jog feature to move the lens carriage where the autofocus plunger and lens cone cannot hit the left or top ruler guides when the table rises.
Open AF Plunger
On the display, press the gear icon, then press Focus to open the Focus Commands/Calibrations menu. Press AF Plunger.
Run the Autofocus Calibration
Press Start and let the engraver finish. A success message appears when it is done.