
This guide covers checking the table level on the Legend 36EXT with the manual focus gauge, and correcting it. A level table keeps the laser in focus across the whole work area and prevents uneven cuts and engravings.
Parts Required
- None
Tools / Materials Required
- Manual Focus Gauge
- 5/32" Allen Wrench
- Safety Glasses
Checking the Table Level
Wear Safety Glasses
Put on the safety glasses supplied with your engraver or your replacement parts.
Open the Main Door
With the engraver on, open the main door so you have full access to the table.
Place the Focus Gauge
Place the V-shaped manual focus gauge on the lens carriage, on the two pins below the lens.
Raise the Table
Raise the table until it just touches the bottom tip of the focus gauge.
Important: Pinch point: keep your hands clear of the table while it moves.
Check All Four Corners
Move the lens carriage to all four corners. If the gauge lifts, or the gap between the gauge and the table changes, the table is not level; continue to the next section.
Leveling the Table
Disable X/Y
With the engraver on, use X/Y Disable on the keypad to free the axes.
Move to the Rear Right
Keeping the X-axis rail at the rear of the engraver, move the lens carriage to the far right and place the focus gauge on it.
Set the Reference Corner
Use the focus feature to raise the table until the gauge just touches the engraving surface. This corner is the reference; the others are raised or lowered to match it.
Important: Pinch point: keep your hands clear of the table while it moves.
Turn Off and Unplug
Turn off the engraver and disconnect it from power.
Check the Front Right Corner
Open the engraving area access window. Move the whole X-axis assembly forward, keeping the lens carriage at the far right, and look at the gauge.
- If the gauge lifted as you moved forward, this corner needs to be lowered.
- If the gauge is no longer touching the surface, this corner needs to be raised.
Locate the Table Lift Wings
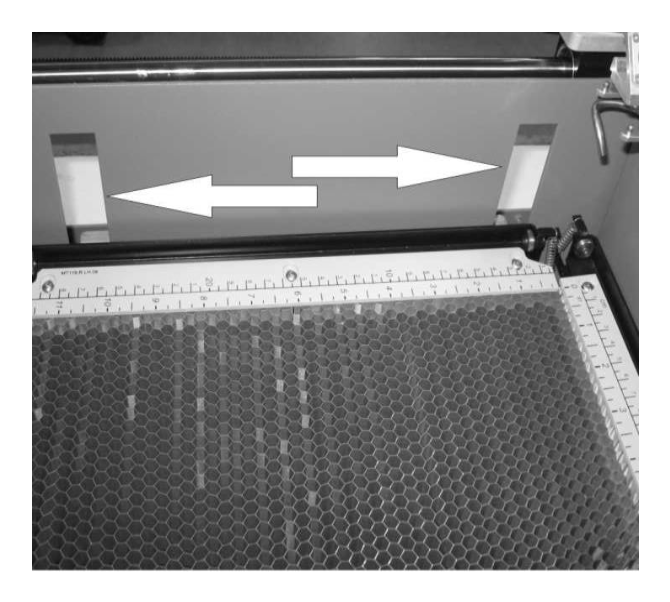
Look inside the engraver at the left and right chassis walls. There are four cutout slots, two on each side; the table lift wings that support the table pass through them. This photo shows the right side.
Locate the Adjustment Screws
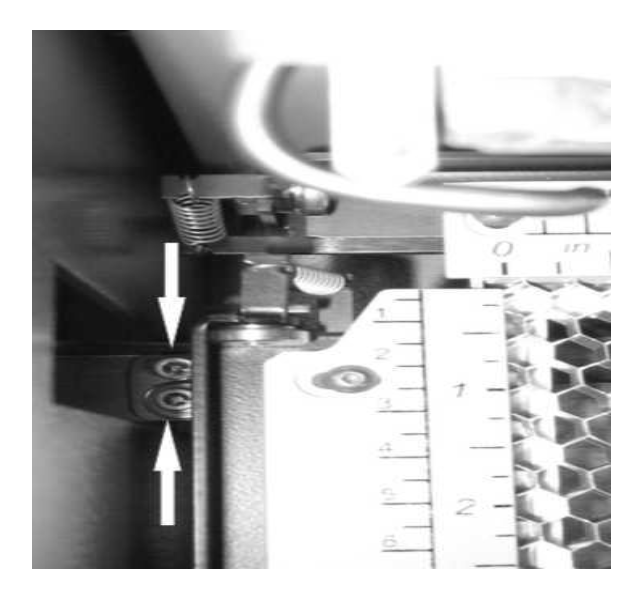
Each table attachment point has two 5/32" Allen screws used to fine tune the level. Each screw gives about 3/8" of adjustment at most.
Adjust the Corner
Adjust the corner with a 5/32" Allen wrench, using these guidelines:
- Counterclockwise loosens a screw; clockwise tightens it.
- One turn moves the table about 1/32", two turns about 1/16", four turns about 1/8".
- To lower the table: loosen the screw without the lock washer first, then tighten the one with the lock washer.
- To raise the table: loosen the screw with the lock washer first, then tighten the one without the lock washer.
Repeat at the Other Corners
Repeat the check and adjustment at the remaining corners until the table is level to the focus gauge everywhere.
Tighten All Screws
Make sure both screws are tight at every corner.
Reconnect Power
Reconnect the engraver to power and turn it on. It is ready to use.