目次
- はじめに
- 安全
- はじめに
- Setting Up Your Laser System
- Unpacking the Fusion Ascent
- Choose Where to Locate the System
- Connecting the Exhaust
- Connecting Electrical Power
- Connecting the Laser to Your Computer
- Power on the Laser
- Set the IP Address
- Install the Software Suite & Set Up Your Laser
- Sign Up for Driver Updates and Register Your System
- コントロールパネル
- System Features
- Machine Maintenance
- Specifications
- Technical Support
- Warranty
- マテリアル設定
- Calibration
Editing Job Settings at the Machine
- Print a job to the Ascent.
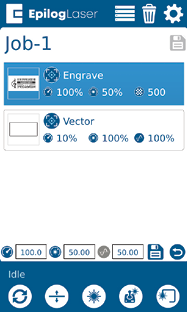
- Long press on the job and the Speed and Power values will come up.
- Press the job again and the Speed and Power boxes will come up at the bottom of the screen.
- Highlight the one you want to change and another dialog box will come up at the bottom of the screen.
- Delete the number in the box and then insert the new value(s).
- Press the Save icon to save the change. If you exit this screen without pressing the Save icon, your changes will not be saved.

スピード
This icon indicates the speed settings on the selected job. It ranges from 1-100%.

パワー
This icon indicates the power settings on the selected job. It ranges from 1-100%.

Frequency
This icon indicates the frequency settings on the selected job. It ranges from 1-100%.

Delete Button
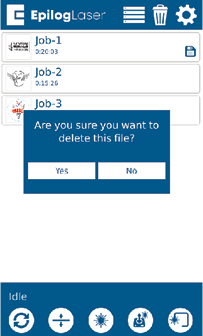
The Delete Button will permanently erase jobs from the Job Menu. To delete a job, select the job in the Job Menu, and then select the Delete Button. A dialog will pop up to confirm that you want to delete the file. Select “Yes” and the file will be removed from the Job Menu.
Helpful Note:
If you have marked a job as “Saved” and delete the file, it will still be erased from the Job Menu.