This guide walks you through configuring your network settings, establishing a connection, and installing the control software for your Epilog Laser system. Please select your machine type below to get started.
Connection Setup
Step 1: Select Your Laser System
Which Epilog Laser model are you configuring?
Legacy Systems
Older generation laser systems.
- Mini / Helix / Fibermark
- EXT
- Zing
- Original Fusion / M2
Modern Systems
Current generation laser systems.
- Maker
- Edge
- Pro
- Galvo
- Ascent
Step 2: Network Configuration (TCP/IP)
To begin, you’ll need to connect your laser to your computer with an Ethernet cable and ensure the machine is powered on. Your computer needs a static IP address to communicate with the laser.
Which operating system are you using?
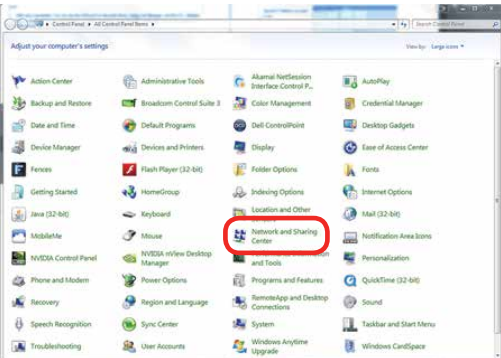
Windows 10 Setup: Network Center
Open Network and Sharing Center from the Control Panel.
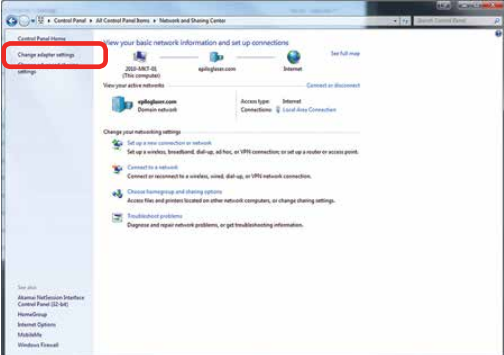
Windows 10 Setup: Adapter Settings
Click Change adapter settings.
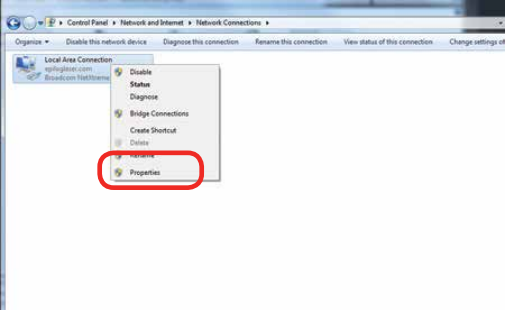
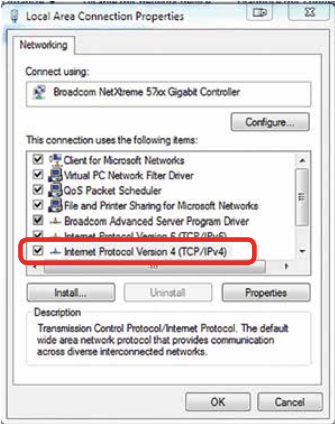
Windows 10 Setup: Connection Properties
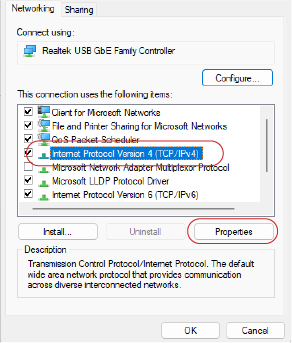
Right-click the Local Area Connection (or the connection labeled Unidentified Network) and choose Properties.
Windows 10 Setup: IPv4 Settings
Select Internet Protocol Version 4 (TCP/IPv4) and click Properties.
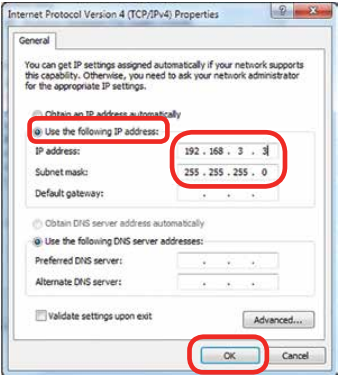
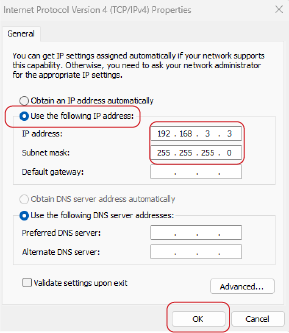
Windows 10 Setup: Assign IP & Save
Choose Use the following IP address and enter 192.168.3.3 as the IP address.
Set the Subnet mask to 255.255.255.0, then click OK to save the settings.
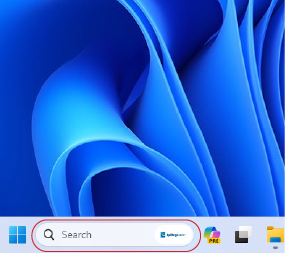
Windows 11 Setup: Open Settings
In the search bar at the bottom of the screen, type Settings and click Open.
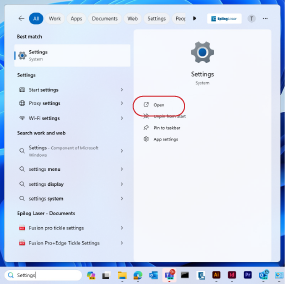
Windows 11 Setup: Launch Settings
Click Open.
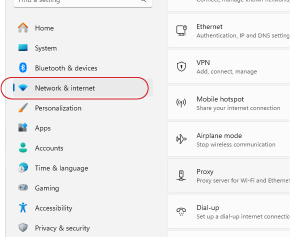
Windows 11 Setup: Network & Internet
Click Network and Internet.
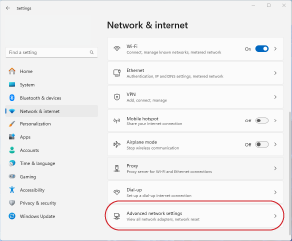
Windows 11 Setup: Advanced Settings
Click Advanced Network Settings.
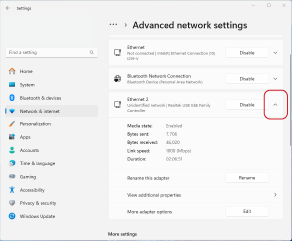
Windows 11 Setup: Select Adapter
Select the drop-down arrow next to the laser’s Ethernet connection.
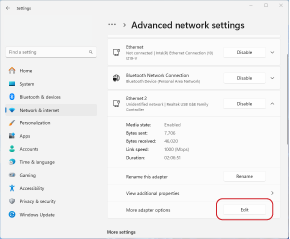
Windows 11 Setup: Edit Settings
Next to More Adapter Settings, click Edit.
Windows 11 Setup: IPv4 Properties
Select Internet Protocol Version 4 (TCP/IPv4), then click Properties.
Windows 11 Setup: Assign IP & Save
Choose Use the following IP address and enter 192.168.3.3 as the IP address.
Set the Subnet mask to 255.255.255.0, then click OK to save the settings.
Software Selection
Your network configuration is complete! Which software will you use to manage and send jobs to your laser?
Driver Setup: Download & Extract
- Visit the Epilog Laser Legacy Drivers page and download the appropriate driver for your machine.
- Open the downloaded file and extract its contents to your computer.

Driver Setup: Add Printer
The Add a Device window will open up. Click “The printer that I want isn’t listed.”

Driver Setup: Add Local Printer
Select Add a local printer or network printer with manual settings and click Next.

Driver Setup: Create Port
Choose Create a new port and select Standard TCP/IP Port from the dropdown menu.

Driver Setup: Configure Port
Enter your laser’s IP address (default is 192.168.3.4) and deselect “Query the printer and automatically select the driver to use”.

Driver Setup: Custom Settings
Select Custom configuration and click Settings.

Driver Setup: Port Settings
Choose the LPR protocol and enter your machine model in the “Queue Name” field. Click OK, then Next.

Driver Setup: Install Driver
Click Have Disk, browse to the extracted driver files you downloaded earlier, and select the .inf file for your model.


Driver Setup: Complete Setup
Follow the remaining prompts to name your printer and complete the installation.

Software Suite: Installation Status
Do you already have the Epilog Software Suite installed on your computer?
Software Setup: Download
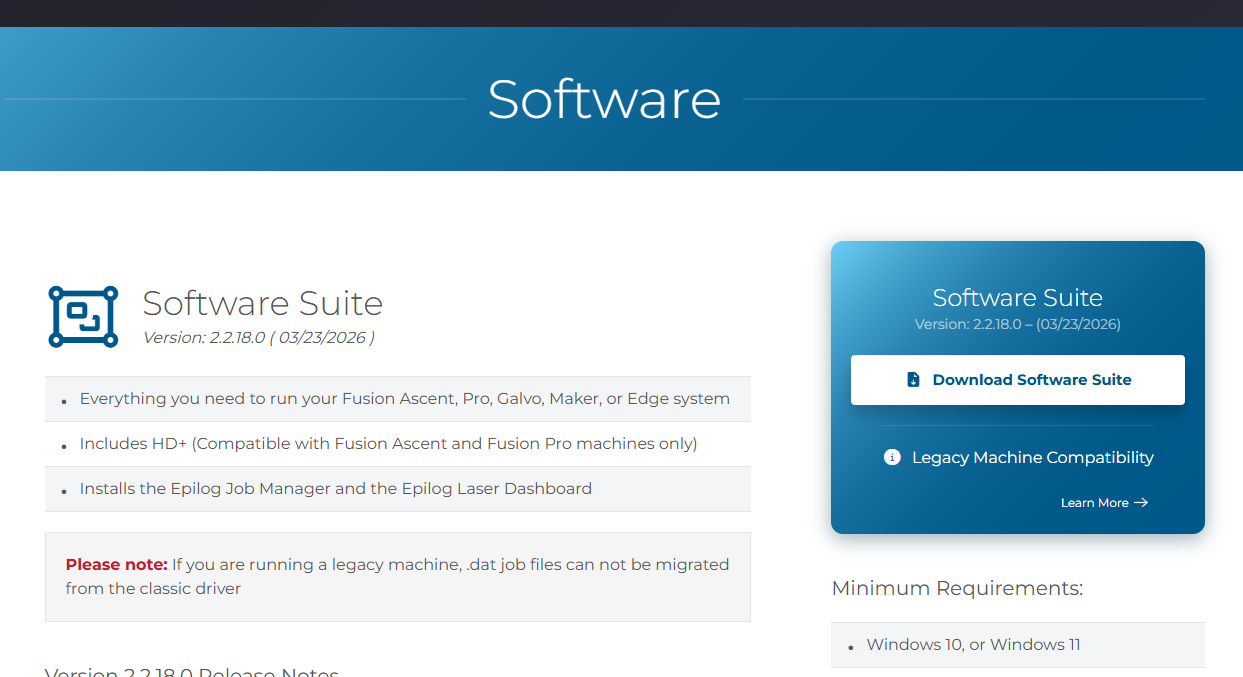
Go to the Drivers and Firmware page, then click on “Download Software Suite”.
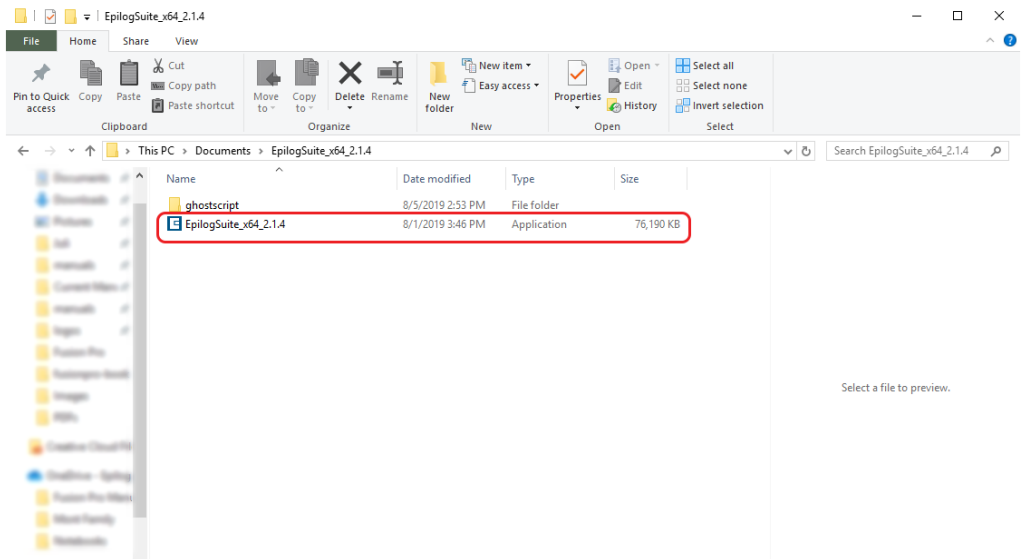
Software Setup: Extract & Run
The installation file will download as a .zip folder that will need to be extracted. Right-click the folder and click “Extract All”. Once finished, double click on the EpilogSuite file.
Software Setup: Welcome
A welcome screen appears, click Next.

Software Setup: Choose Directory
Select default install and click Next.

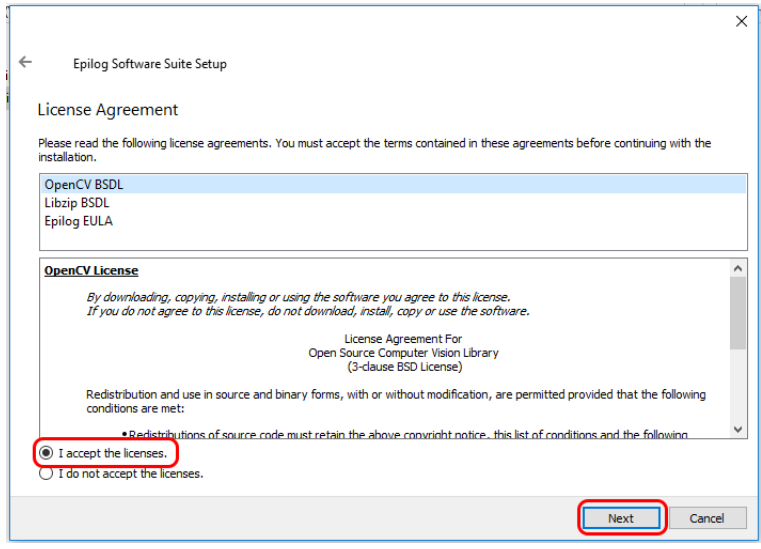
Software Setup: License Agreement
Read and accept the license agreements and click Next.
Software Setup: Ready to Install
Click Install to begin the installation.

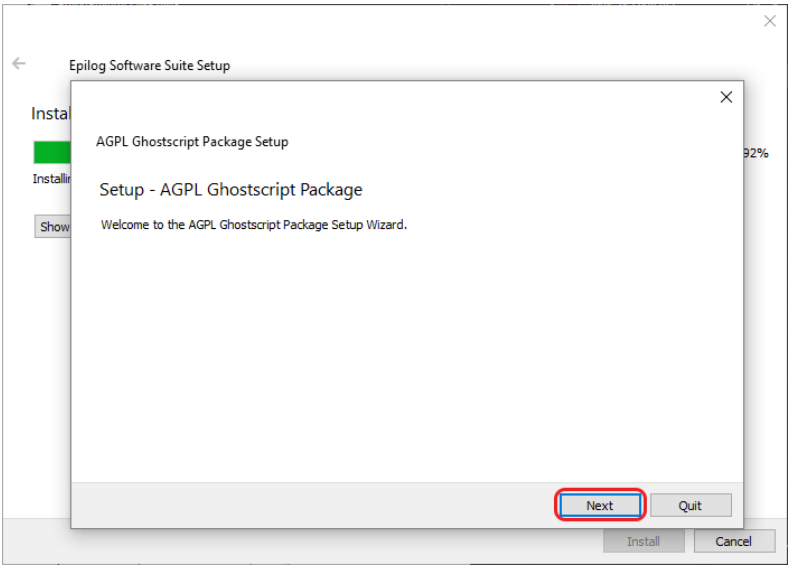
Software Setup: Ghostscript Install
The Epilog Software Suite will begin installing. During the installation, a dialog box will pop up to also install the AGPL Ghostscript Package. Click Next.
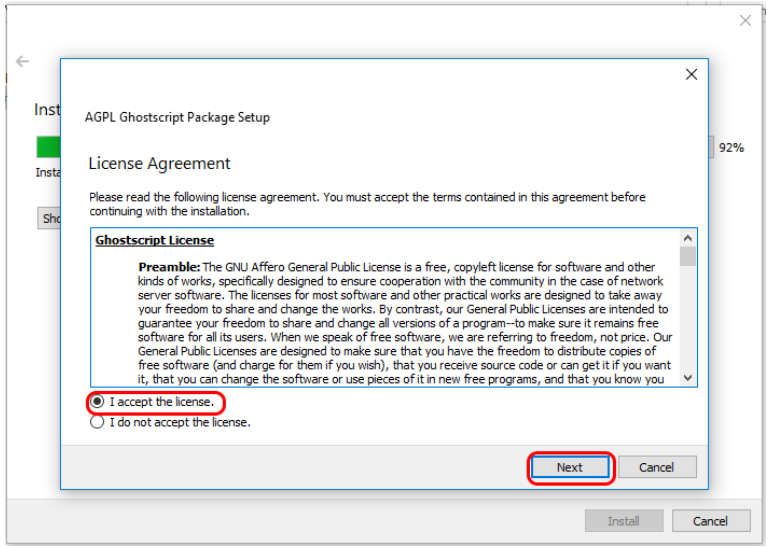
Software Setup: Ghostscript License
Read and accept the AGPL Ghostscript License Agreement, then click Next.
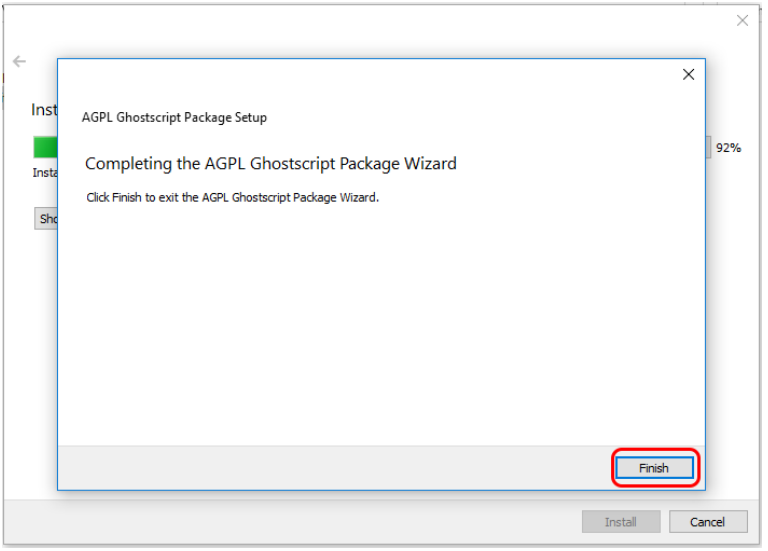
Software Setup: Finish Ghostscript
Click Finish to complete the AGPL Ghostscript installation and resume the Epilog Software Suite installation.
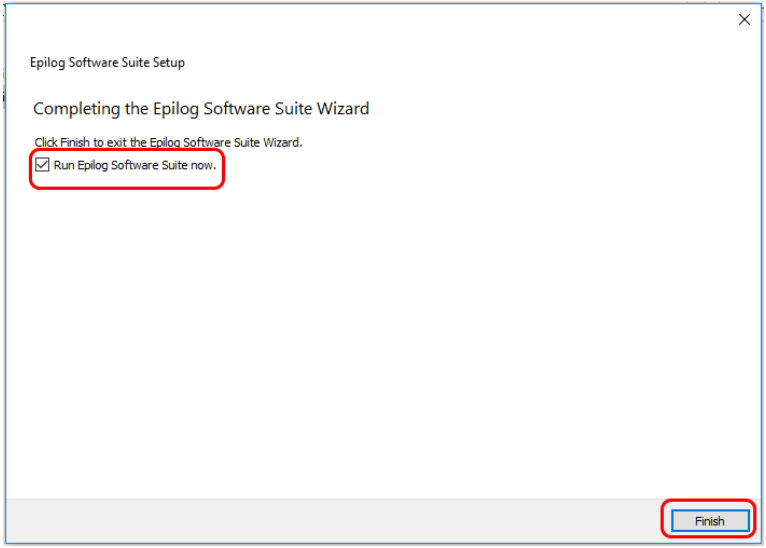
Software Setup: Complete Installation
Select whether or not you want to run the program now. Click Finish to complete the installation.
Software Setup: Add System
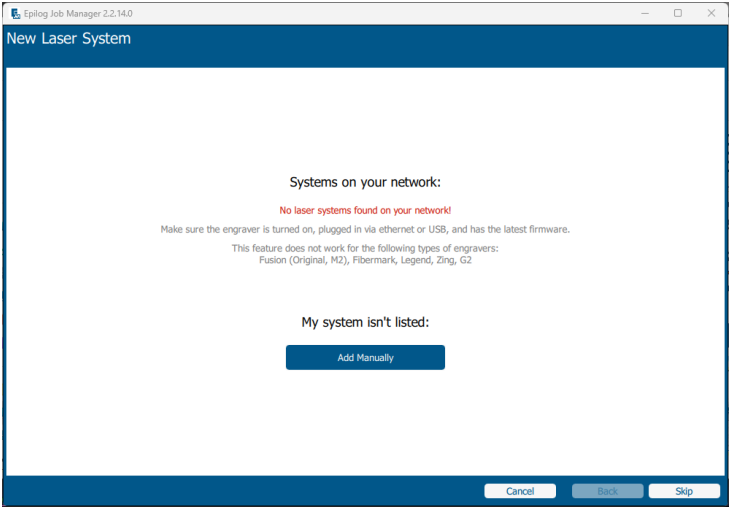
The first time you open the Job Manager you’ll see this screen. Click Add Laser System to get started.

Software Setup: Detection
If your machine is turned on and connected your computer, the Job Manager will detect it and allow you to add the machine. You may also add it manually by selecting Add Manually.
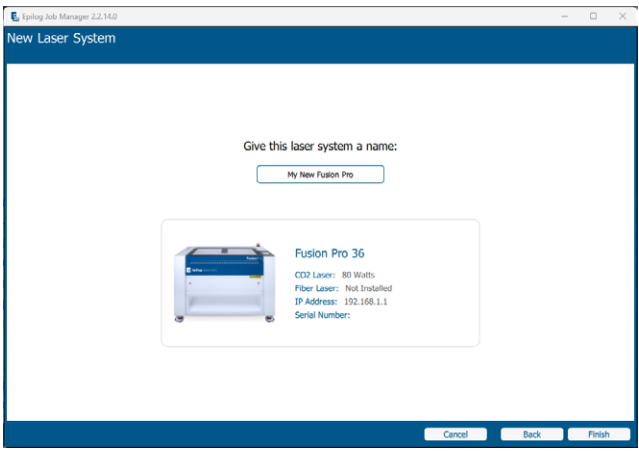
Software Setup: Configuration
Select your machine from the list of models and configure your specific settings:
- Model & Wattage: Select your specific machine.
- IP Address: Enter the IP address you set up earlier.
- Serial Number & Name: Enter your machine’s serial number and give it a custom name.
Once you have entered this information, click Finish.
Software Setup: Activation
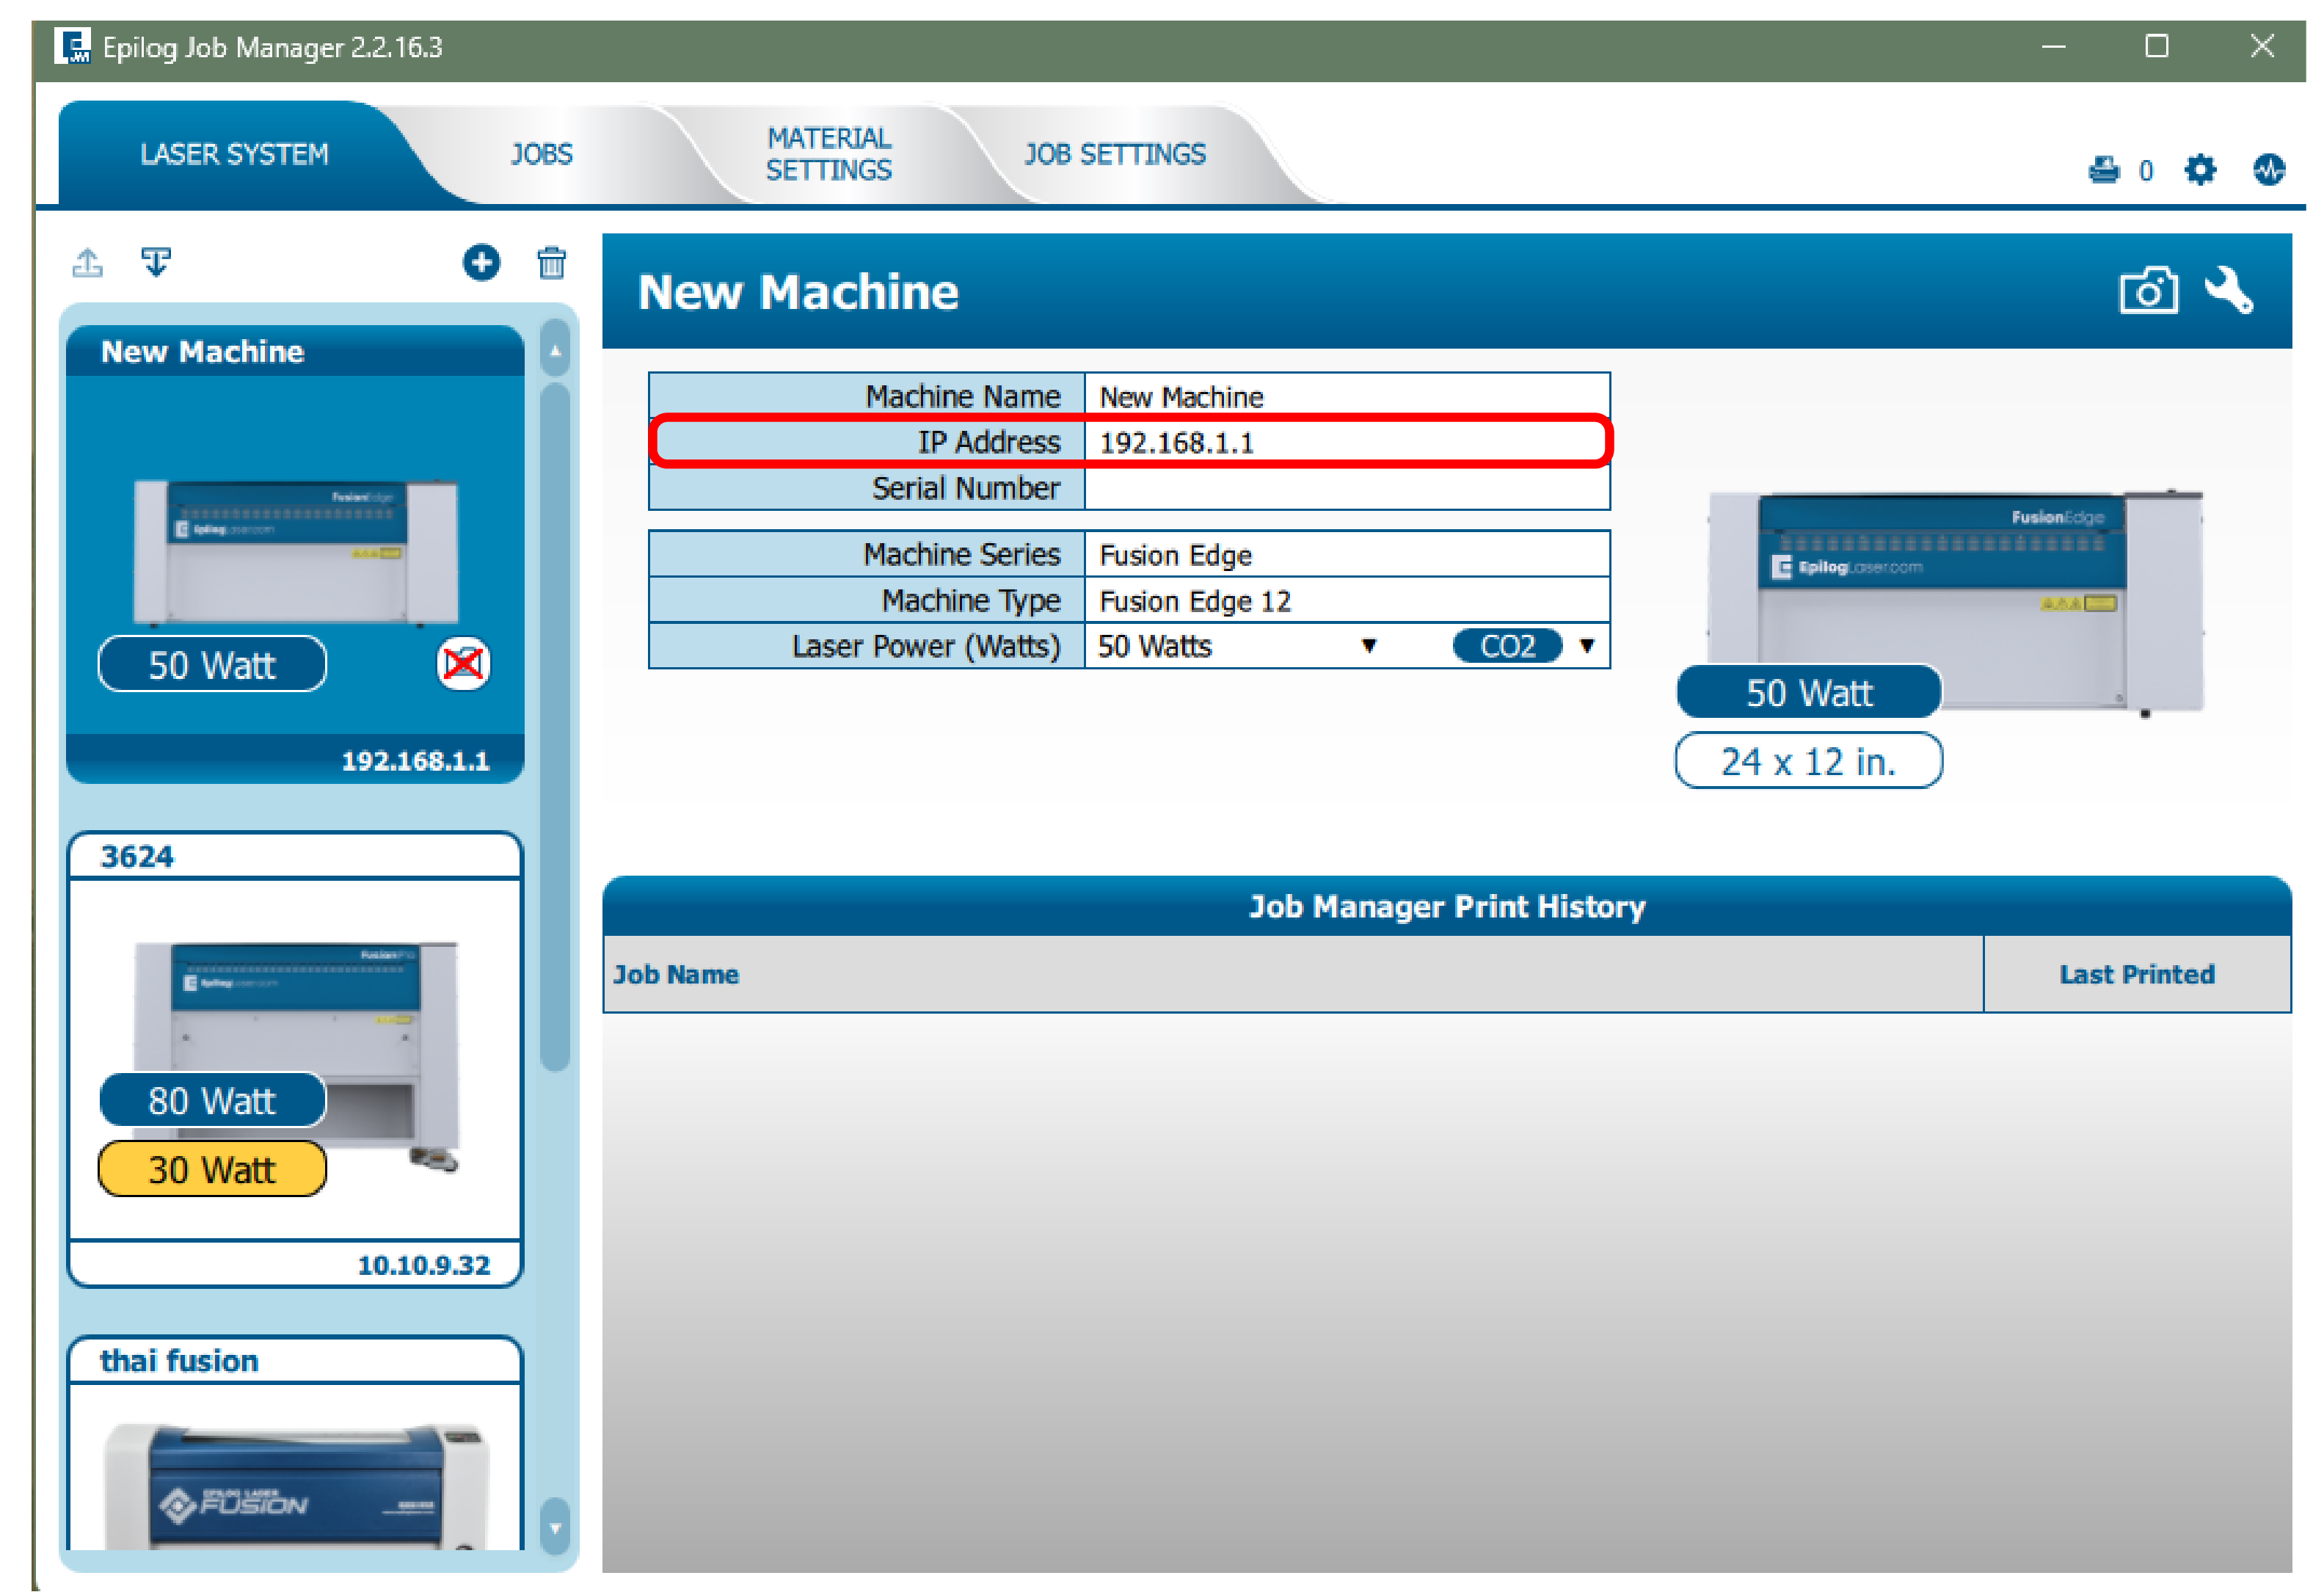
Your laser has been added to the Job Manager, and appears in the left panel. It is now ready to accept jobs.

Software Setup: Enter IP Address
Since the software suite is already installed, you just need to ensure the IP Address in the Job Manager matches the IP Address you just assigned to the laser.
All Set!
Congratulations! Your software is fully configured.
Troubleshooting Tips:
- Verify the IP address of the laser matches what was entered during driver/software installation.
- Ensure the USB cable is NOT connected when using Ethernet.
- Test your Ethernet cable if connection issues persist.
- Confirm your firewall settings allow printer communication.
Step 2: Select Connection Type
How would you like to connect your laser system?
- USB: A direct, simple cable connection to a single computer.
- Ethernet: A wired connection (either direct to a PC or through a local network router).
- Wireless (Wi-Fi): A cordless connection to your local Wi-Fi network.
Ethernet Setup: Connection Type
How is your Ethernet cable routed?
- Direct connection: The laser is connected directly to your computer.
- Network connection: The laser is connected to your local network/router/switch.
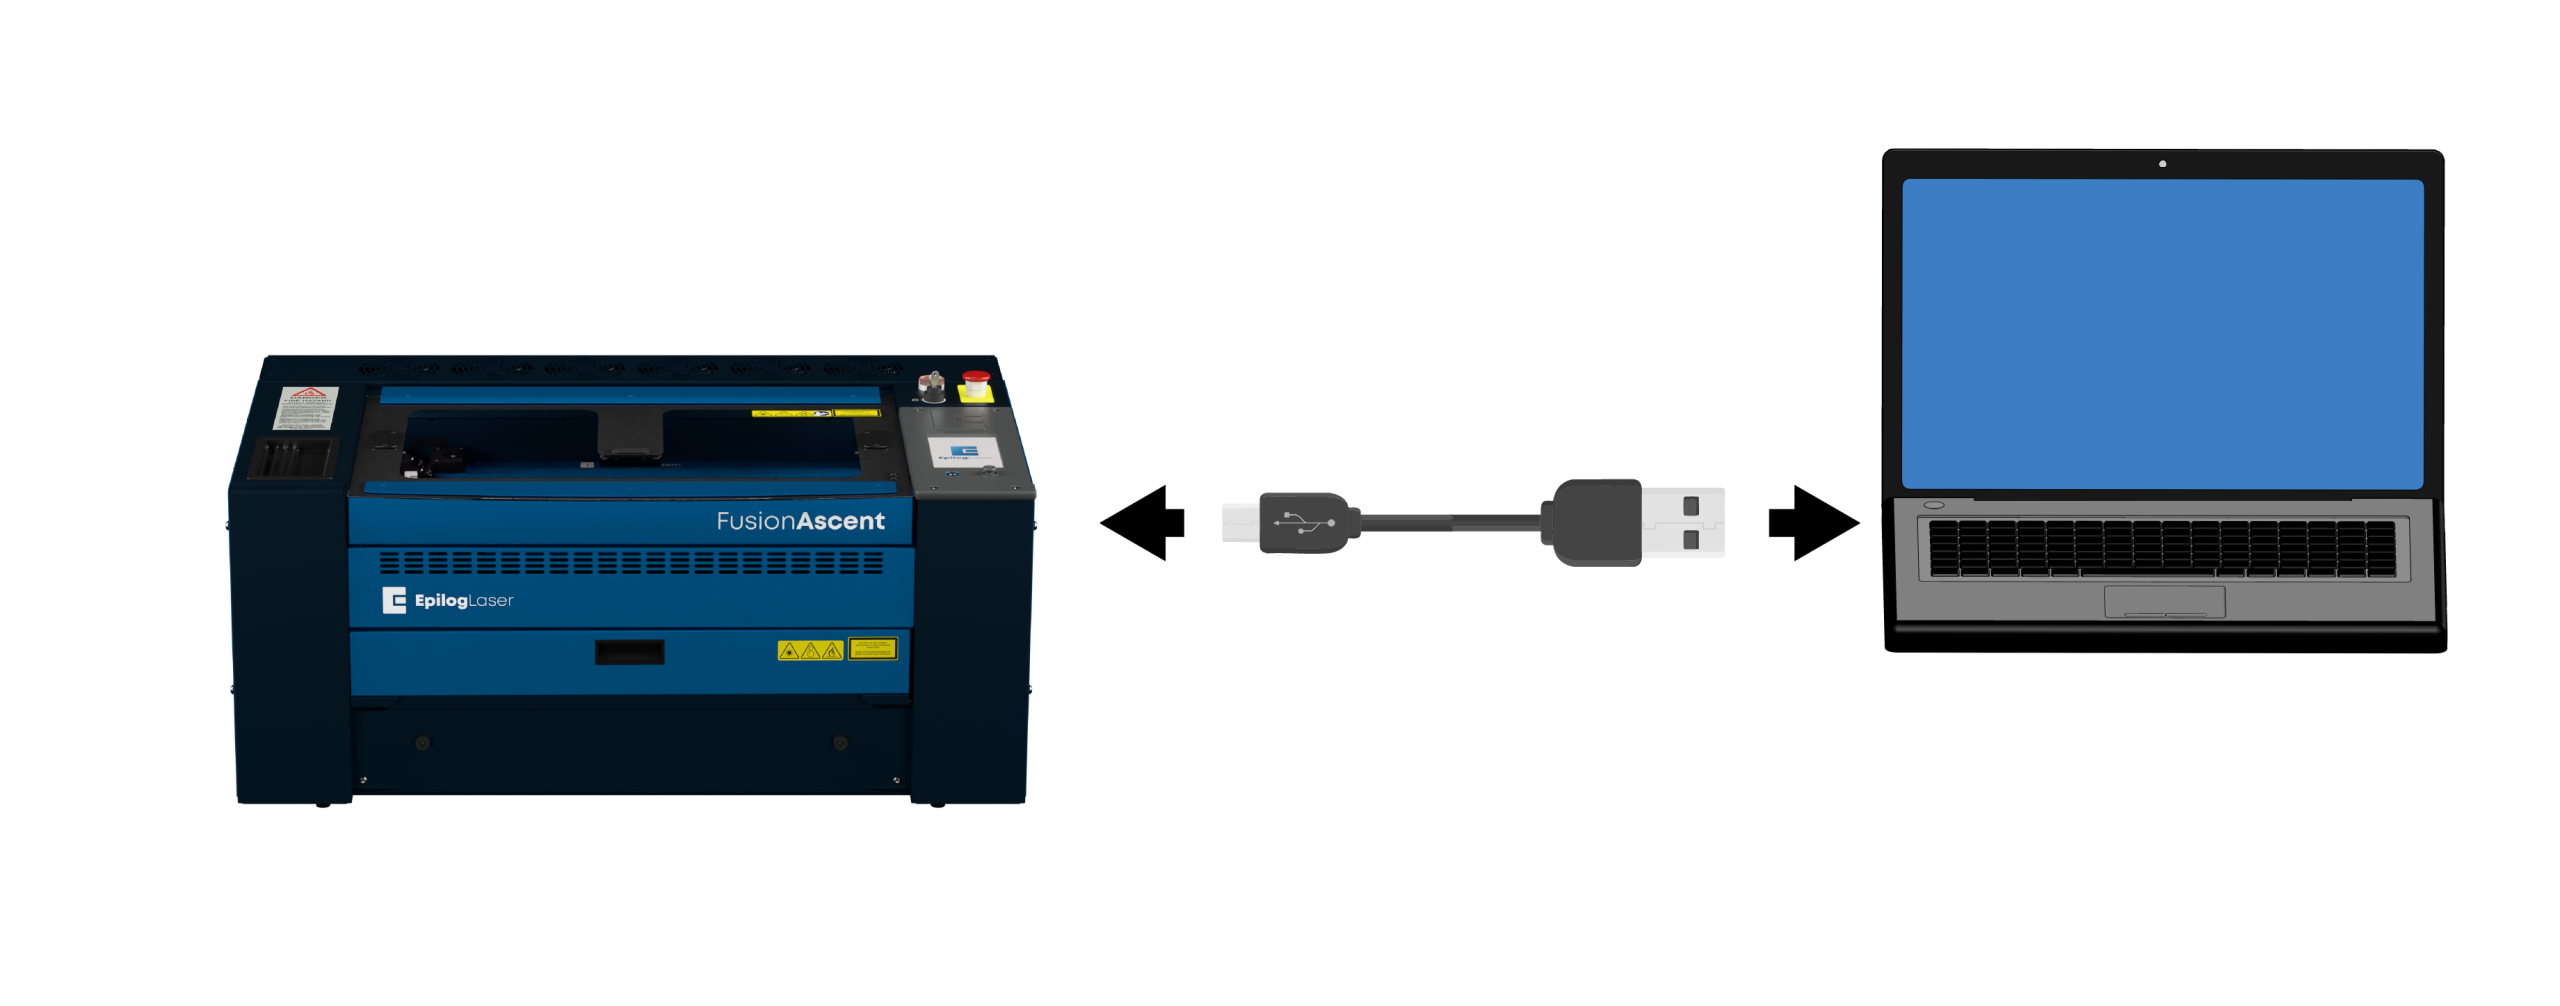
USB Setup: Power & Connect
- Power ON the machine.
- Connect the laser to the computer with a USB cable.
USB Setup: Settings
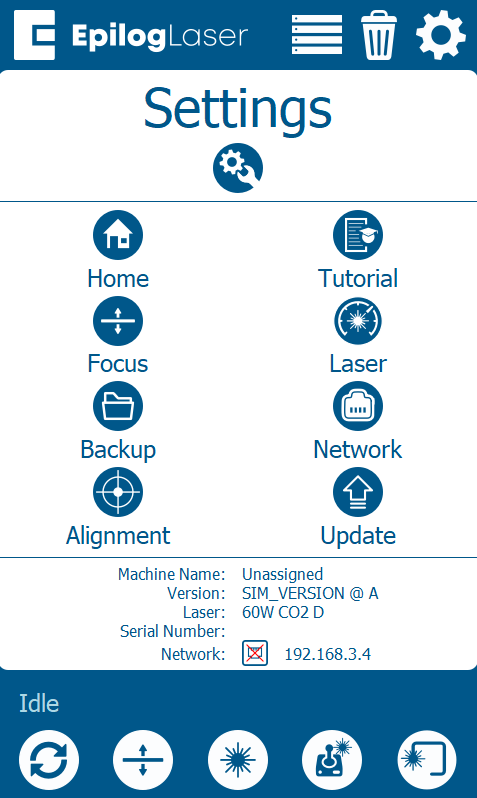
Click the gear icon in the top right corner of the display panel.
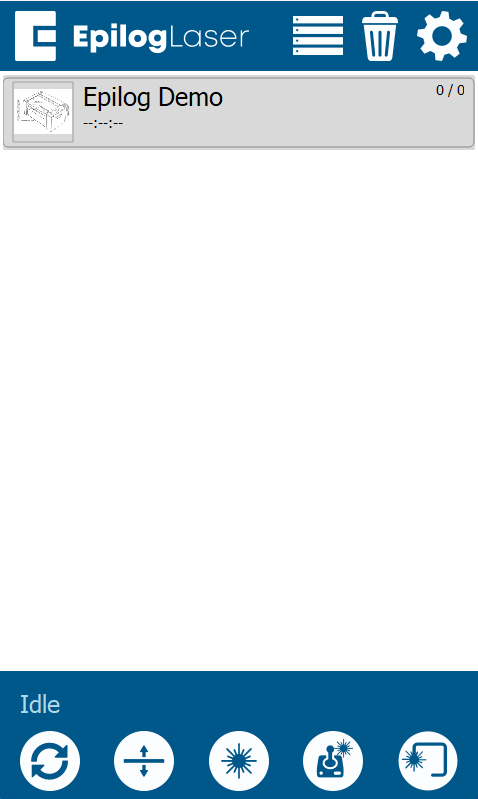
USB Setup: Network Menu
Select Network.
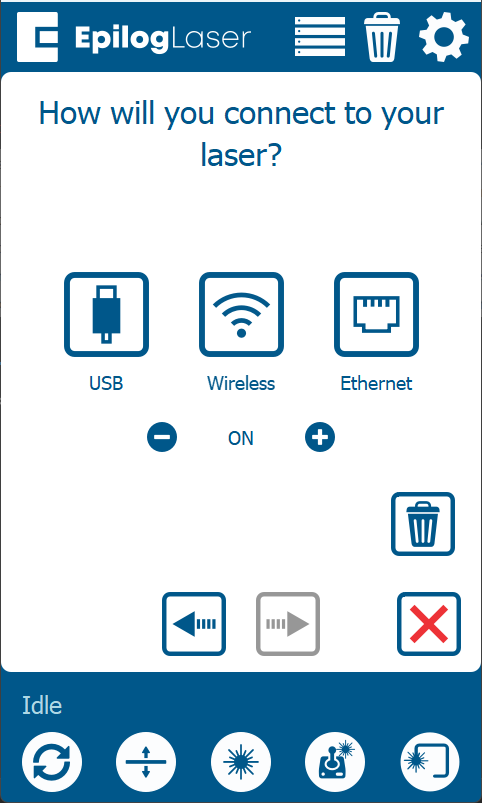
USB Setup: Select USB
Select USB as your connection type.
Note: If you don’t see that option, you may need to click the edit button at the bottom center of the screen.
USB Setup: Default IP
The default IP address for a USB connection is 169.254.7.2. Click the green arrow to complete the setup.
Note: This is the standard IP address for USB connections. Write the IP address down for use later during software setup.
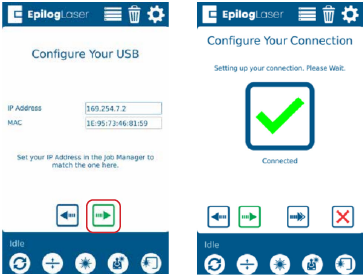
USB Setup: Machine Setup Complete
Your computer and laser are now configured to communicate via USB.
Wireless Setup: Settings
Wireless Setup: Settings
Click the gear icon in the top right corner of the display panel.
Wireless Setup: Network Menu
Select Network.
Wireless Setup: Wireless Menu
Select Wireless.
Note: If you don’t see that option, you may need to click the edit button at the bottom center of the screen.
Wireless Setup: Select Network
Select your wireless network from the list, then click the green arrow to proceed.
Note: Select the same WIFI network that your computer is connected to.
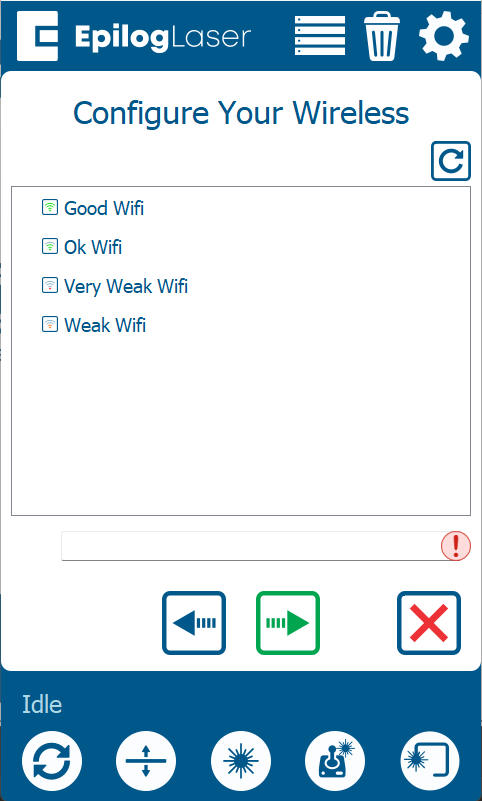
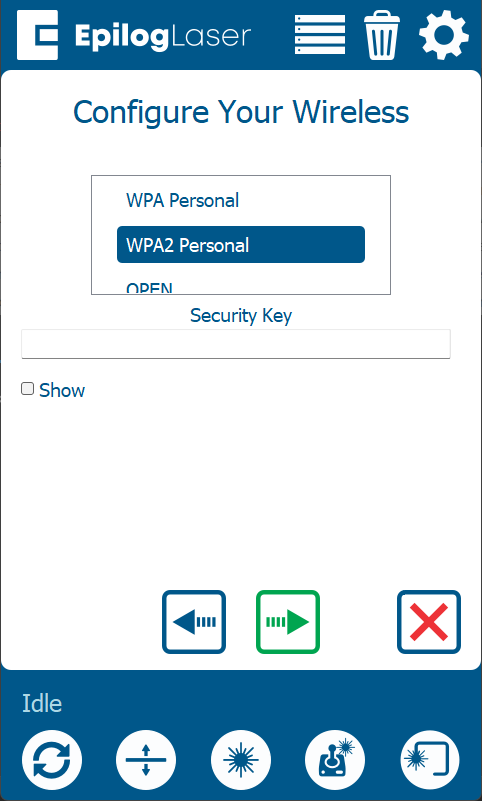
Wireless Setup: Security & Password
Select the network’s security protocol and enter the password. The most common type is WPA2 Personal.
Wireless Setup: IP Address
Select Obtain IP Address Automatically, then click the green arrow to complete the setup.
Wireless Setup: Machine Setup Complete
Your laser is now configured to communicate over your Wi-Fi network.
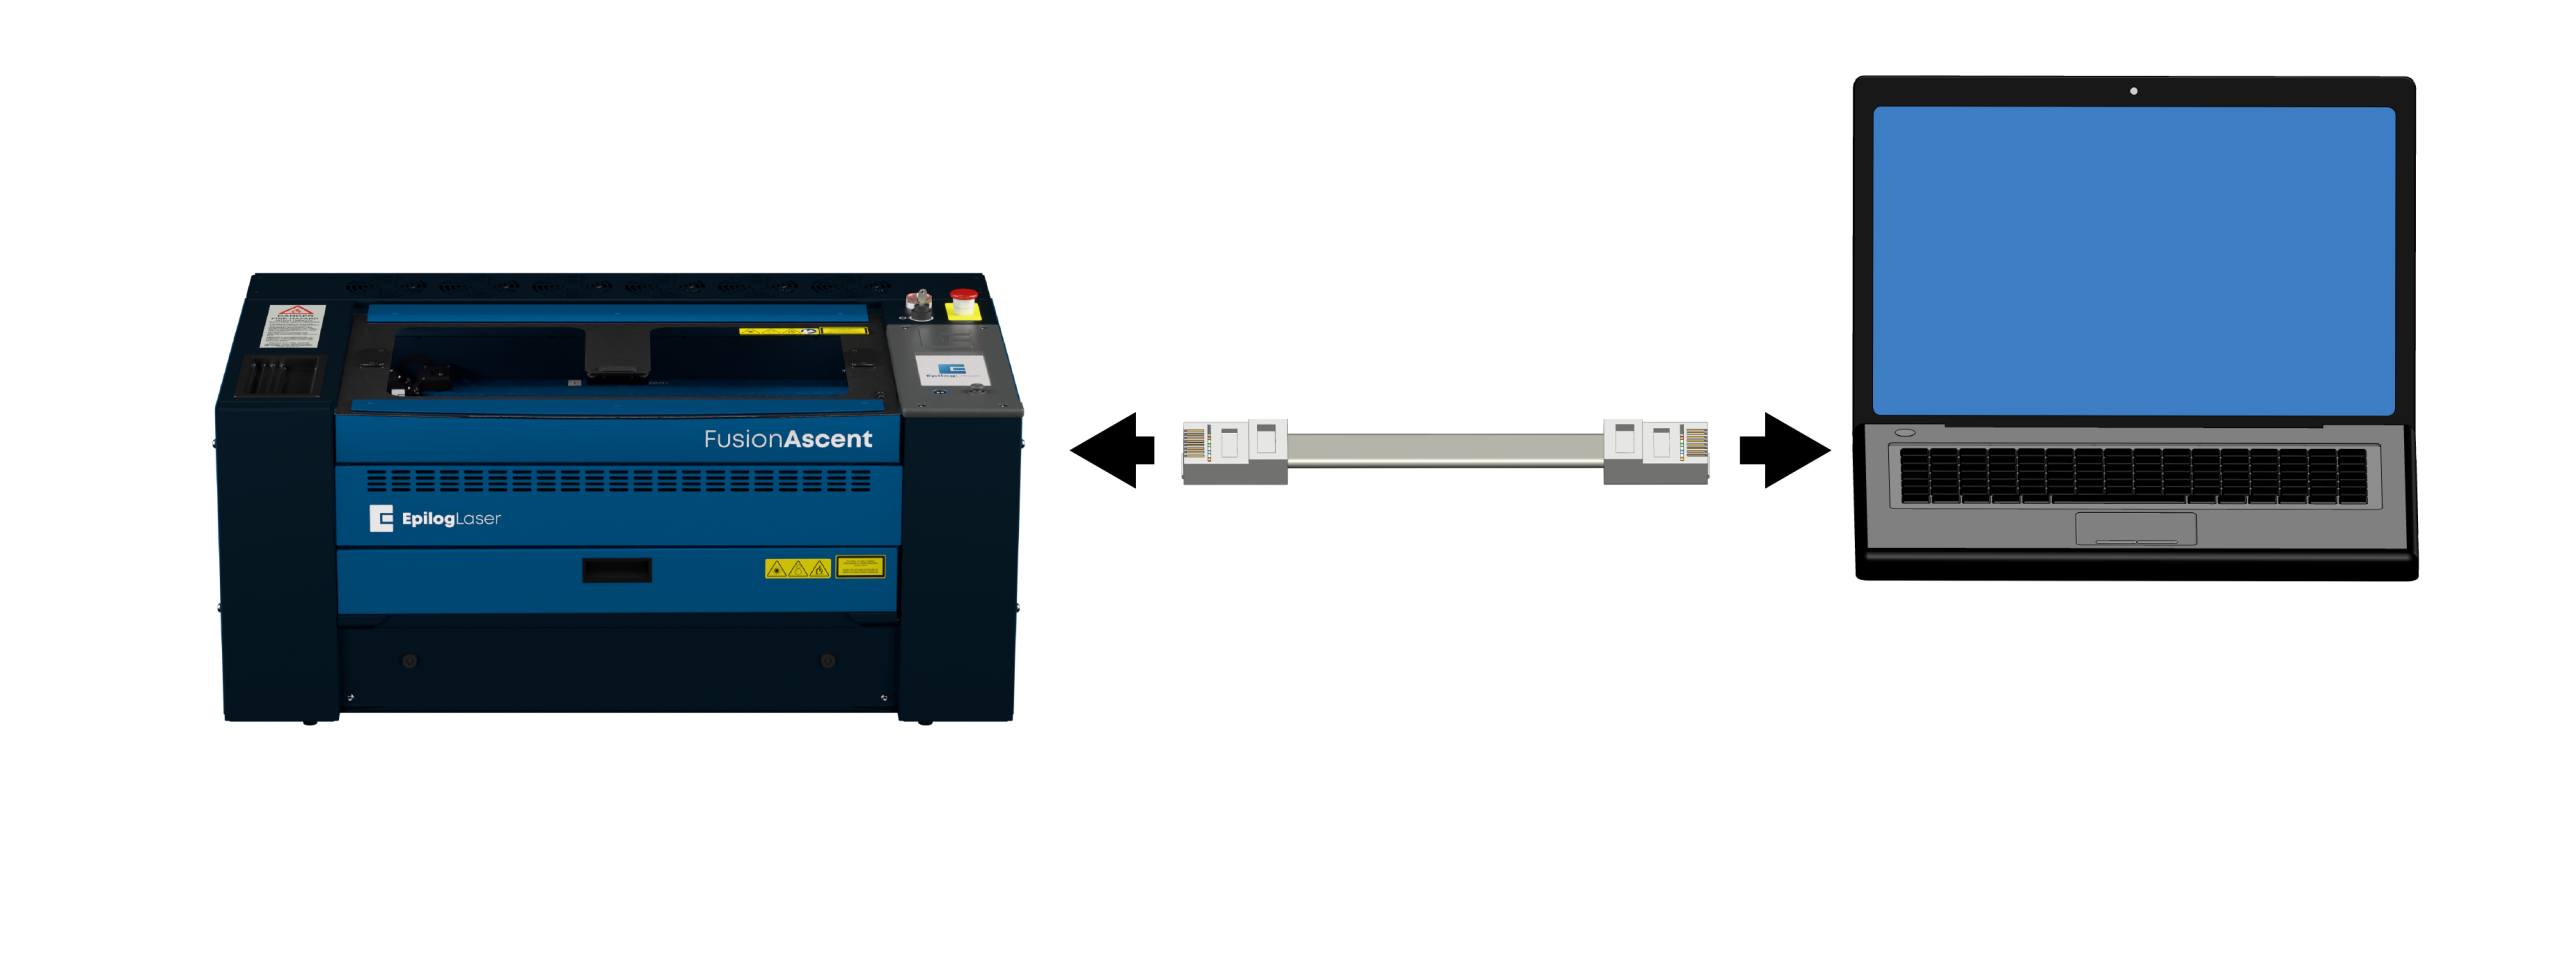
Direct Setup: Power & Connect
- Power ON the machine.
- Connect the laser to the computer with an Ethernet cable.
Direct Setup: Settings
Click the gear icon in the top right corner of the display panel.
Direct Setup: Network Menu
Select Network.
Direct Setup: Ethernet Menu
Select Ethernet.
Note: If you don’t see that option, you may need to click the edit button at the bottom center of the screen.
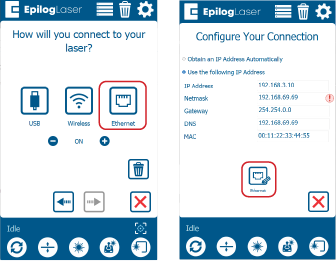
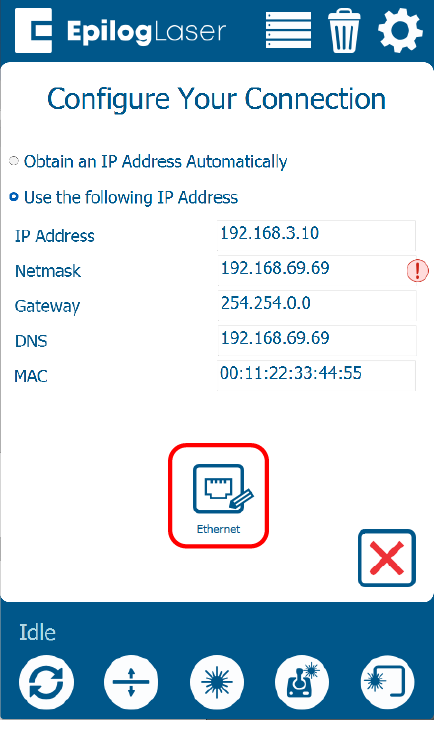
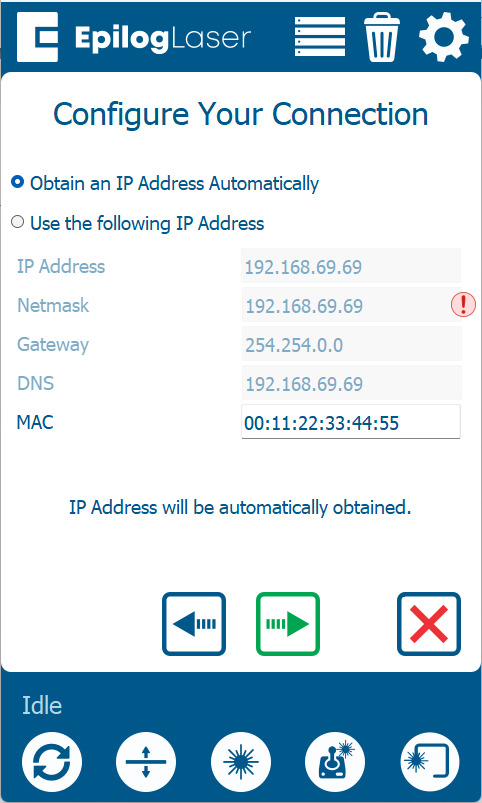
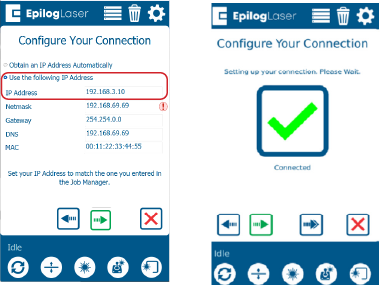
Direct Setup: Assign IP Address
Select Use the following IP Address. In the IP Address field, enter 192.168.3.4. Press the green arrow to save the IP address.
Note: This is the standard IP address for direct connections. Write the IP address down for use later during software setup.
Direct Setup: Configure TCP/IP Port
Configure your TCP/IP Port settings on your computer.
- TCP/IP Port setup is only required for direct connections.
- If you haven’t set up the TCP/IP port on the computer, you will need to follow the instructions below based on your operating system.
Windows 10 Setup: Network Center
To create a direct Ethernet connection to your Epilog laser, you will need to assign a static IP address to your computer. The TCP/IP port address you set on the PC is not the same as the laser’s IP address.
Open Network and Sharing Center from the Control Panel.
Windows 10 Setup: Adapter Settings
Click Change adapter settings.
Windows 10 Setup: Connection Properties
Right-click the Local Area Connection (or the connection labeled Unidentified Network) and choose Properties.
Windows 10 Setup: IPv4 Settings
Select Internet Protocol Version 4 (TCP/IPv4) and click Properties.
Windows 10 Setup: Assign IP & Save
Choose Use the following IP address and enter 192.168.3.3 as the IP address.
Set the Subnet mask to 255.255.255.0, then click OK to save the settings.
Windows 11 Setup: Open Settings
To create a direct Ethernet connection to your Epilog laser, you will need to assign a static IP address to your computer. The TCP/IP port address you set on the PC is not the same as the laser’s IP address.
In the search bar at the bottom of the screen, type Settings.
Windows 11 Setup: Launch Settings
Click Open.
Windows 11 Setup: Network & Internet
Click Network and Internet.
Windows 11 Setup: Advanced Settings
Click Advanced Network Settings.
Windows 11 Setup: Select Adapter
Select the drop-down arrow next to the laser’s Ethernet connection.
Windows 11 Setup: Edit Settings
Next to More Adapter Settings, click Edit.
Windows 11 Setup: IPv4 Properties
Select Internet Protocol Version 4 (TCP/IPv4), then click Properties.
Windows 11 Setup: Assign IP & Save
Choose Use the following IP address and enter 192.168.3.3 as the IP address.
Set the Subnet mask to 255.255.255.0, then click OK to save the settings.
Direct Setup: Connection Complete
Your computer and laser are now configured to communicate directly.
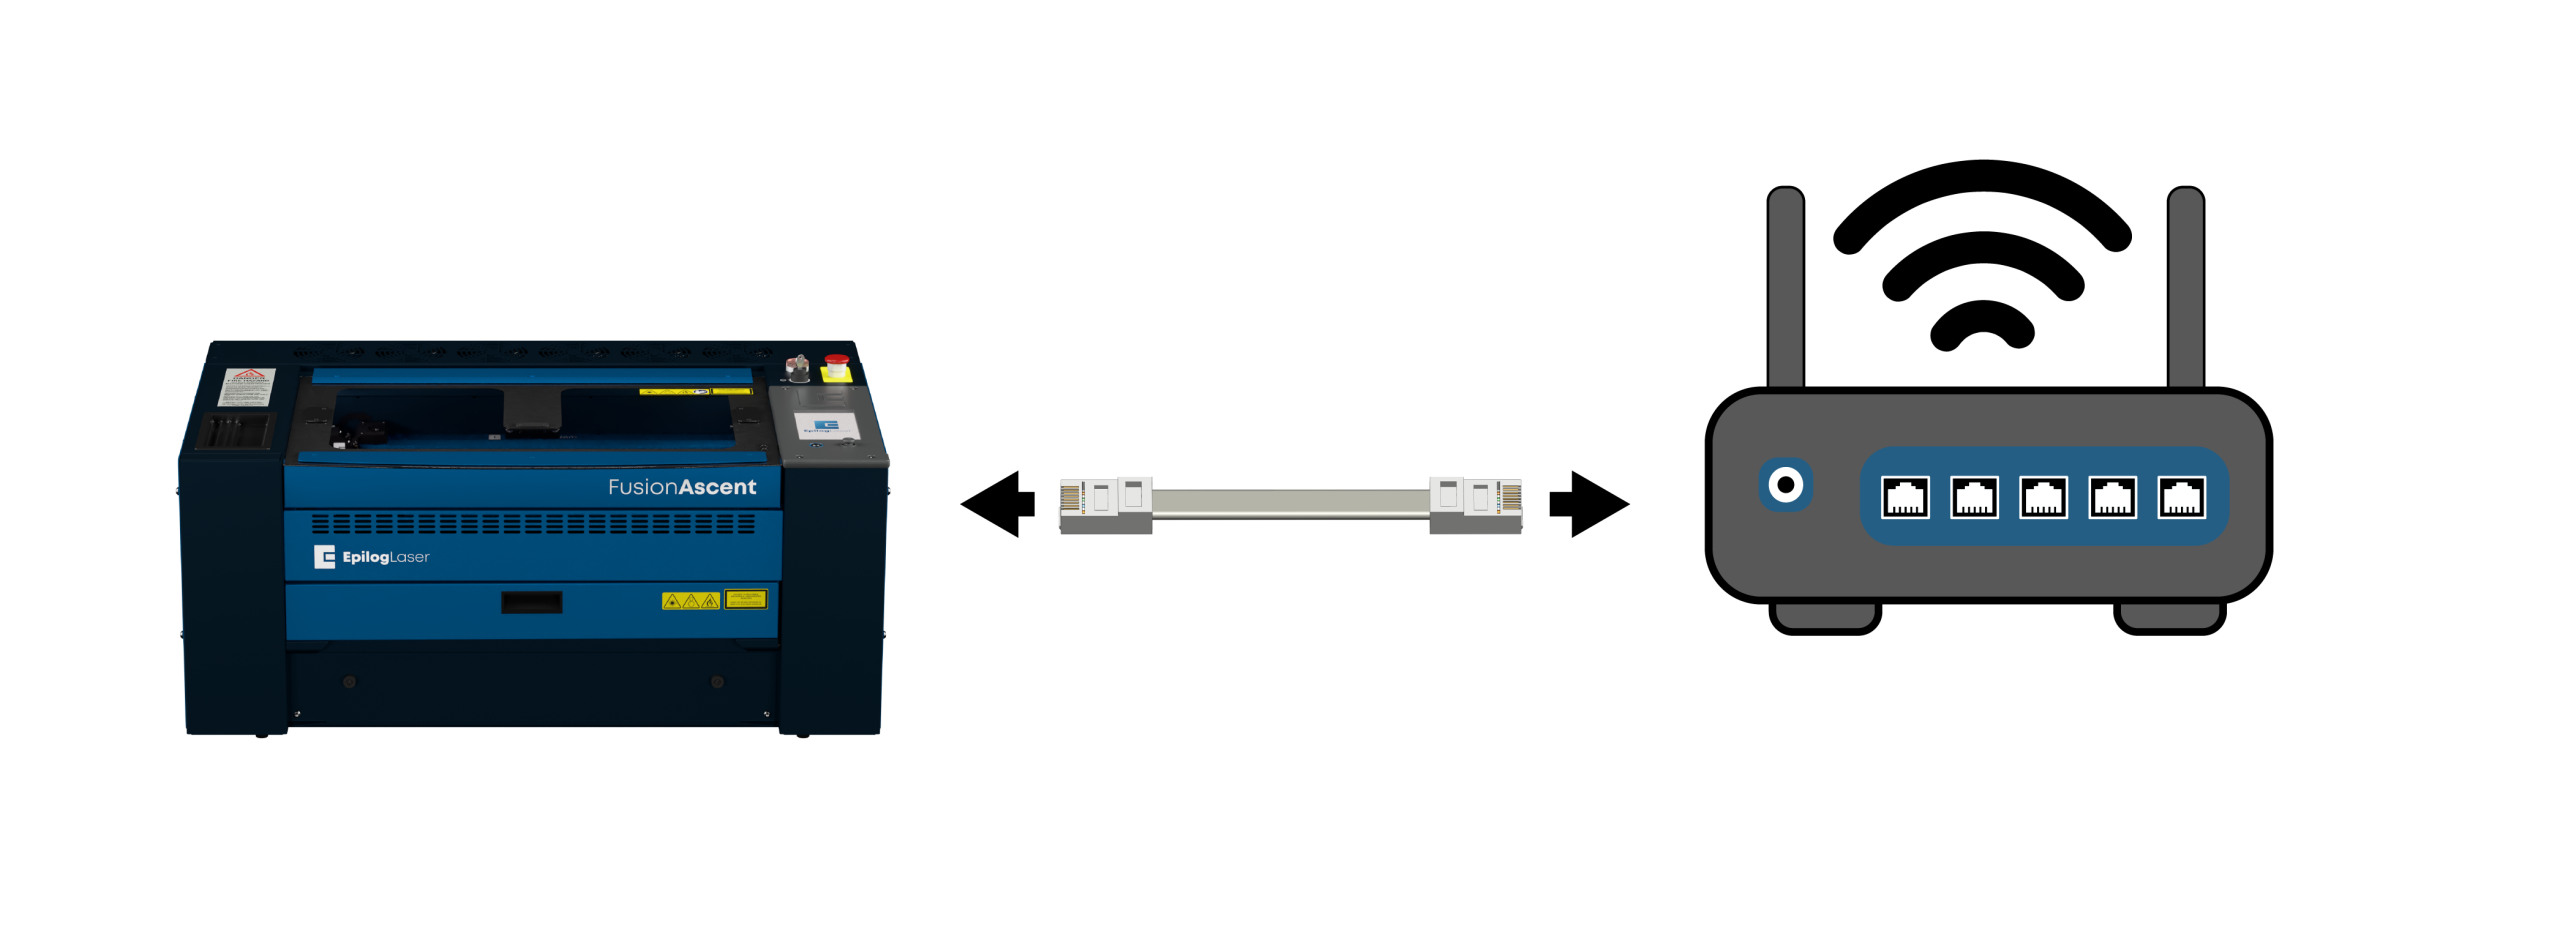
Network Setup: Connect Cable
Connect the laser to the network (router or switch) with an Ethernet cable.
Network Setup: Settings
Click the gear icon in the top right corner of the display panel on the laser.
Network Setup: Network Menu
Select Network.
Network Setup: Ethernet Menu
Select Ethernet.

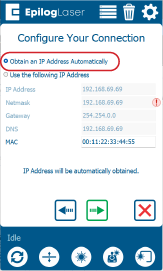
Network Setup: Obtain IP Address
Select Obtain IP Address Automatically. Press the green arrow to save the settings.
Network Setup: Machine Setup Complete
Your hardware connection is established.
Software Setup: Choose Software
Your laser Machine Setup is ready! Now we need to choose the software you will use to send jobs to the laser.
- Epilog Software Suite: A robust desktop application designed exclusively for Windows PCs.
- Pulse App: A modern, browser-based application that works on any operating system (Mac, Windows, Linux, ChromeOS) using a standard web browser.
Which software would you like to set up?
Software Setup: Installation Status
Do you already have the Epilog Software Suite installed on your computer?
Software Setup: Download
Go to the Drivers and Firmware page, then click on “Download Software Suite”.
Software Setup: Extract & Run
The installation file will download as a .zip folder that will need to be extracted. Right-click the folder and click “Extract All”. Once finished, double click on the EpilogSuite file.
Software Setup: Welcome
A welcome screen appears, click Next.
Software Setup: Choose Directory
Select default install and click Next.
Software Setup: License Agreement
Read and accept the license agreements and click Next.
Software Setup: Ready to Install
Click Install to begin the installation.
Software Setup: Ghostscript Install
The Epilog Software Suite will begin installing. During the installation, a dialog box will pop up to also install the AGPL Ghostscript Package. Click Next.
Software Setup: Ghostscript License
Read and accept the AGPL Ghostscript License Agreement, then click Next.
Software Setup: Finish Ghostscript
Click Finish to complete the AGPL Ghostscript installation and resume the Epilog Software Suite installation.
Software Setup: Complete Installation
Select whether or not you want to run the program now. Click Finish to complete the installation.
Software Setup: Add System
The first time you open the Job Manager you’ll see this screen. Click Add Laser System to get started.
Software Setup: Detection
If your machine is turned on and connected your computer, the Job Manager will detect it and allow you to add the machine. You may also add it manually by selecting Add Manually.
Software Setup: Configuration
Select your machine from the list of models and configure your specific settings:
- Model & Wattage: Select your specific machine.
- IP Address: Enter the IP address you set up earlier.
- Serial Number & Name: Enter your machine’s serial number and give it a custom name.
Once you have entered this information, click Finish.
-
Need help finding the IP Address?
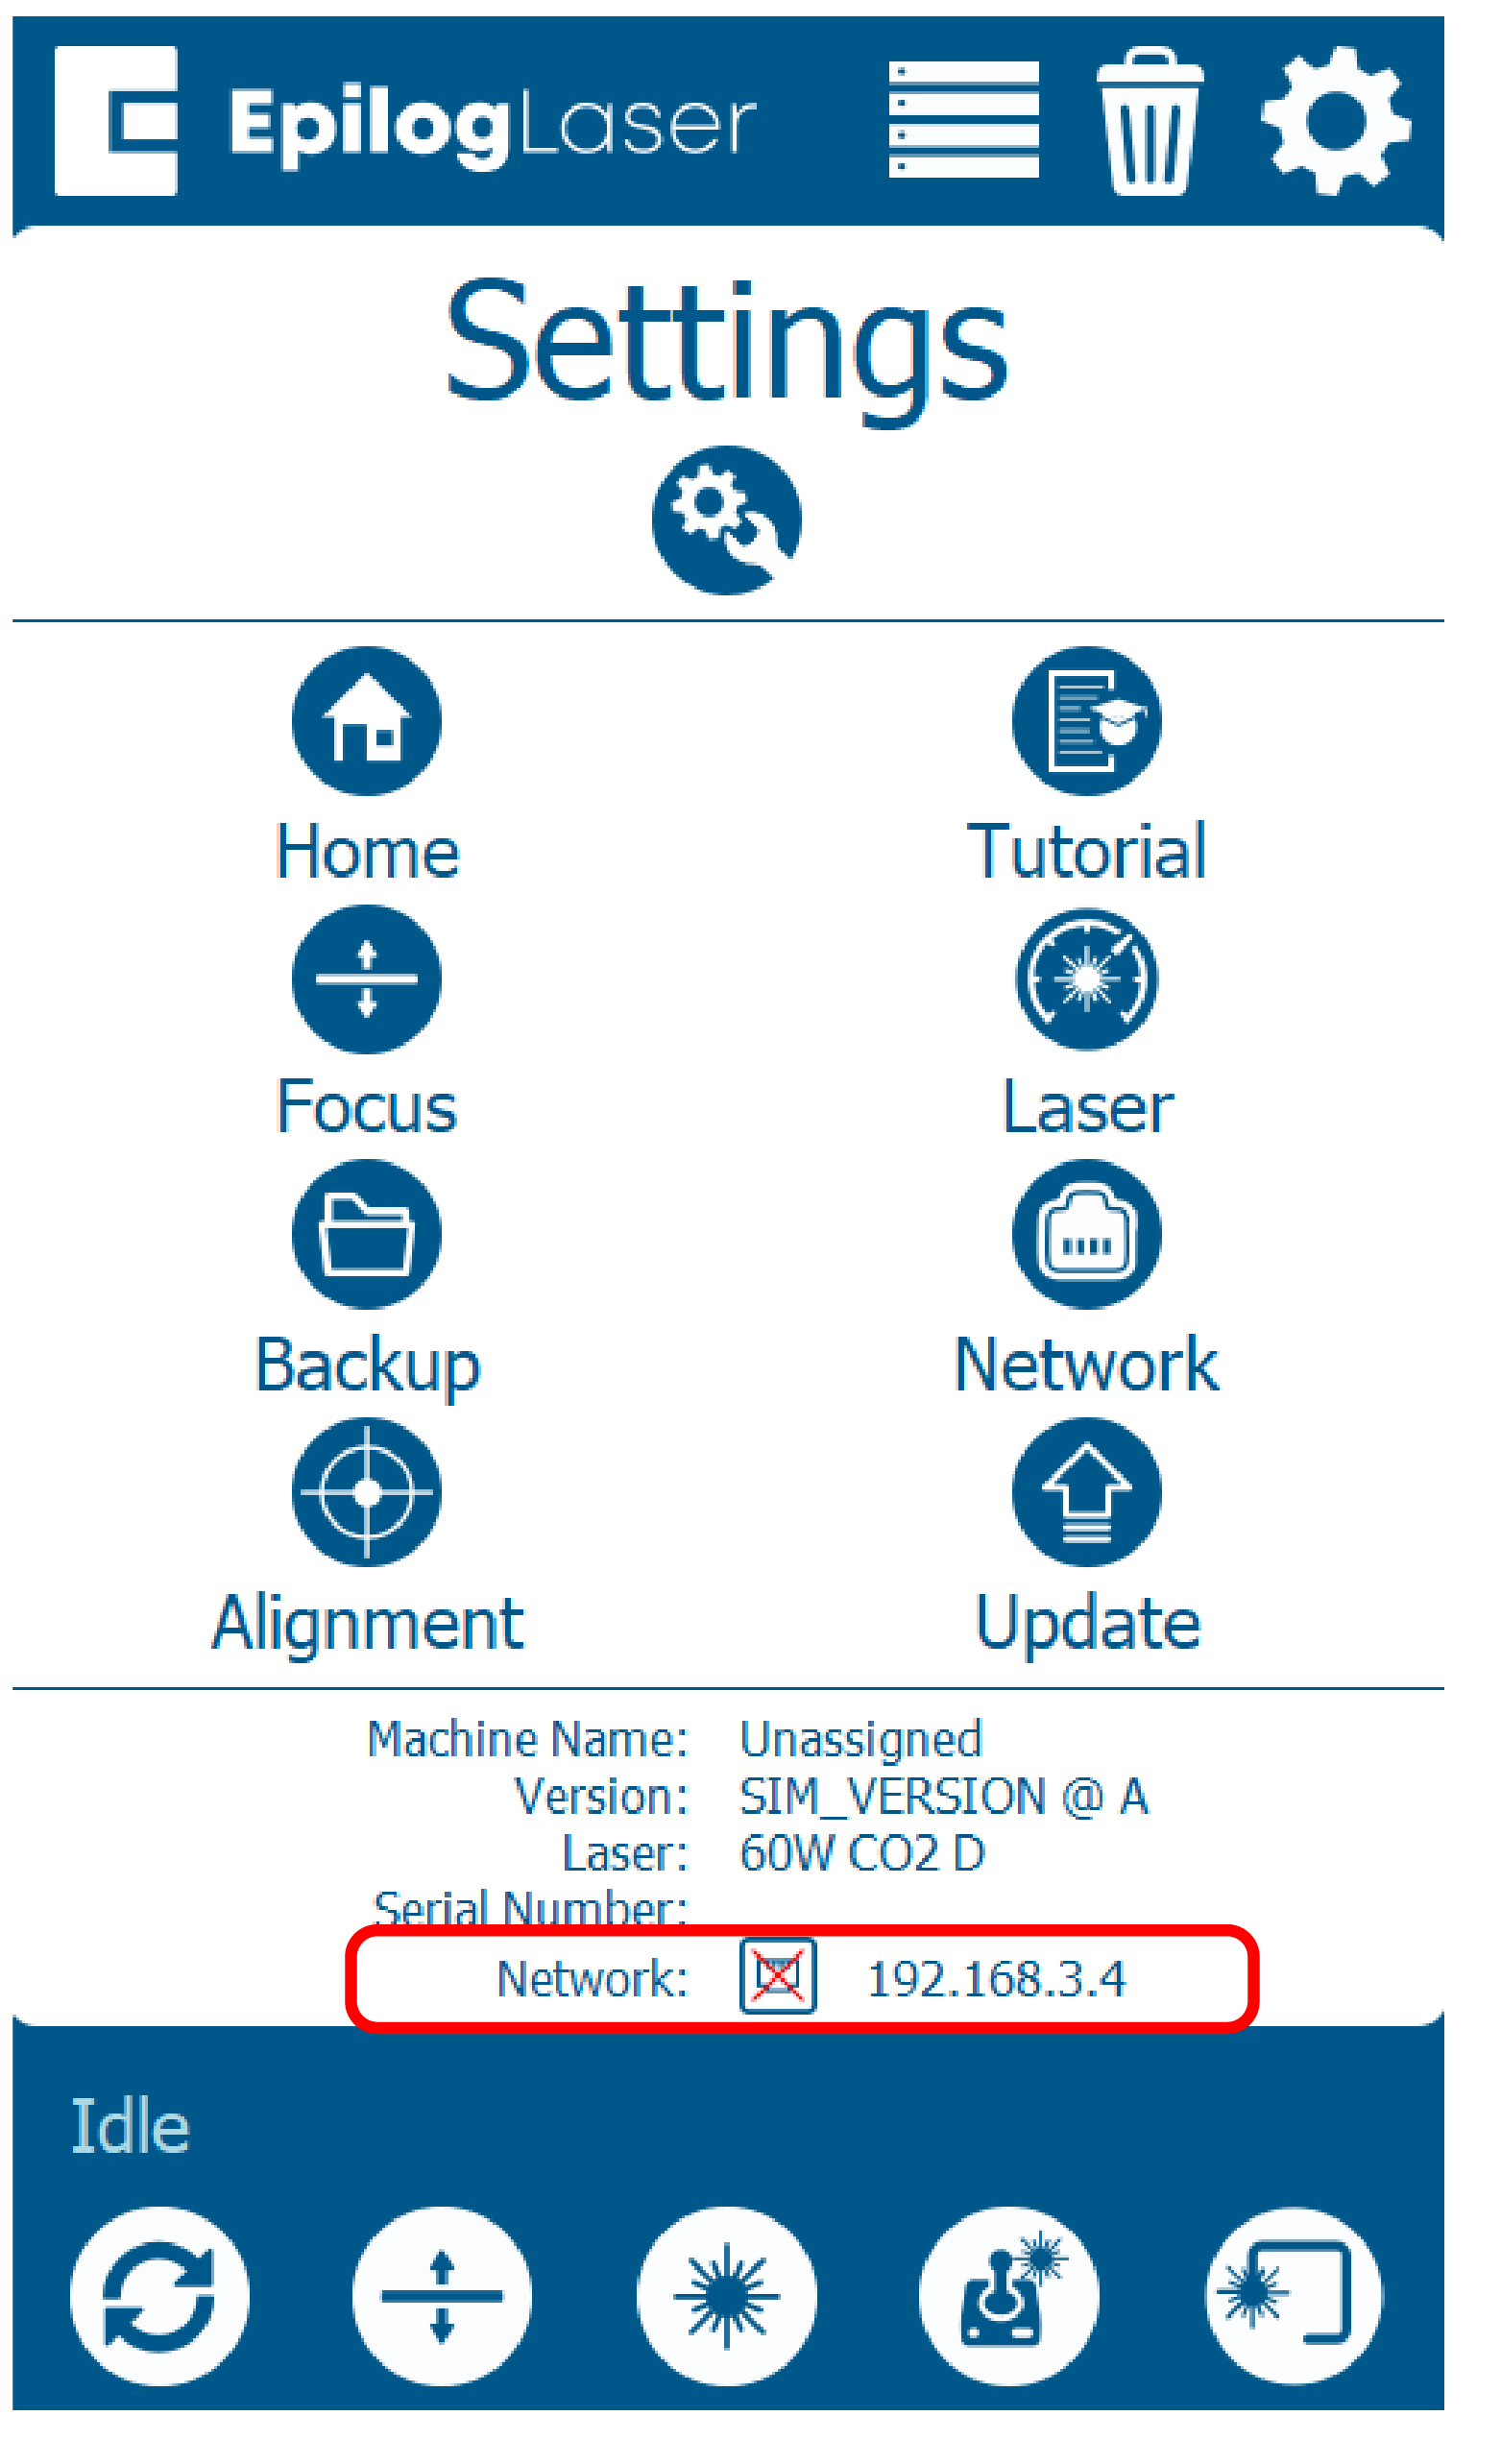
To locate your laser’s IP address, go to the laser’s display panel:
- Click the gear icon.
- The current IP address will be displayed on the screen at the bottom under Network:
Software Setup: Activation
Your laser has been added to the Job Manager, and appears in the left panel. It is now ready to accept jobs.
Use the Add or Delete buttons to add or remove additional machines.
Software Setup: Enter IP Address
Since the software suite is already installed, you just need to ensure the IP Address in the Job Manager matches the IP Address you just assigned to the laser.
-
Need help finding the IP Address?
To locate your laser’s IP address, go to the laser’s display panel:
- Click the gear icon.
- The current IP address will be displayed on the screen at the bottom under Network:
Pulse Setup: Launch Application
- Open a web browser window.
- In the address bar type http:// followed by the IP address of the laser. Example: http://192.168.3.4
- Press Enter.
- The Pulse App will load in your web browser window.
-
Need help finding the IP Address?
To locate your laser’s IP address, go to the laser’s display panel:
- Click the gear icon.
- The current IP address will be displayed on the screen at the bottom under Network:
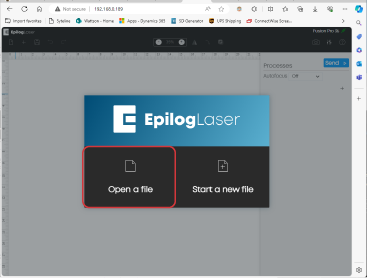
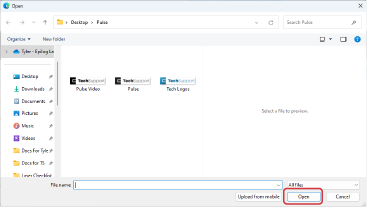
Pulse Setup: Open File
- Select Open File.
- Select a file and click Open.
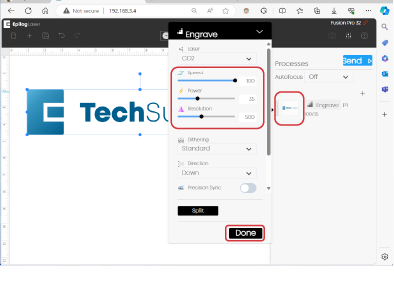
Pulse Setup: Settings & Send
- Under Processes, on the right hand column, click the thumbnail for Engrave/Cut. Set the speed and power, click Done.
- Click Send.

Pulse Setup: Run Job
- Verify the file is now visible on the laser’s display panel.
- Load your material.
- Select the job.
- Click the Play/Pause button on the laser to run the job.
All Set!
Congratulations! Your laser and software are fully configured.