Choose Your Design Software
Epilog’s laser systems work through the Epilog Laser Software Suite, built on an open-architecture design so you can create your artwork files in many different graphic software packages, including CorelDraw, Illustrator, Photoshop, AutoCAD, and many more.Choose the software that you’re most comfortable with, so you don’t need to spend valuable time learning a new program.
Sending a Job
In your design software, start by choosing your page size. There are two popular options for page size: either setting it to the size of the piece you are working with, or to the size of the engraving table. Either method will allow you to easily position your artwork.

Here we have a groomsman gift we’re going to engrave on a coated metal flask. If we set this up to the size of the object we’re engraving, 3.75” x 3.75”, we can easily position this graphic to the center of the image.

If we set the page size to the size of the engraving bed, we can easily fill up the entire table with multiple flasks. We can duplicate the image across the page for the number we need. And edit each design to customize them.

Since we’re engraving one flask today, we’ll change the page size back to the size of a single item. Once we’re happy with our design, we’re ready to send it to the laser.
Print the file, just as you would to a paper printer.

In the Printer drop-down menu you’ll find the Epilog Engraver that was added when you installed the Epilog Software Suite.
Select Print.
Laser Dashboard Settings
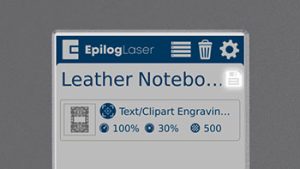
The job will appear in the Laser Dashboard, Epilog’s interface between the design and the laser where you’ll set up all of your settings. Here we can position our graphic using either the top left corner of the engraving bed, or using the camera for positioning.
For the material settings, you can use our common materials list to get started. Click the Folder with a down arrow icon to open the materials list.

You’ll find multiple materials listed here that you can use as a jumping off place for fine tuning your own material settings. Since this is a coated metal, we’ll choose the anodized aluminum 500 DPI engraving settings.

Click the Import button to use these settings. We can easily adjust these settings as needed.

And print the file to the laser.
Run the Job
At the laser, select your job and press the Start button.


Use these step-by-step tips to start creating your own beautiful and profitable projects!