Estimated time: 15-20 minutes • Skill: Beginner
A perfectly level engraving table is essential for accurate focusing and consistent engraving results. This guide will walk you through checking and adjusting the table level on your Epilog Mini or Helix laser system.
Checking Table Level
-
Access the table.
Power on the machine and open the top door to gain full access to the engraving table.
-
Disable motors.
Press the X/Y OFF button, then press GO to release the motors. This allows you to manually move the lens carriage over the entire table.
-
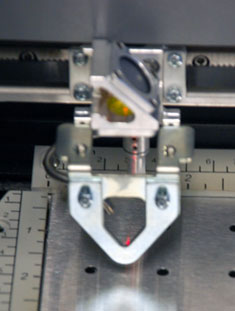
Position the manual focus gauge.
Locate the triangular or “V” shaped manual focus gauge and place it on the lens carriage head where the two locating pins are positioned below the lens.
-
Raise the table to the focus point.
Adjust the table height until it just touches the very bottom tip of the focus gauge.
-
Check all four corners.
Move the carriage to each corner of the table and inspect the distance between the gauge and the table. The spacing should remain consistent at all corners.
-
Evaluate table level.
If the gauge moves up or if the gap changes, the table is not level and will require adjustment.
If you find the table is uneven, proceed with the leveling procedure below. Begin with the corner that is noticeably higher or lower than the rest.
Leveling the Table
-
Lower the table halfway.
Power on the machine and lower the engraving table to about halfway down for easier access.
-
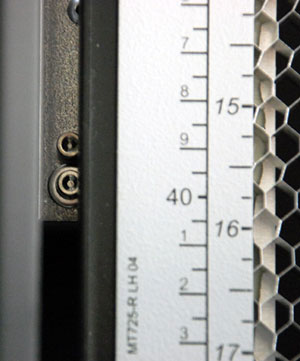
Locate the adjustment screws.
On both sides of the chassis (front and rear), look through the rectangular cutouts near the flip-up rulers. Each corner has a pair of screws—one with a lock washer and one without.
-
Identify screw functions.
The screw without a lock washer is the adjustment screw (used to raise or lower the table).
The screw with a lock washer is the lock screw (used to hold the table position after adjustment). -
Adjust table height.
Loosen the appropriate lock screw before making an adjustment.
- To Raise Table: Loosen the screw with the lock washer, then tighten the screw without the lock washer.
- To Lower Table: Loosen the screw with the lock washer, then tighten the screw without the lock washer.
Tip: Turning the adjustment screw one full revolution moves the table by 1/32” (0.8 mm).
Two revolutions equal 1/16”, and four revolutions equal 1/8”. -
Fine tune each corner.
Move the carriage and focus gauge to each corner, adjusting until the focus gauge just touches the table at all four corners. If the table is still off, continue fine-tuning as needed.