As part of your regular maintenance routine for your Zing, you will need to clean your system's optics.
Remove Side Panel
To begin the optics cleaning procedure, shut off the laser and remove the power cord from the machine.

Remove the left side panel by removing the three screws on the side of the machine.
Remove the screw on the back of the machine.
Remove the left side panel by pulling it toward you.

Optics Cleaning Overview
The mirrors in the periscope housing are enclosed, and will likely require cleaning less often than the other components of the optics system.

The other components are exposed to dust, smoke, and other debris and should be cleaned regularly as part of your routine maintenance.

Cleaning Lens Assembly Optics
Let’s start with the lens assembly.
Unscrew the lens from underneath the carriage.

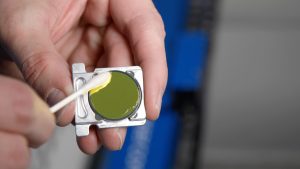
Begin by applying lens cleaning fluid to a cotton swab.

Gently clean both sides of the lens with the cleaning fluid cotton swab.

Screw the lens back into place underneath the carriage.

Next, from on top of the lens assembly, push the x-axis belt to one side and unscrew the mirror.

Gently clean the mirror with the cleaning fluid cotton swab.

Push the x-axis belt aside and screw the mirror back in, making it hand-tight.

X-Axis Assembly Mirror
For the mirror at the end of the x-axis assembly, use a Phillips screwdriver to remove the four corner screws. Do not adjust the hex screws, as these control laser beam alignment.

Remove the mirror from its housing.
Then gently clean the mirror with the cleaning fluid cotton swab.

Now, reinsert the mirror, positioned so two hex screws are near the bottom and one is near the top. Then reinsert the four Phillips head screws, loosely at first, tightening once everything is lined up.

Periscope Housing (Top) Optics Cleaning
For the outside of the window at the top of the periscope housing, gently clean it with the cleaning fluid cotton swab.

Next, let’s clean the components inside the periscope housing.
Remove the four corner Phillips head screws from the top mirror. Once again, do not adjust the hex screws.

Remove the mirror and clean it with the cleaning fluid cotton swab.

While the inside of the housing is accessible, use the cleaning fluid cotton swab to clean the inside of the window at the top of the periscope.

Then reinsert the mirror, positioned so two of the hex screws are near the bottom and one is near the top.
Reinsert the four Phillips head screws, loosely at first, tightening once everything is lined up.

Periscope Housing (Bottom) Optics Cleaning
Finally, remove the four corner Phillips head screws from the bottom mirror. Do not adjust the hex screws.

Remove the mirror and clean it with the cleaning fluid cotton swab. Reinsert the mirror, positioned so one hex screw is near the bottom and two are near the top.

Then reinsert the four Phillips head screws, loosely at first, tightening once everything is lined up.

Replace Side Panel
Reinstall the left side panel by reattaching the three screws on the side of the machine.
Tighten the screw on the back of the machine as well.

Then plug in the machine and turn it on.