When engraving a barcode on stainless, it is difficult for a barcode reader to scan the code against the reflective metal. This tip shows two ways to etch a stainless steel tag with a barcode on a metal etching galvo laser that is easily readable.
Barcode Readability
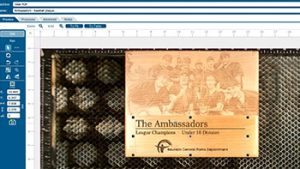
We have a design for a barcode to be engraved on a stainless steel tag.

The issue is that barcodes are very difficult to scan when engraved on highly reflective metal.
We’ll walk through two solutions to this issue.
Polished Barcode Solution
For the first solution, we’ll draw a box around the barcode.

Change the box to a different color and turn off the border.

Right click on the box and choose Order > To Back of Page.

Align the box to the barcode so they are centered to each other.

Print the file to the laser.
At the Laser Dashboard™, there are two processes defined by the different colors in the file.
The black will be etched, and the blue will be polished white.

Import the metal etching settings for the black layer.
And import the metal polish settings for the blue.

Rearrange the processes so the polish process will run before the etching.

Using the IRIS™ Cameras, center the image on your tag.

And print the file to the laser.
At the galvo laser display panel, choose the file and press the start button.
First the laser will engrave the white polish mark.

Then the black engraving over the top.

Wipe off the debris, and you have a tag that is readable by a barcode reader.

Polished Tag Solution
Next we’ll show another solution that will give you a completely different look.
Remove the design from the Laser Dashboard.
Select the Copy Background Image icon in the menu bar.

Back in CorelDRAW, create a new page that is 6” x 6”, the same size as the engraving area.

Paste your copied background image.

Now we can see the exact placement of the tag on the table.
Draw a box the size of the tag and adjust the edges to line up with the tag.

Create a second box and repeat this.
Adjust the boxes so they are touching the sides of the tag.

Change the outer box to a different color.
Select the outer box, then the inner box holding down the Shift key.
Select the Simplify tool in the tool bar.
This will remove the inner box from the outer one.

Turn off the outlines on both boxes.

Copy over your file and remove the blue behind the barcode.


Select the contents of the file without the background image.
Print the file to the laser as Selection only.

The file comes over perfectly positioned.

As before, Import the Metal Polish settings for the blue layer.
Import the Metal Etch settings for the black layer.
Rearrange the processes so the polish mark happens before the etching.
Print the file to the laser.
Now the polish mark covers the entire tag instead of just behind the barcode.

Test the Barcodes
Wipe off the tag and you have a second option with a completely different look.

Now we can test our barcodes with a barcode reader.

We can see that both barcodes were successfully scanned!