
Y-Motor Replacement

Replace the motor that moves your machine's x-axis assembly forward and backward.

Introduction

In this lesson we’ll walk through replacing the Epilog Zing Y-Motor.

Shut off the laser and remove the power cord from the machine.

Removing the power cord from the machine.

Remove Rear Panel

Loosen the two screws on the back of the machine and remove the back panel.

Unscrewing the top left screw of the Zing's rear panel.

Remove Old Y-Motor

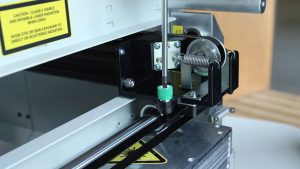
Using a 3mm hex key, loosen the four hex screws located on the drive couplers located on both sides of the Y-Motor.

Loosening the hex screws on the left drive coupler.Loosening the hex screws on the right drive coupler.

Slide the drive couplers away from the Y-Motor.

The left drive coupler slid to the left.The right drive coupler slid to the right.

On the left side of the chassis, remove the Y-Motor electrical connection.

The Y-Motor electrical connection plugged in to the left side of the rear compartment.

Cut all three of the white cable ties.

Scissors preparing to cut the middle zip tie around the rear compartment wires.

On the right-side of the Y-Axis motor, using a long handled screwdriver, remove the four mounting screws.

Unscrewing the Y-Motor mounting screws.

Move the motor to the left far enough to clear the motor shaft and remove the motor.

Pulling the Y-Motor out of the rear compartment.

Install New Y-Motor

Take your new Y-Motor and turn it so the harness is on top. Install from the left side of the opening.

Installing the Y-Motor.

Place the fan control board on the top two screws.

Lifting the fan control board panel to gain access to the two upper mounting screw holes.Inserting one of the top two Y-Motor mounting screws.

Tighten the four mounting screws.

The Y-Motor installed with all four mounting screws.

If you would like, attach new zip ties to hold the cables together, then reconnect the electrical connection on the left side of the machine.

Securing a new zip tie around the rear compartment wires.The Y-Motor electrical connection plugged in to the left side of the rear compartment.

Slide the drive couplers back into place, keeping the couplers approximately 1/4 inch away from the motor to avoid grinding. To ensure proper alignment, have someone hold the assembly square to the back of the macine before tightening the couplers.

Sliding the left coupler back into place.

Tighten the four Allen screws.

Tightening the hex screws on the left drive coupler.Tightening the hex screws on the right drive coupler.

Manually turn the couplers to make sure they are in sync, otherwise you will feel them slipping.

Turning the left coupler to make sure it is in sync with the right coupler.

Reinstall Rear Panel

Replace the rear panel and tighten the two screws.

Installing the rear panel.Screwing in the rear panel's top right screw.

Plug the machine in and turn it on.

Putting the power cord into the machine.

  • ID:
    TA-119
  • Date:
    09/24/2024

Tools:

  • Scissors
  • 3mm Allen / Hex Key
  • Long Handled Philips Screwdriver

Parts & Resources:

  • Zip Ties

Continue Your Laser Journey

Revisit a past lesson or move ahead to discover what’s next!