In this lesson we’ll walk through replacing the Epilog Zing’s Lens Carriage Rollers
Remove Lens Assembly
Shut off the laser and remove the power cord from the machine.

Move the X-Axis Assembly to the center of the machine and the lens carriage to the center of the table.

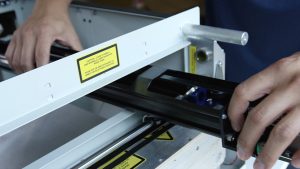
Loosen the two screws which secure the lens carriage to the belt assembly.

As you place your thumb at the front of the carriage, pinch the lever that is next to the black roller wheel. Push the carriage backwards and then lift it up with your thumb.

Replace Lens Carriage Rollers
Remove the three rollers using a 3/32″ hex key.

Install the new rollers, tightening each one securely.

Reinstall Lens Assembly
Reinstall the carriage by placing it at an angle into the machine. Position the belt on top of the lens carriage. Using your thumb, press the lens carriage to the rear of the machine. When the front rollers clear the front of the x-axis assembly, lower the lens carriage into place.

Move the lens carriage left and right a few times to ensure proper alignment.

Tighten the two screws to secure the belt assembly to the lens assembly.

Plug the machine in and turn it on.